
")


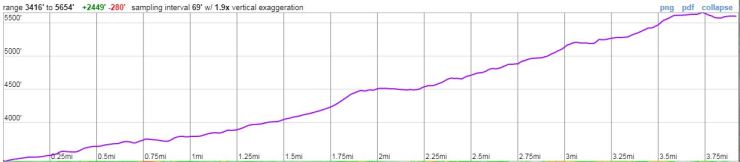
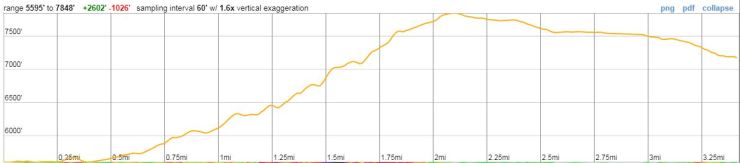
Trip Overview: The 20 mile Enchantments Traverse backpacking trip goes the beautiful and popular Enchantments Lakes region of the Alpine Lakes Wilderness in the Cascade Mountains. +5,800 / -7,900 feet of elevation across the course of this trek with a peak elevation of 7,860 feet. Highlights include glacial-fed alpine lakes, impressive granite peaks, spectacular views, and alpine meadows. This region is one of the most sought after areas to backpack in Washington State. The majority of the images here are more a trip in September and are representative of late summer conditions.

- Higher resolution version of the overall map for The Enchantments trek (PDF)
- Topographic map of Alpine Lakes Wilderness for purchase (amazon link)
Jump to Day 1: Stuart Lake Trailhead to Colchuck Lake
Jump to Day 2: Colchuck Lake to Inspiration Lake
Jump to Day 3: Optional day in core of The Enchantment Basin
Jump to Final Day: Inspiration Lake to Snow Lakes Trailhead
Shop Deal of the Day at REI Outlet (up to 50% off)!
Preparations:
Click here to read more about Permits
Permits: Permits are required for overnight camping in The Enchantments from May 15 through October 15. Demand is very high, so permits are given out using a lottery system. Permit applications are accepted between February 15 and March 2 of each year, and applications are processed in a random lottery starting on March 20th. Any permits not obtained during the lottery are available for reservation on a first-come, first-serve basis starting April 1st.
On the permit application you must choose one of the five zones that make up The Enchantment area and you may only camp within the zone you select (and get a permit for). You may day hike into other zones, but are not allowed to camp there. The major exception is if you obtain a permit for the Core Enchantment Zone. Core Zone permit holders are allowed to camp in any of the five zones. Thus, a permit for the Core Enchantment Zone is the most sought after and is required for the itinerary described here.
If you do not get the Core Zone permit, you can only day hike into The Enchantment Lakes Basin and cannot camp there. To do a similar itinerary without the Core Zone permit, you can try to obtain two different permits: one for the Colchuck Zone for the first night of your trek and one for Snow Zone on the subsequent night(s). You could first use a Colchuck Zone permit to camp one night at Colchuck Lake. Then, you day hike through the Core Zone and camp at Snow Lakes for one or two nights using a Snow Zone permit for those nights. This could also be reversed if need be, or you could possibly combine permits from the Stuart Zone and Snow Zone if the Colchuck Zone is fully booked.

To apply for a permit, you submit an application (between February 15 and March 2) with an entry date and zone request and pay a $10 fee. You then must check your application after March 20th to see if you were selected for a permit. If you were, you must claim your permit by March 31st and must provide an exit date (max stay is 14 days) and group size (max size is 8) and pay a $5 per person per day fee. Applications are submitted using this recreation.gov website and detailed information about the permit process can be found on the USFS website. For reference, statistics on the number of applications and permits issued can be found here.
If you do not win the lottery, you may still have a chance to get a permit. Any unclaimed permits are opened up for first-come, first-serve reservation starting on the morning of April 1st. Also, one “walk-in” permit per zone is reserved for each day. To obtain a walk-in permit you need to arrive at the Wenatchee River Ranger District Office in Leavenworth at 7:30 am the day of your hike (there is lottery every day except Sundays). At 7:45 am, a random lottery is used to determine which individuals will be given the walk-in permits. Arriving very early to wait in line will not increase your odds since it is a lottery system.
Click here to read more about Logistics
Logistics: There are no long loop hikes in The Enchantments, so backpackers must either hike in and out using the same trail or must hike point-to-point between different trailheads. This itinerary starts at the Stuart Lake Trailhead and ends at the Snow Lakes Trailhead, so one must figure out how to travel between the trailheads at the start/end of the hike. These two trailheads reside on either side of the core Enchantments Lakes Basin, so this itinerary allows for a modest distance trek that includes the most beautiful section of The Enchantments Wilderness. The trailheads are about 20-30 minutes apart by car, and to negotiate the transfer you can hitchhike, you can bring two cars, or you can try to arrange a taxi ride or shuttle.
If hitchhiking, I recommend parking at the Snow Lakes Trailhead and trying to catch a ride to the Stuart Lake Trailhead at the start of your trek. There should be more traffic near the Snow Lakes Trailhead since it is closer to town and you should have a better chance of finding a ride. Alternatively, you can have your group bring multiple cars and park one at each trailhead. This involves some shuttling between trailheads so that you can leave one car at each point, but can be worth it if you don’t want to deal with finding a hitch. Lastly, you can arrange for a shuttle or taxi ride before or after your hike to bring you to your car. This option is clearly the most expensive, but may be useful for groups with one car who do not want to hitch.
Click here to read more about Difficulty
Trail Conditions and Difficulty: Backpacking and hiking in The Enchantments is difficult given the steep trails and abundant elevation gain. Be sure to plan a reasonable itinerary that does not cover too much distance. For an enjoyable experience, plan for fewer than 10 miles a day on average. Many people also like to spend multiple days in the Core Enchantments Zone (if permits allow) and relax and go on day hikes. If you are lucky enough to get a Core Zone permit, try to maximize your time there!
Most of the trail along this itinerary is easy to follow. The trail up Aasgard Pass is not well maintained, so a bit of route finding is required. That said, the likelihood of getting lost is low here given that it is a popular hiking area.
If you are hiking in May, June, late September, or October, you are likely to encounter snow in The Enchantments. Exercise caution when traversing snow fields. Several hikers have died glissading down Aasgard Pass. If you are not familiar with snow travel techniques, plan to go on your trek in July or August.
Supplies: There is not much concern for bears in The Enchantments so there is not a requirement for bear canisters. That said, rodents and goats in the area are known to forage through hiker supplies. At the very least, you should hang your food in an ursack to prevent rodent/goat issues.
You likely will want bug spray because the mosquitoes can be out in force in certain areas where the snow has recently melted. I prefer a picaridin based spray because it does not damage plastics and synthetic fibers like high concentration DEET sprays do. I also like to pre-treat my clothes and tent with permethrin spray repellent. The permethrin treatment stays on your clothes for up to 7 washes, so it helps reduce the amount of spray you need to put on your skin.
The other essential item for this trek is an inflatable sleeping pad. Most of the campsites are on pretty hard granite or gravel surfaces, so a good mat makes all the difference. You likely will want trekking poles since they help your knees on the steep climbs and descents. If you are hiking early in the summer (May or June) or late in the fall (October), the snow will likely be present in the higher elevation areas. In this case, you may want microspikes/crampons and an ice ax. That said, only experienced backpackers should go on this trek when there is still plenty of snow on the trail.
Below is a list of the gear recommended for backpacking in The Enchantments:
Hiking clothes
- a lightweight hiking rain jacket (North Face Venture 2 Jacket)
- fast drying synthetic hiking pants (prAna Zion Pants)
- a quick drying long sleeve hiking shirt (Columbia Silver Ridge L/S Shirt)
- wool outer socks (People Socks Moreno 4-pack)
- thin blister preventing base socks (WrightSock double layer Coolmesh)
- quick drying synthetic boxer briefs (ExOfficio Give-N-Go)
- Gore-tex hiking shoes (adidas Outdoor Terrex Fast R Gore-Tex Shoe)
Clothes for camp
- wool leggings (Minus33 Merino Wool Kancamagus Midweight Bottom)
- wool base layer shirt (Minus33 Merino Wool Chocorua Midweight Crew)
- warm wool overshirt (Pendleton Long Sleeve Classic-Fit Board Shirt)
- lightweight down jacket (Patagonia 800-fill Down Jacket)
- lightweight camp shoes (Xero Z-Trail lightweight sandal)
Hiking gear
- topographic map (Nat Geo topographic map)
- trekking poles (Black Diamond Trail Ergo Cork Trekking Poles)
- 2 liter hydration bladder (Platypus Big Zip Water Reservoir)
- 65 liter backpack (Osprey Atmos 65 Liter pack)
- water filtration system (Platypus gravity filtration system)
Camp gear
- strong tent with rain-fly (Alps Mountaineering Chaos 2 Tent)
- inflatable sleeping pad (Therm-a-Rest Trail Pro Sleeping Pad)
- sleeping bag (REI Co-op Igneo 25 Sleeping Bag)
- inflatable camping pillow (Ultralight Inflating Pillow)
- lightweight backpacking chair (Helinox Chair Zero)
- lightweight lantern (MPOWERD Luci Outdoor 2.0)
- headlamp (Black Diamond Cosmo Headlamp)
- multi-tool with knife (Gerber MDime Mini Multi-Tool)
- Ursack (Ursack Major bear bag) or bear canister (BearVault BV500)
- lightweight stove (MSR PocketRocket 2)
- lighter (BIC plastic lighters)
- 2 liter pot (GSI Outdoors Halulite Boiler Pot)
- coffee cup (GSI Outdoors Glacier Stainless Cup)
- lightweight spork (Snow Peak Titanium Spork)
- small, quick drying towel (REI mutli towel mini)
Random
- wet wipes (Stall Mates individually wrapped wipes)
- mole skin for blisters (Blister medic kit)
- lightweight trowel (GSI Sanitation Trowel)
- small amount of duct tape for gear repairs
- chapstick and sun screen
Food and drink
- a variety of my favorite dehydrated meals
- electrolyte replacement (NUUN Hydration Tablets)
- quick snacks (Clif Shot Bloks and Clif energy bars)
- instant coffee (Starbucks VIA)
- small plastic water bottles filled with whisky 🙂
……….
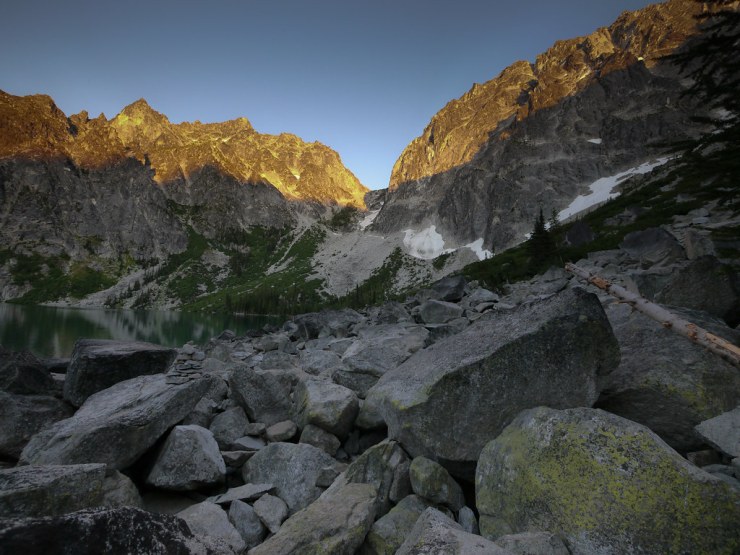
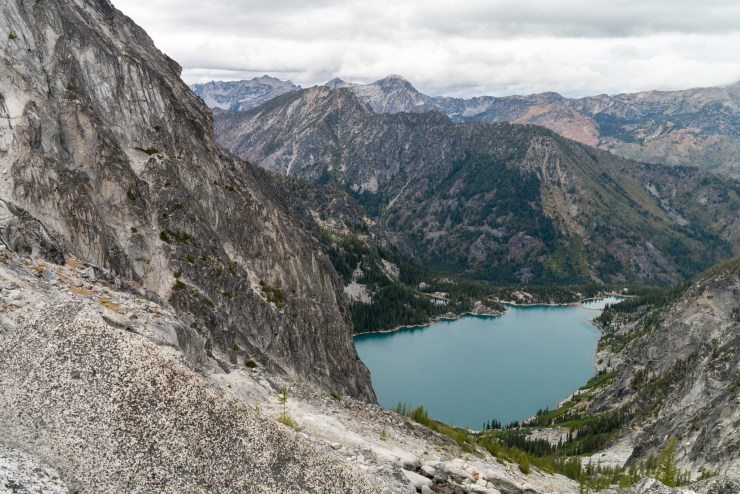
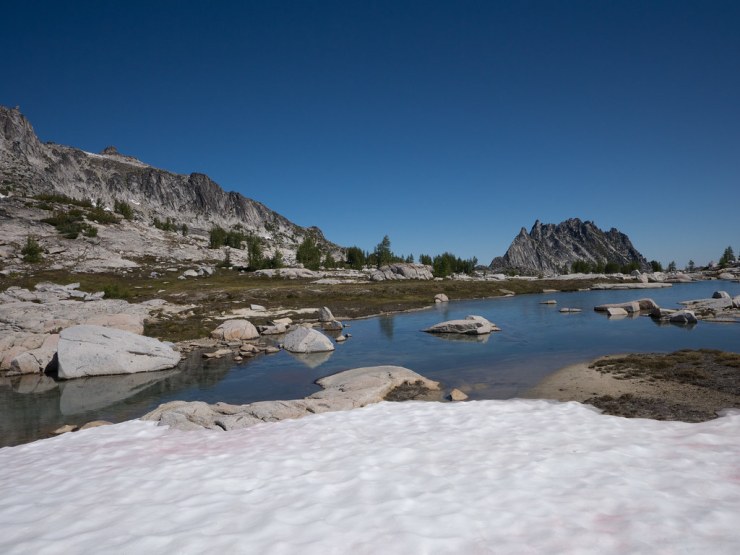
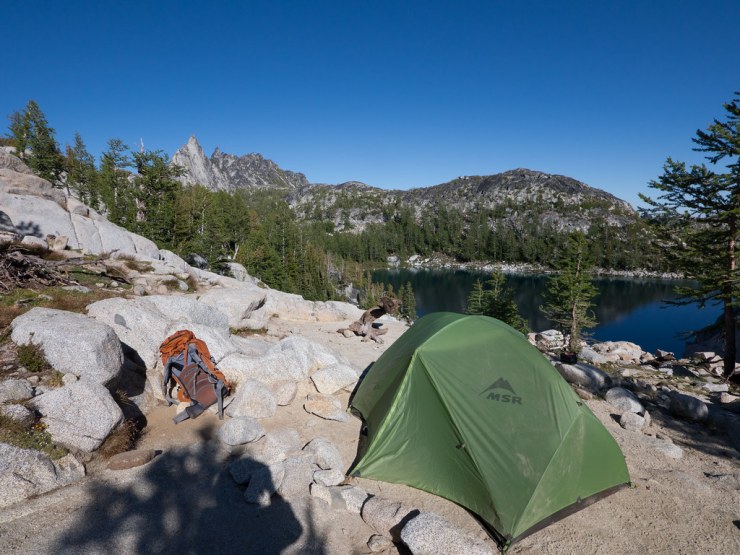
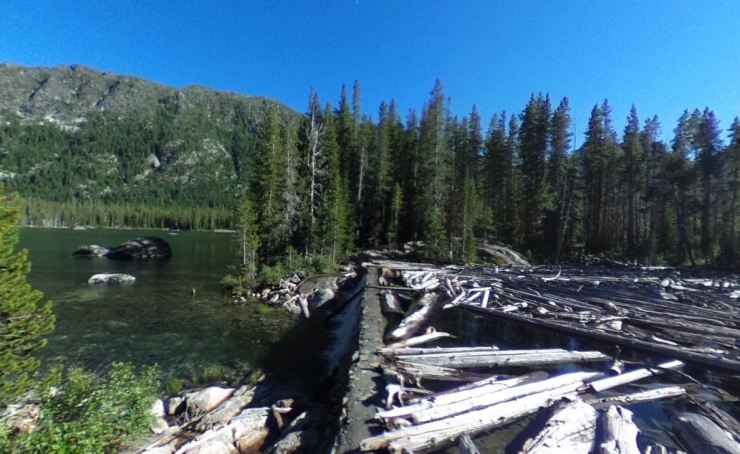
Day 1: 4 miles; +2,450 feet / -280 feet; Stuart Lake Trailhead to Colchuck Lake

Map of the Day 1 hike in The Enchantments (PDF)
The first day of the trek starts with a 4 mile trek up to Colchuck Lake. This day should not be too difficult and will set you up nicely to tackle Aasgard Pass on the next day. The campsites on the West side of the lake provide the best views of the lake and of the mountains guarding the Core Enchantment Zone.


……….
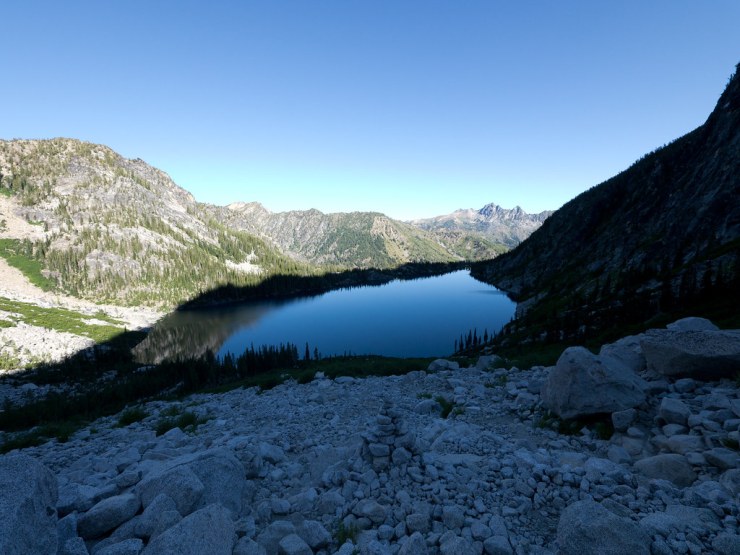
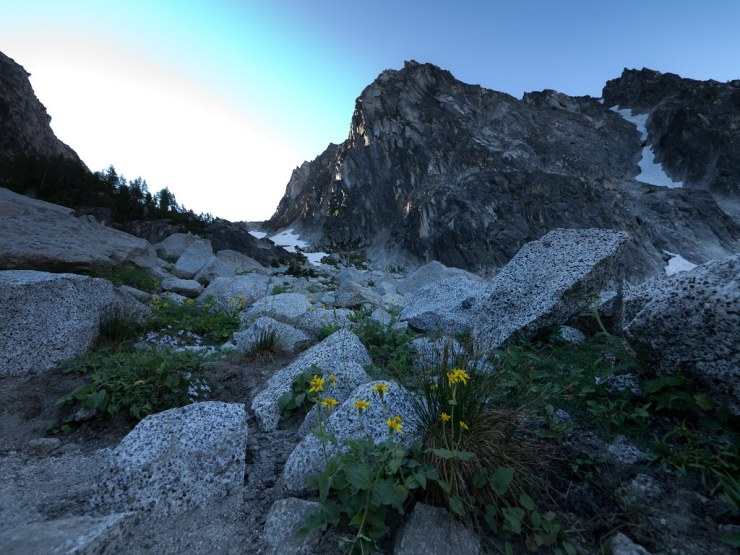
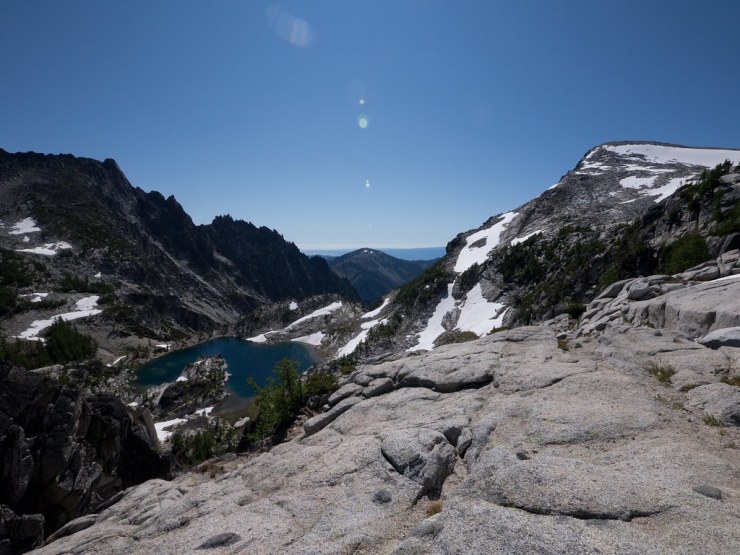
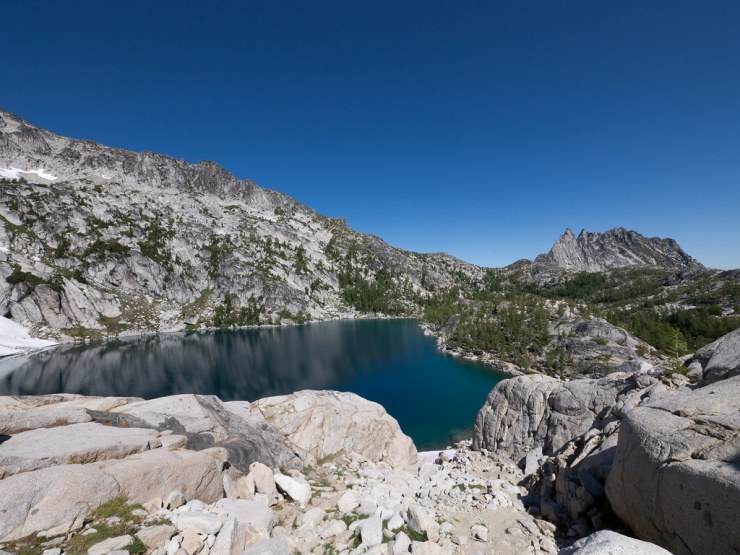
Day 2: 3.5 miles; +2,600 feet / -1030 feet; Colchuck Lake to Inspiration Lake

Map of the Day 2 hike in The Enchantments (PDF)
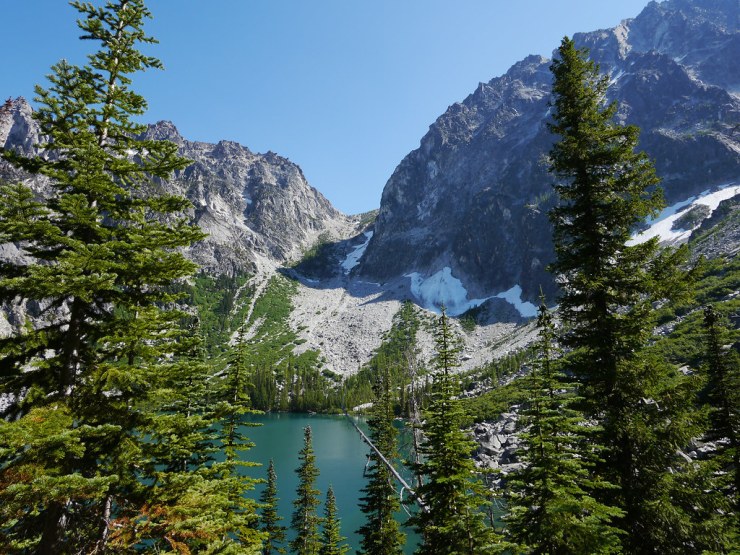
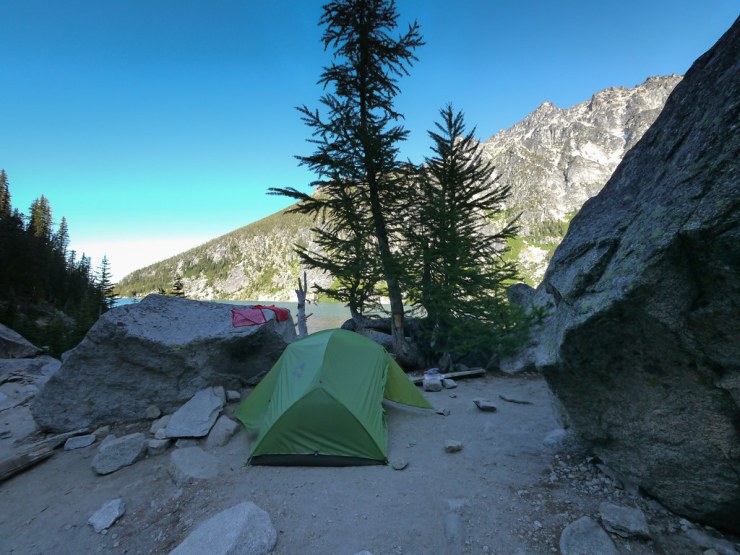
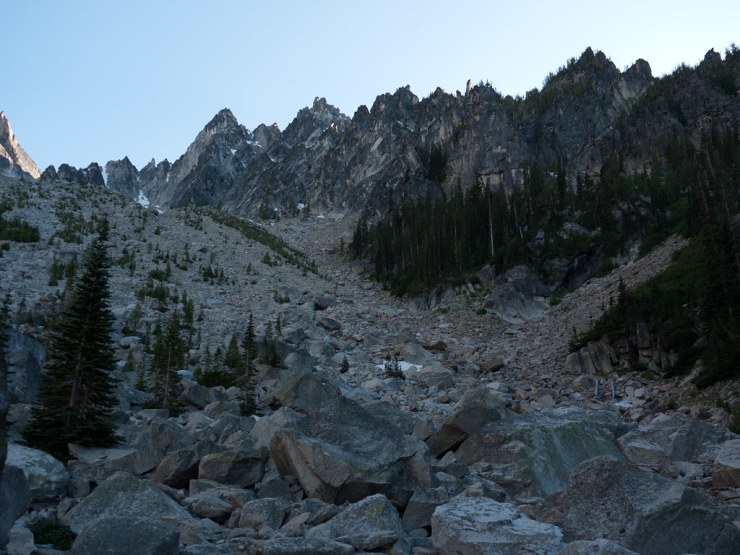
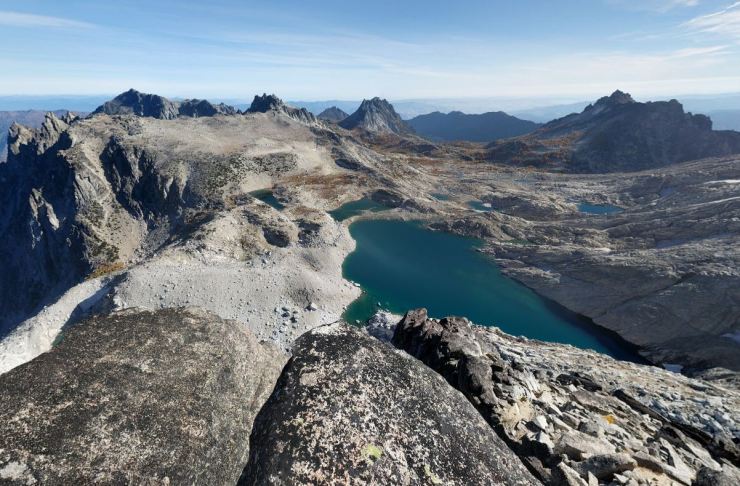
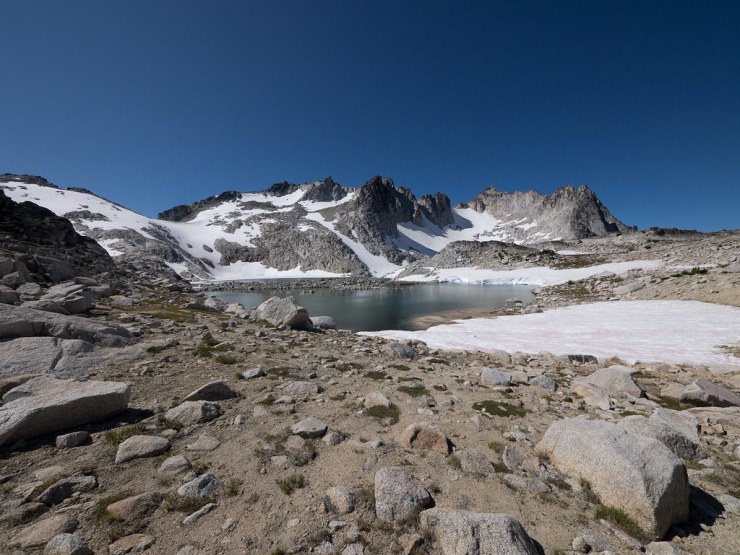
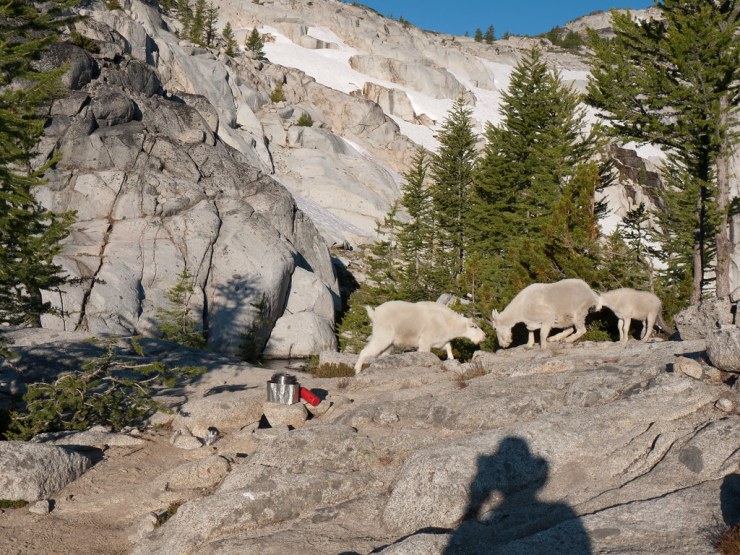
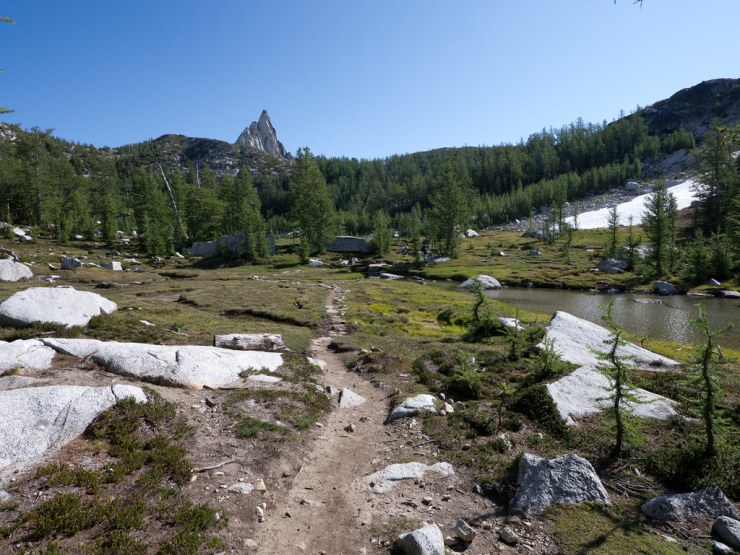
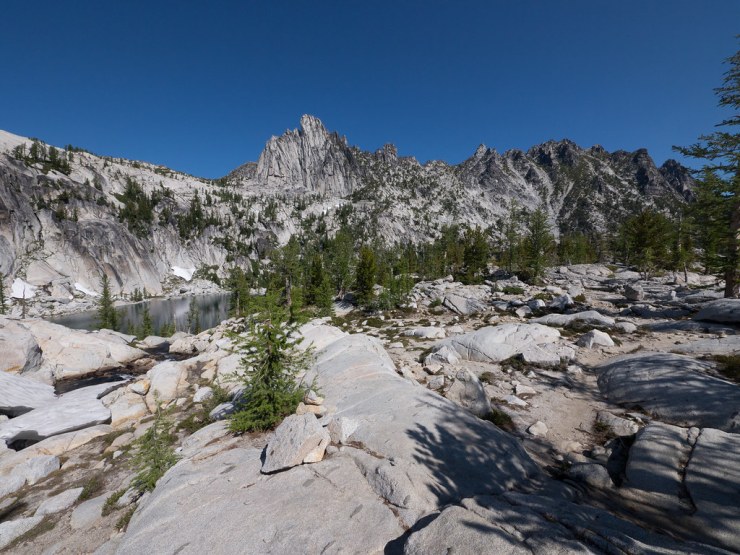
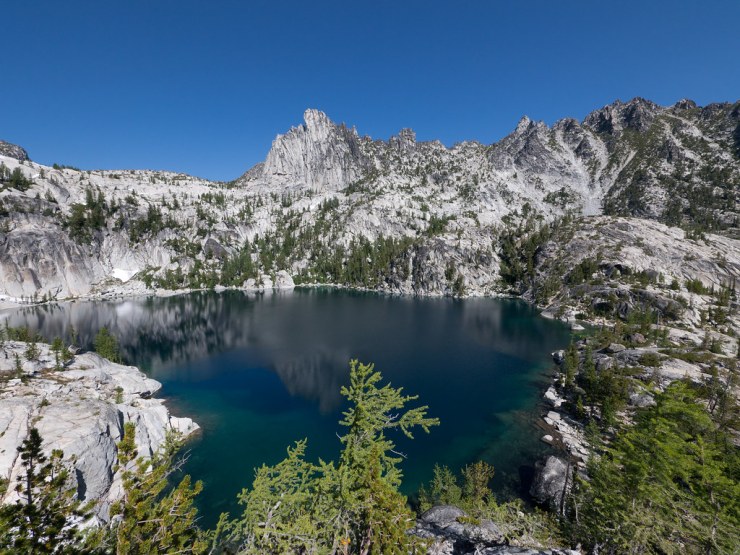
The hike on the second day takes you up over Aasgard Pass (aka Colchuck Pass) and into The Enchantments Lakes Basin. This area is the most beautiful section of this wilderness area. The hike over Aasgard Pass is tough >2,000 foot climb over the course of less than 2 miles. Plan to take it slow and be careful about choosing your route, especially if there is still snow on the trail. After the 2 mile mark, you are in the Upper Enchantments and will come across several alpine lakes. All the lakes are beautiful and there are a variety of campsites. Many people choose to camp near Inspiration and Perfection Lakes, which are at the 3.5 mile mark. After making camp, you are free to relax or go on some day hikes. Just be sure to store your food carefully if you leave your pack behind because there are many mountain goats in the area that will gladly go through your supplies.


……….
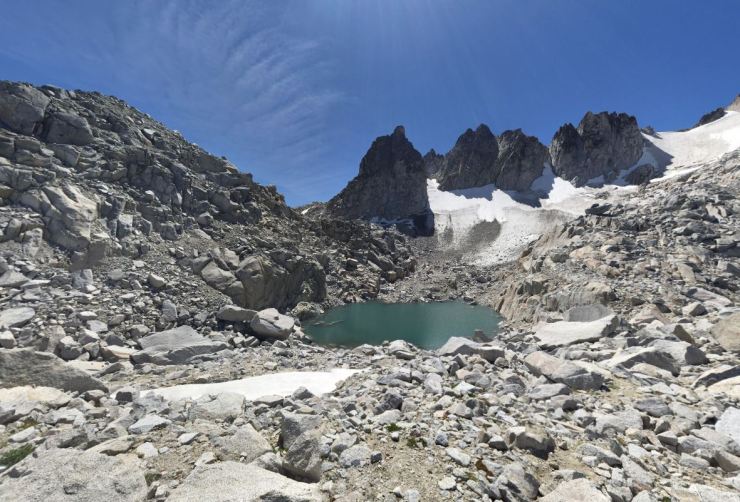
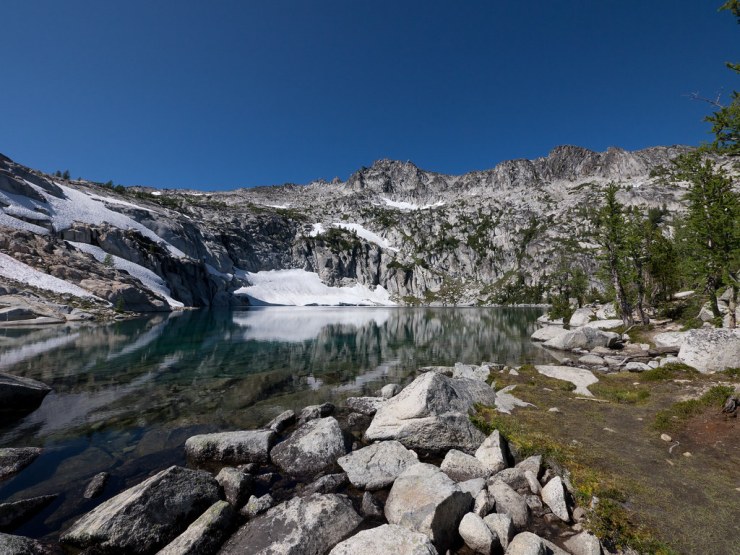
Day 3 (optional): Side trips in The Enchantments Basin

Map of the various side trips in The Enchantments Basin (PDF)
If you decide to spend an extra night camping in the Core Enchantment Zone, there are several great day hikes you can do. Each involves a fair amount of elevation gain, but they are reasonably short. You can get some great views by climbs to the top of Little Annapurna Peak or Prusik Pass. Or, you can find some solitude by making a short trip to Crystal Lake.
Little Annapurna: 2.6 miles; +/- 1,360 feet from Inspiration Lake


Prusik Pass: 1.4 miles; +/- 750 feet from Inspiration Lake


")

Crystal Lake: 2.2 miles; +/- 820 feet from Inspiration Lake

……….
Final Day: 10.5 miles; +730 feet / -6,550 feet; Inspiration Lake to Snow Lakes Trailhead

Map of the final hike in The Enchantments (PDF)

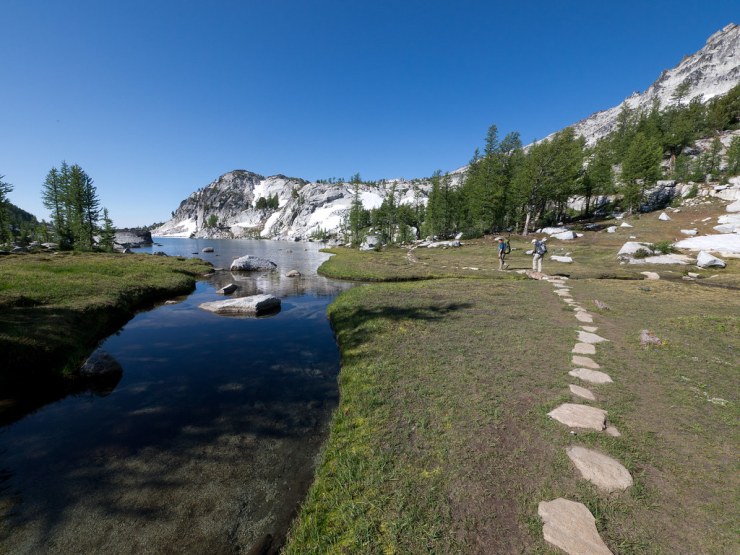
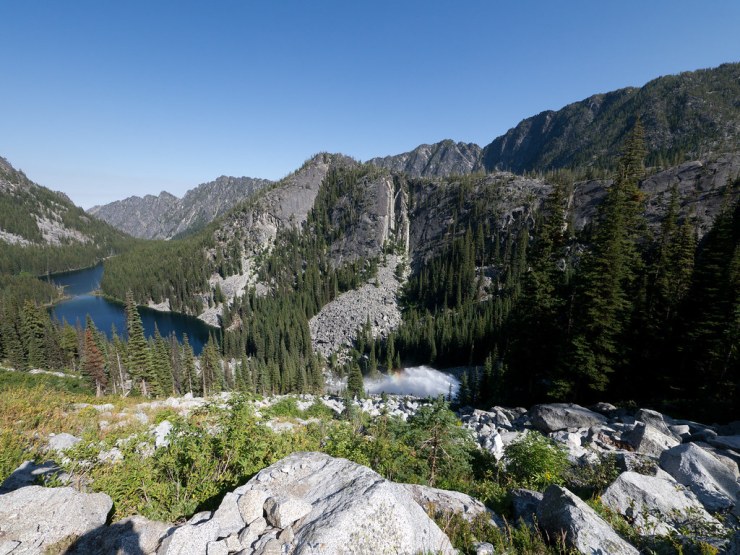
On the last day you hike out to the Snow Lakes Trailhead. This is a longer hike at 10.5 miles, but it is almost all downhill. The trail starts off by wrapping around Perfection Lake and passing small Sprite Lake. It then drops down into the Lower Enchantements region and passes by Leprechaun Lake and Lake Viviane. The scenery in the Lower Enchantments is great just as it was in the Upper Enchantments. At the ~1.5 mile mark you begin the steep descent down to Snow Lakes. The trail follows along Snow Creek so you get some great views of Snow Creek Falls. Between miles 3 and 5.5 you pass by Snow Lakes and Nada Lake. After that you have the final 5 mile descent along the Snow Lakes Trail, which leads to the trailhead. The last section of the trail is not the most exciting since it heads back into the forest. However, you will be motivated to get back to your car!


Here are some similar trip reports!
Four Pass Loop – Maroon Bells Snowmass Wilderness, CO (28 mile loop)
Three Sisters Wilderness – Broken Top Loop (24 mile loop)
Trinity Alps Wilderness – Four Lakes Loop (20 mile trek)
Desolation Wilderness – Twin Lakes, Island Lake, Lake Aloha (12 mile trek)

The Enchantments are such a wonderful area… I applied for permits 3 years in a row before I got them and it was worth the wait!! This point brings back so many good memories 🙏
LikeLike
Thank you for writing this… definitely going to apply for permits next year
LikeLike
I read that the goats can be annoying near the lakes. Is there any thing you can do to keep them away from your campsite?
LikeLike
Hi Olia – Yes, there are mountain goats that live in the main Enchantments Lakes area. The goats crave salt and thus are attracted to camper’s urine, sweaty clothing and equipment, and food scraps. To help keep the goats away, you are supposed to use toilets where available and are supposed to pee on bare rocks or between rocks (instead of in soil or on plants) at least 100 feet away from your camp and the trail. You also want to make sure you do not wash dishes or leave food waste near your camp. Lastly, be careful leaving any sweaty clothing hanging or outside your pack/tent. The goats can steal clothing and chew on equipment to get salt. You want to watch your clothing when it is hanging and want to store it in your tent when you are not around to watch it.
LikeLike