


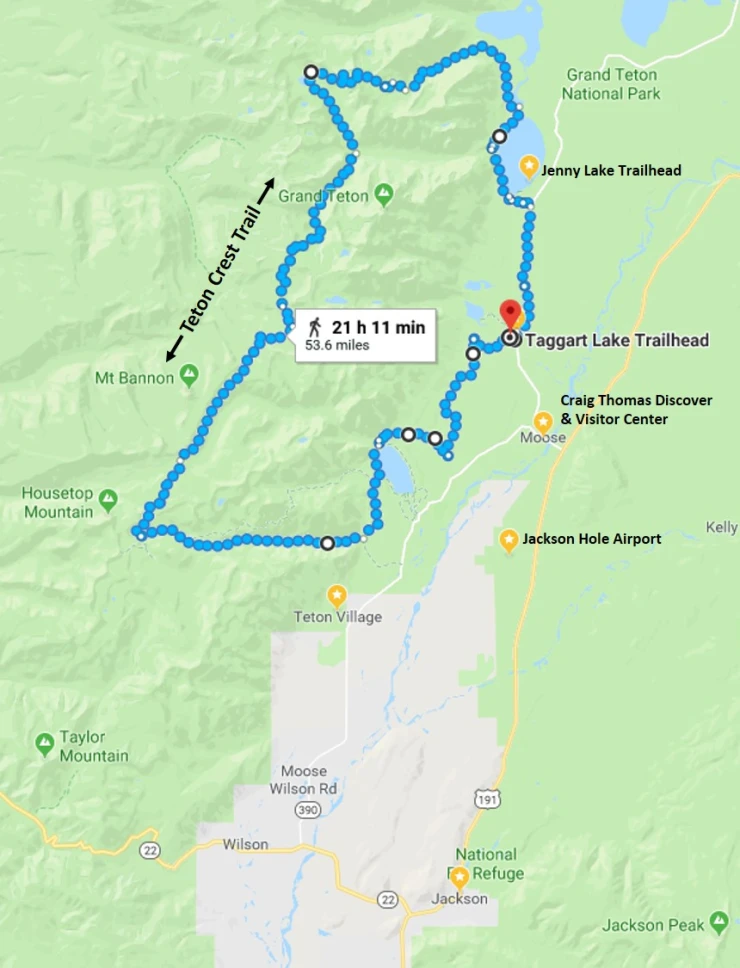
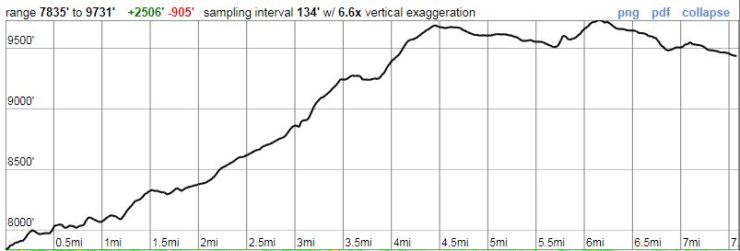
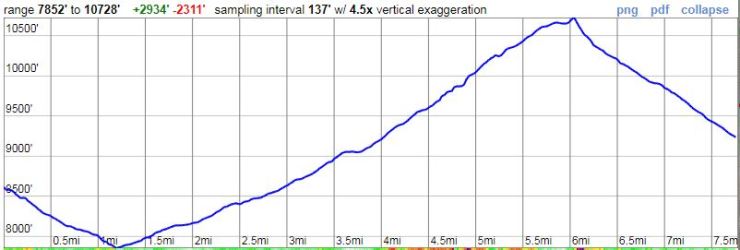
Trip Overview: As described, this ~48 mile backpacking loop circumnavigates the three Teton peaks (Grand Teton, Middle Teton, and South Teton) in Grand Teton National Park and covers roughly 30 miles of the Teton Crest Trail. One of the most scenic backpacking loops in the United States, this challenging trek has a starting elevation of 6,600 feet, a peak elevation of 10,700 feet, and climbs +/-9,300 feet over the course of the 48 mile loop. Highlights include panoramic views of the Teton Range, high alpine terrain with fields of wild flowers, turquoise colored alpine lakes, and sweeping views of a variety of geological structures in Grand Teton National Park. If you are unable to attain permits for this trek, the Cirque of the Towers Loop in the nearby Wind River Range is a good alternative.
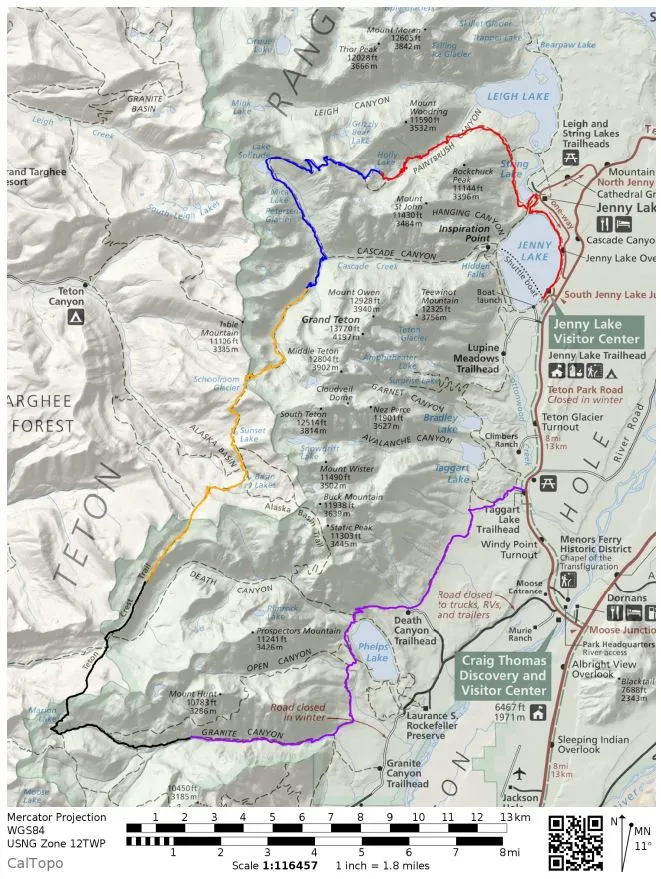
- Overall Teton Crest Trail Loop Map (PDF)
- Link to purchase a great topographic map of Grand Teton National Park (here)
Jump to Day 0: Arrival and preparations
Jump to Day 1: Taggart Lake Trailhead to Lower Granite Canyon
Jump to Day 2: Lower Granite Canyon to Death Canyon Shelf
Jump to Day 3: Death Canyon Shelf to South Fork Cascade
Jump to Day 4: South Fork Cascade to Holly Lake
Jump to Day 5: Holly Lake to Jenny Lake Visitor Center
Shop Sale & Clearance Items at REI.com (up to 50% off)!
Preparations:
Click here to read about Permits
Permits: A permit is required in order to camp Grand Teton National Park. One-third of permits are available for advanced reservation and the other two-thirds are available on a first-come, first-serve basis the day before you start your trek. Due to the trail’s popularity, permits for the campsites along the Teton Crest Trail are reserved very quickly. Campsites can be reserved online between the first Wednesday in January and May 15th. However, the most optimal dates/sites are typically booked within the first week of reservations being open. Permits reserved online cost $45 and walk-in permits picked up in person cost $35. More info on backcounty reservations can be found on the NPS website.
Before reserving a permit, you will need to decide on a rough itinerary (with a few backups in case availability is limited). The backcountry camping guide with a map of all designated camping zones can be found here. You can more detailed maps of each camping zone here. Keep in mind that most people hike the Teton Crest Trail in the clockwise direction because this provides the great views of the Teton mountains when you descend from Hurricane Pass. For your permit, you need to reserve spots in specific camping zone for each night. You do not simply say that you want to hike the trail between date X and date Y. Also note that dispersed camping is not allowed along the Teton Crest Trail in Grand Teton National Park and you are required to camp in these designated zones. The only exception is that dispersed camping is allowed in Jedediah Smith Wilderness which the Teton Crest Trail crosses through in two areas. Camping in the Alaska Basin portion of the wilderness is a good backup option if you are unable to get a permit to camp at the Death Canyon Shelf zone.
Additionally, it is possible to camp in a few areas that are short side trips from the main Teton Crest Trail. These areas include Grizzly Bear Lake, Snowdrift and Taminah Lakes, and the west side of the Avalanche divide (among others). If you are unable to get a permit in the designated camping zones, call the ranger station and ask about camping in these undesignated areas to confirm potential alternate itineraries.
Click here to read about Logistics
Logistics: The most important logistical choice for this trek is deciding whether or not you want to hike the Teton Crest Trail as a loop or as a point-to-point hike. In this report, I will talk about hiking a 48 mile near loop that circumnavigates Grand, Middle, and South Teton starting and ending in Grand Teton National Park. I call this a “near” loop because the itinerary as described has you hitchhike from the Jenny Lake Visitor Center back to the Taggart Lake Trailhead. This cuts about 7 miles off the loop distance. A strong hiker could hike the whole loop with a big 16 mile last day if they so choose.
The Teton Crest Trail can also be hiked as a ~40 mile point-to-point hike from Teton Village (or the Granite Canyon Trailhead) to the Jenny Lake Visitor Center. The trek from Teton Village to Jenny Lake is ~42 miles and climbs +8,900 feet and -8,500 feet. The advantage of hiking this route is that it is shorter, but does not sacrifice too much scenery. The disadvantage is that you must either arrange transportation between the starting trailhead and end point of the hike or hitchhike all the way from Jenny Lake to Teton Village (a bigger ask that simply getting a ride to Taggart Lake).
Other hikers start hiking the Teton Crest Trail outside of Grand Teton National Park at Phillips Pass. If you start there you have bragging rights that you hiked the whole Teton Crest Trail if you make it all the way to String and Jenny Lake. We chose not to do this because reports I’ve read say the most scenic parts of the Teton Crest Trail lie between Marion Lake and String Lake within Grand Teton National Park. Plus, hiking a loop is easier logistically than doing a large point-to-point hike. Either way, there are several potential itineraries to chose from!
Public transportation options within Grand Teton National Park are mostly non-existent. There is not a park shuttle, so you are mostly reliant on driving. There is a public bus (START Bus) that runs between the city of Jackson and Teton Village. This can be used to get to you to the trailheads near Teton Village to start your hike. However, there are no public transit options that take hikers to/from the Jenny Lake Visitor Center. Thus, the point-to-point hike from Teton Village to Jenny Lake requires you to either hire a private transfer at the end of your hike or to hitchhike in order to get from Jenny Lake back to Teton Village (or back to Jackson). You can also use Uber to get from town to the trailheads, but it may be difficult to get a ride back since there is not cell service in all sections of the park and at all trailheads. Some combination of ubering to the trailhead and then hitching hiking home may be effective for those who do not want to rent a car.
We wanted to skip the need to arrange complicated transport, so we decided to just hike a nearly full loop. We rented a car, drove to the Taggart Lake trailhead, and then parked our car there for the whole hike. This meant that we only needed to one of us to get a ride from Jenny Lake to the Taggart Lake Trailhead at the end of the hike in order to get back to our rental car. This is only a ~8 minute ride and is on the way to Jackson, so hitching a ride at the Jenny Lake Visitor Center is easy. In the worst case scenario, we figured one of us could hike all the way to the car if need be. If you wanted to truly hike the whole loop and average about 10 miles a day, you could starting/ending the hike at Teton Village and adding a 5th night where you camp at Bradley Lake. We did not have enough time in our itinerary, so we could not do this option.
Aside from choosing the route you will take, you also will need to decide where to stay before and after your trek. The primary options are the city of Jackson or Teton Village. We chose to stay in Jackson because it was cheaper and closer to the airport. Also, keep in mind that you will need to pick up your backcountry permit at one of the ranger stations before starting your trek. You can pick up your permit at either the Craig Thomas Visitor Center, the Colter Bay Visitor Center, or the Jenny Lake Ranger Station. You must get the permit before 10am on the day of your trek begins. While at the Ranger Station, ask if they have any Bear Spray or camp gas you can have. When we got our permit we were able to get two free cans of bear spray, which saved us $80. Backpackers often turn in unused gas and bear spray at the end of their hike since you cannot fly home with them.
Click here to read about Difficulty
Difficulty: The trek describe in this report is a difficult 5 day loop. Four out of five days have a fair amount of climbing and the first day is over 10 miles long. You should be prepared and in shape if you want to enjoy the hike. You must also be comfortable with backpacking in bear country and should make sure you are aware of bear safety principles. Hiking this trek early (June and early July) or late (late September) in the hiking season increases the level of difficulty because there can be snow on the mountain passes and the weather can be unpredictable. We hiked in the last week of August and got caught in a snow storm. You should be prepared for all types of weather and should avoid mountain passes during storms!
Overall, the trail is well marked and easy to follow. That said there are plenty of trail junctions, so a map is definitely helpful. For fairly regular updates on trail conditions, including when the mountain passes are free of snow, you can check the Jenny Lake Climing Rangers blogspot. There are ample water resources along the trail so you do not need to carry too much water at any given time (the area of trail we encountered without water was a 2 mile stretch after Marion Lake). Also, there is no climbing required and no dangerous river crossings. Thus, this trail requires no advanced route finding or climbing training. It is just a long and tough (but beautiful) backpacking loop.
Click here to read about Weather
Weather: The weather during the hiking season (late June, July, August, early September) is characterized by warm days, cool nights, and occasional thunderstorms. When a storm rolls in, it is not uncommon for the temperature to drop quickly. Thus, you must be prepared for a wide range of temperatures (32-85 degrees F). Late in the season (late September-October), it is not uncommon for it to snow at high elevation. If you plan to complete the trek in September, you must be prepared for rapidly changing weather and be comfortable hiking in snow. In the prime hiking season (July/August), the weather is typically good, but be mindful to avoid exposed, high elevation areas in the afternoon when brief storms frequently occur. For reference of how quickly things can change, we hiked in late August and couldn’t hike over Paintbrush Divide because it was snowing so hard that there was zero visibility. The day before, the weather was perfect. It just goes to show that the weather in the mountains is highly unpredictable. I would also note that we had rain at night on 2 out of 4 nights. I am not sure how typical evening precipitation is, but having a solid water proof tent is a good idea.
Supplies: In the Tetons, you must be prepared for a variety of conditions depending on the time of year. Up until late July / early August, snow often remains in the high country and on mountain passes. If you are hiking the trail in June or July (before the snow fully melts) or in mid-to-late September (when snow can begin to fall again), you will want to consider bringing microspikes/crampons and an ice ax. If the trail is clear of snow, then these are not needed.
Because of rapidly changing weather in the mountains, you will want to bring several layers so that you can easily adapt to the changing temperature and also so that you can stay dry. I also recommend having a set of wool clothes to change into at camp. Wool is great because it doesn’t pick up funky stenches as fast at cotton or synthetic clothes. It also dries out quickly so that you are able to stay warm even if all your gear gets soaked in a thunderstorm.
Other specific gear you will want for backpacking in Grand Teton National Park is related to bear safety. The park is inhabited by both grizzly and black bears. Thus, it is essential to store all food and scented items in a bear canister. It is also highly recommended for every member of your party to carry bear spray. Bear canisters are required in the backcountry and carrying bear spray is encouraged.
You may also want to pre-treat your clothes and tent with permethrin spray repellent. We treated our camp and hiking clothes with permethrin and did not have any issues with mosquitoes during the trek. The permethrin treatment stays on your clothes for up to 7 washes, so it helps reduce the amount of spray you need to put on your skin.
Below is a list of the gear I brought on Teton Crest Trail Loop:
Hiking clothes
- a lightweight hiking rain jacket (North Face Venture 2 Jacket)
- fast drying synthetic hiking pants (prAna Zion Pants)
- a quick drying long sleeve hiking shirt (Columbia Silver Ridge L/S Shirt)
- wool outer socks (People Socks Moreno 4-pack)
- thin blister preventing base socks (WrightSock double layer Coolmesh)
- quick drying synthetic boxer briefs (ExOfficio Give-N-Go)
- Gore-tex hiking shoes (adidas Outdoor Terrex Fast R Gore-Tex Shoe)
Clothes for camp
- wool leggings (Minus33 Merino Wool Kancamagus Midweight Bottom)
- wool base layer shirt (Minus33 Merino Wool Chocorua Midweight Crew)
- warm wool overshirt (Pendleton Long Sleeve Classic-Fit Board Shirt)
- lightweight down jacket (Patagonia 800-fill Down Jacket)
- lightweight camp shoes (Xero Z-Trail lightweight sandal)
Hiking gear
- high quality topographic map (Leo Larson Grand Teton Hiking Map)
- trekking poles (Black Diamond Trail Ergo Cork Trekking Poles)
- 2 liter hydration bladder (Platypus Big Zip Water Reservoir)
- 65 liter backpack (Osprey Atmos 65 Liter pack)
- water filtration system (Platypus gravity filtration system)
Camp gear
- strong tent with rain-fly (Alps Mountaineering Chaos 2 Tent)
- inflatable sleeping pad (Therm-a-Rest Trail Pro Sleeping Pad)
- sleeping bag (REI Co-op Igneo 25 Sleeping Bag)
- inflatable camping pillow (Ultralight Inflating Pillow)
- lightweight backpacking chair (Helinox Chair Zero)
- lightweight lantern (MPOWERD Luci Outdoor 2.0)
- headlamp (Black Diamond Cosmo Headlamp)
- multi-tool with knife (Gerber MDime Mini Multi-Tool)
- Ursack (Ursack Major bear bag) or bear canister (BearVault BV500)
- lightweight stove (MSR PocketRocket 2)
- lighter (BIC plastic lighters)
- 2 liter pot (GSI Outdoors Halulite Boiler Pot)
- coffee cup (GSI Outdoors Glacier Stainless Cup)
- lightweight spork (Snow Peak Titanium Spork)
- small, quick drying towel (REI mutli towel mini)
- lightweight clothesline (Sea to Summit Lite Line Clothesline)
- bear spray (Frontiersman max range bear spray)
Random
- wet wipes (Stall Mates individually wrapped wipes)
- mole skin for blisters (Blister medic kit)
- lightweight trowel (GSI Sanitation Trowel)
- small amount of duct tape for gear repairs
- chapstick and sun screen
Food and drink
- a variety of my favorite dehydrated meals
- electrolyte replacement (NUUN Hydration Tablets)
- instant coffee (Starbucks VIA)
- quick snacks (Clif Shot Bloks and Clif energy bars)
- small plastic water bottles filled with whisky 🙂
……….
Day 0: Arrival and preparations
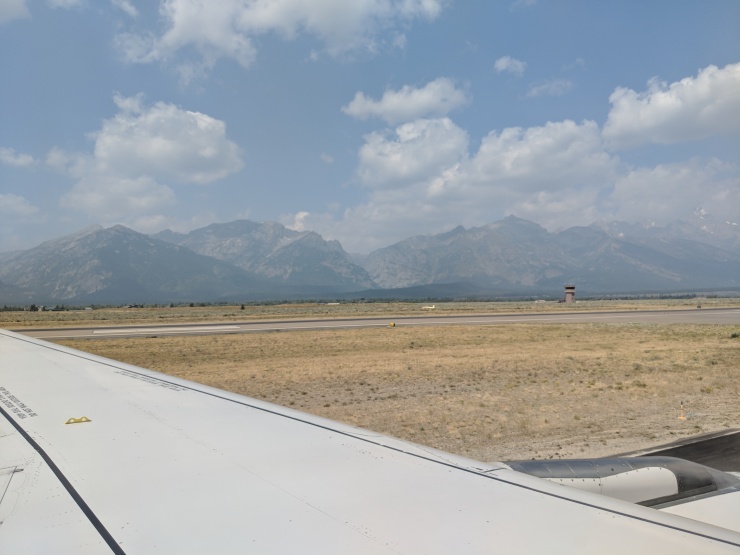
The day before setting off on our trek, we flew into Jackson Hole Airport. We grabbed our rental car and headed directly to the Craig Thomas Discovery & Visitors Center to speak to the Rangers about the current trail conditions and to pick up our backcountry permit. This visitor center is only about 5 miles from the airport. Before getting our permit, we were required to watch a 5-10 minutes safety video. Beyond that we were ready to go. The ranger was also nice enough to give us two cans of bear spray that other hikers had turned in after their hike. After securing our permit, we headed to Jackson where we had a hotel for the night. I really liked getting the permit the day before leaving for our trek. This allowed us to head straight to the trailhead the next morning.
In Jackson, we stopped at a store to buy fuel for our camp stove and to pick up some snacks. There are several outdoor equipment stores in town that sell gas and bear spray and some grocery stores have it as well. You can also rent supplies at several businesses including Teton Backcountry Rentals and Leisure Sports. At that point we were all set and ready as far as supplies went. We headed to the hotel, packed up our backpacks, and then went out to have a big dinner before starting the trek. We had some burgers and beers at Snake River Brewing and really enjoyed it.


……….
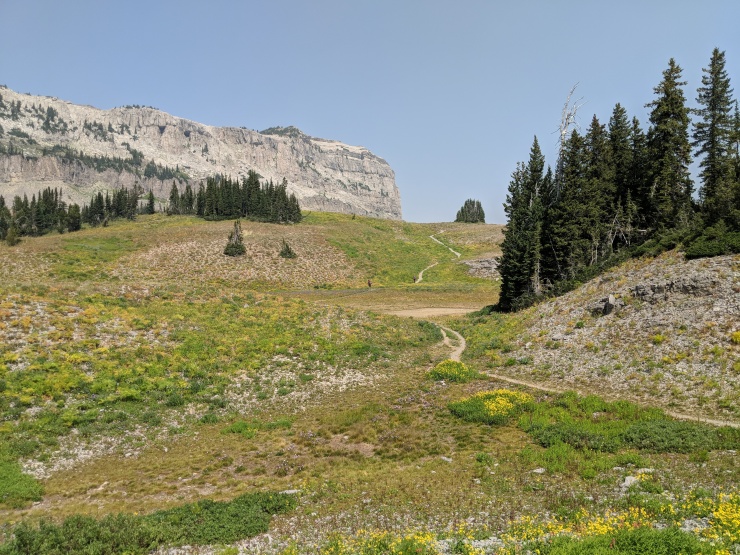
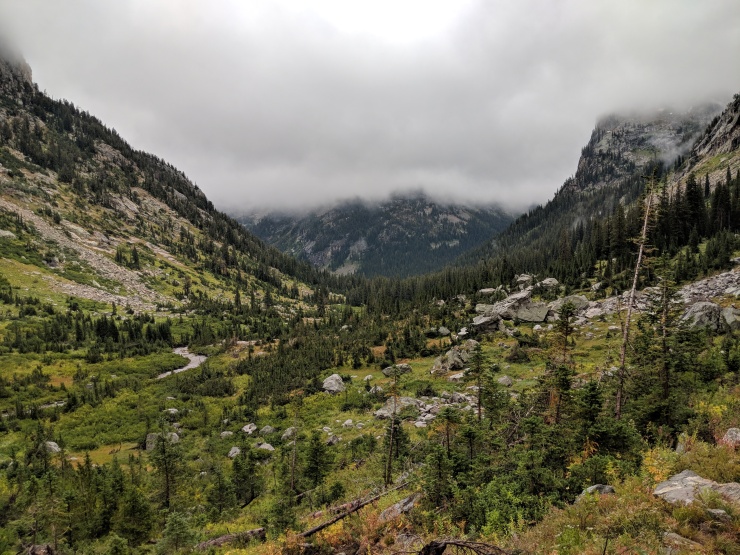
Day 1: 12.7 miles; +2,750 / -1,540 feet; Taggart Lake Trailhead to Lower Granite Canyon
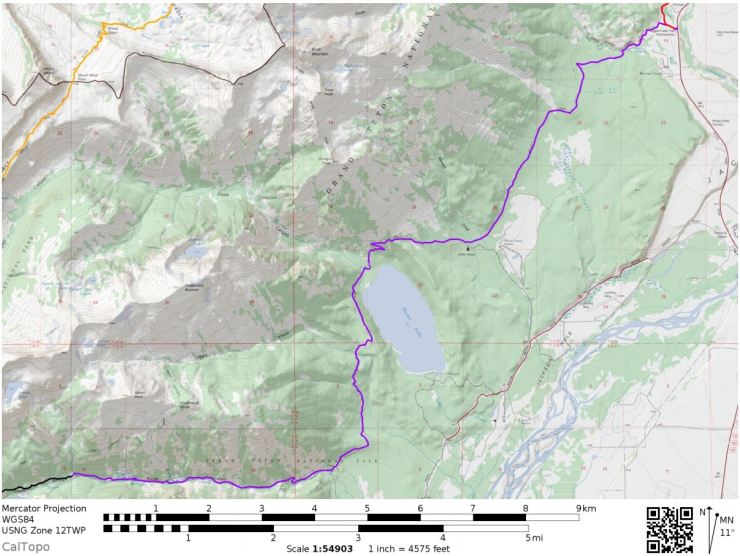
PDF Map of Day hike along the Teton Crest Trail

We left our hotel early in the morning on the day we started the trek. Along the way into Grand Teton National Park, you have to pay a $35 entrance fee, which gives you access to the park for 1 week. We arrived at the Taggart Lake Trailhead at roughly 8:15 am and then started hiking around 8:40 am. At this time in the morning there were plenty of parking spots in the Taggart Lake parking lot. If you are leaving on the weekend day to start your trek, you will want to be sure to arrive early so that you get a parking spot.
At the trailhead there is a pit toilet and trash cans. I did not see a water spout at the trailhead (though there could be one there), so it is probably best to fill up your bottles and camelbaks before heading out for the park.
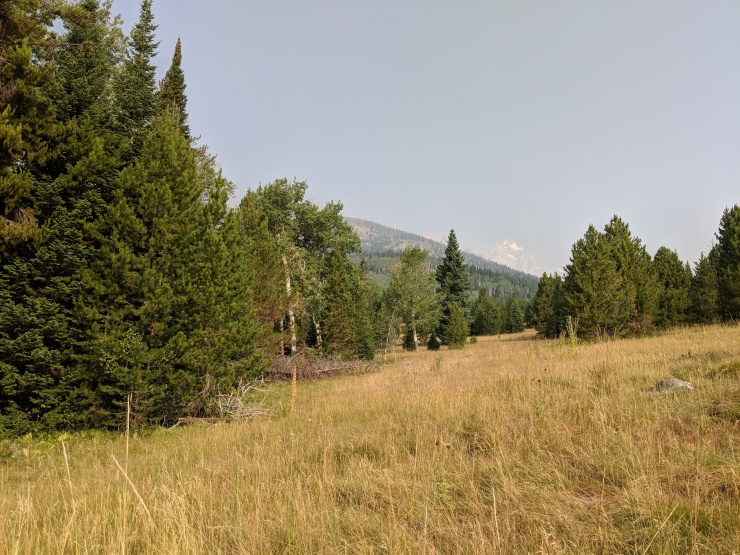
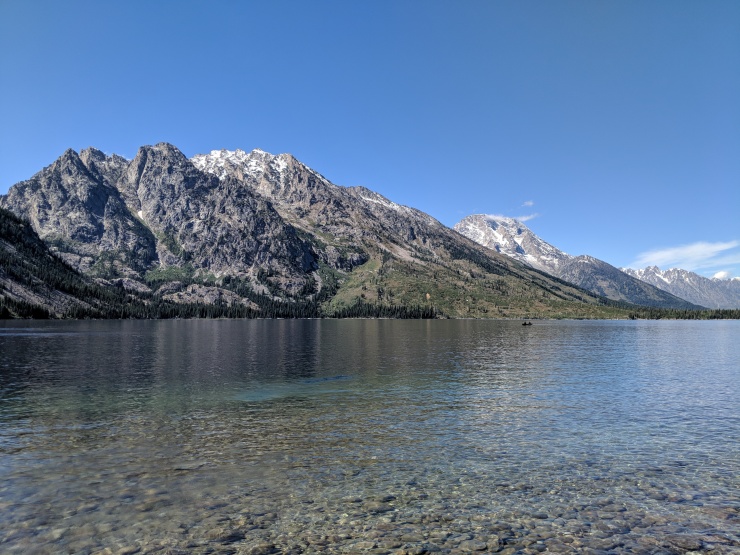
From the Taggart Lake Trailhead you are treated to some great views of the Tetons at you start your hike. When we started hiking the sky was pretty hazy from wildfires in the northwest US and western Canada, so the view were not as spectacular as they could have been. During our trek it rained though and much of the haze went away. Starting at Taggart Lake is nice because you get to see up close the mountains that you are about to circumnavigate.
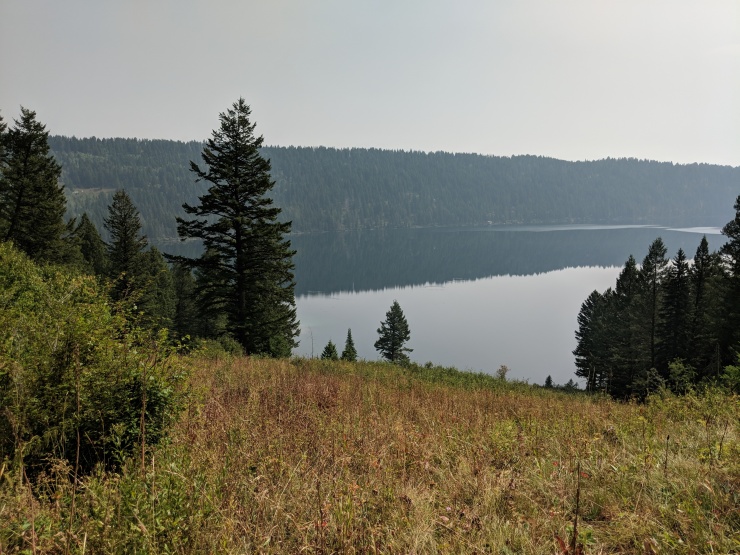
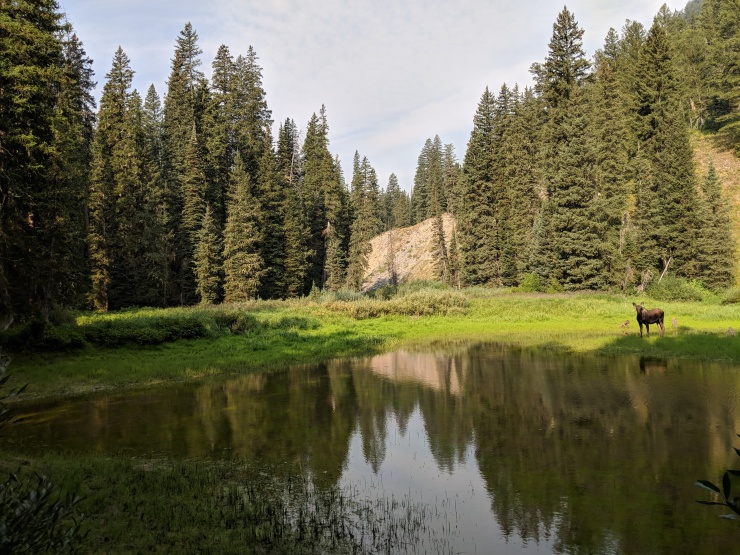
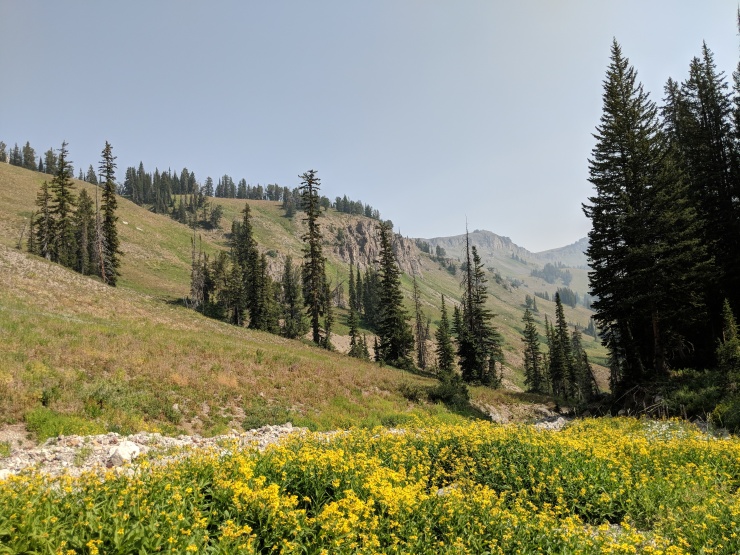
The first few miles of this hike are not the most spectacular. The Valley Trail meanders through a forested area that provides some occasional views of the mountains. Around the 6 mile mark you reach a lookout that provides a nice view of Phelps Lake. Unfortunately, it was very hazy over Phelps Lake and the view was not great. From this point on, the views get better as you hike past Open Canyon and hike into Granite Canyon before reaching the Lower Granite Camping Area. We saw lots of berries and bear scat on the trail near Phelps Lake so be on the look out for bears here. Fortunately, we did not encounter any bears during our whole trip and never had to use our bear spray.
We arrived at camp at 3:50 pm, completing the hike in roughly 7 hours. This included a couple snack breaks and many small breaks for pictures. The first day of this trek is by no means the most beautiful day. You could say that this hike is mostly a transit day where you make your way towards the more beautiful sections of the trek, which are on the Teton Crest Trail.


……….
Day 2: 7.6 miles; +2,500 / -905 feet; Lower Granite Canyon to Death Canyon Shelf

PDF map of Teton Crest Trail Day 2 hike
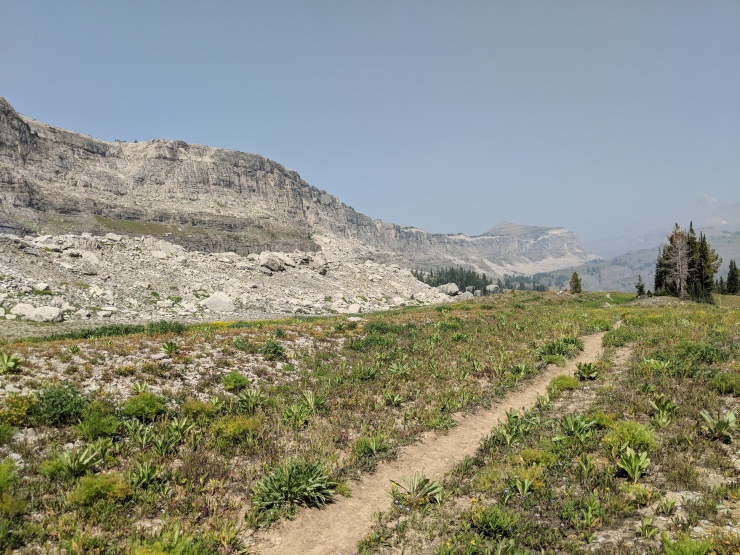
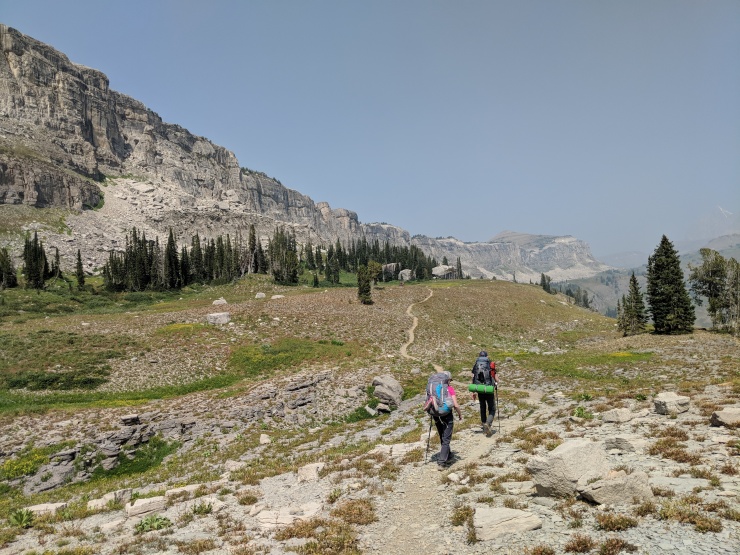
The hike on the 2nd day from Granite Canyon to the Death Canyon Shelf provides significantly better views than the hike on the first day. The first couple miles hiking out of Granite Canyon are not spectacular, but as soon to the Granite Canyon Trail meets up with the Teton Crest Trail, things get much more scenic. At about the 4 mile mark, you reach Marion Lake. This makes for a great lunch spot. You should also check your water supply here as there is little to no water access between Marion Lake and Fox Creek Pass (2 miles away).
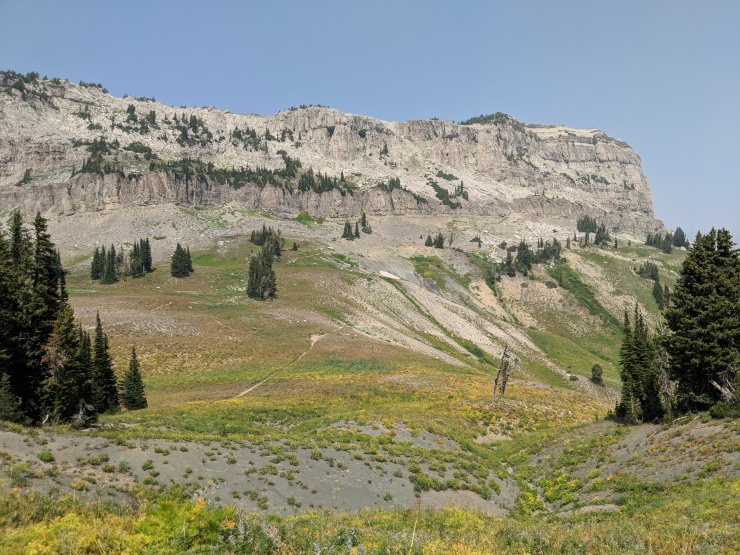
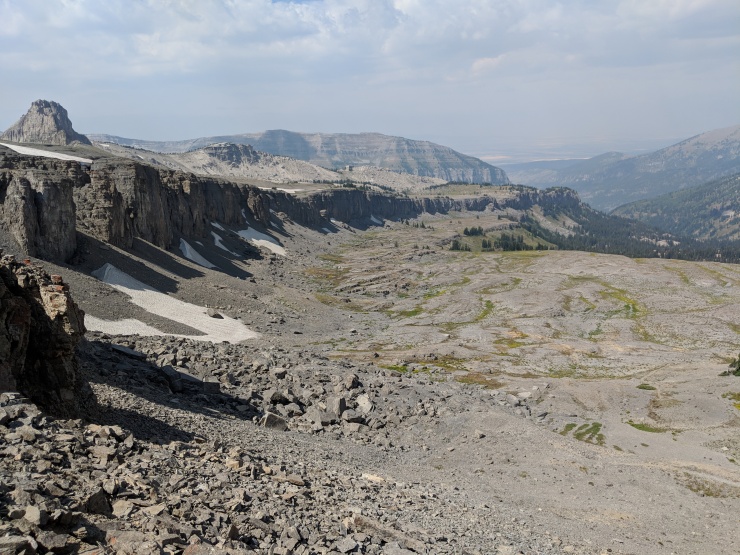
Shortly after leaving Marion Lake, you briefly leave Grand Teton National Park and enter the Jedediah Smith Wilderness. This section of the Teton Crest Trail has wide open views of the wilderness area and is a nice flat section of the trail. Around the 6 mile mark, you reach Fox Creek Pass and re-enter Grand Teton National Park. From here, the views are amazing as the Teton Crest Trail meanders along the Death Canyon Shelf. To the right you have views of Death Canyon, to the left you have views of a large shear rock wall, and straight ahead you have views of the long shelf and the tip of Grand Teton in the distance. There several campsites along the Death Canyon Shelf, and I highly recommend trying to get a permit to camp here. If you are not able to get a permit, you can continue hiking and camp in the Alaska Basin several miles ahead.
We started hiking at 10:00 am and arrived at camp at 2:20 pm on this day.


……….
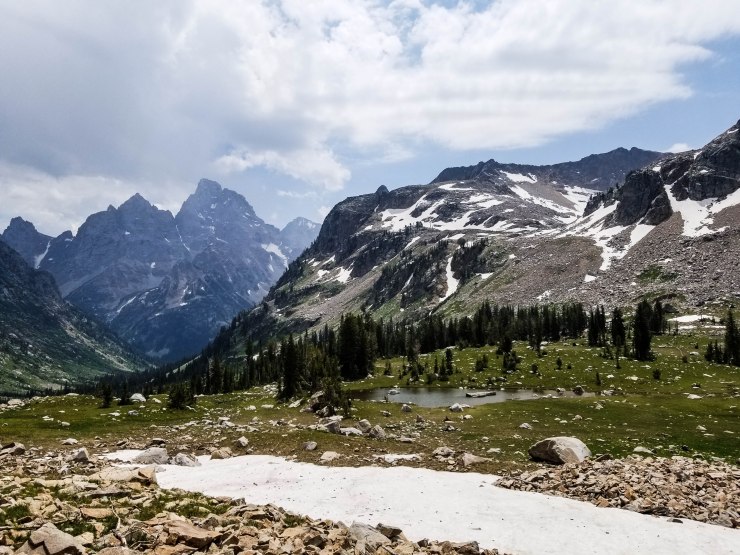
Day 3: 10.7 miles; +2,090 / -2,960 feet; Death Canyon Shelf to South Fork Cascade

PDF map of Teton Crest Trail Day 3 hike

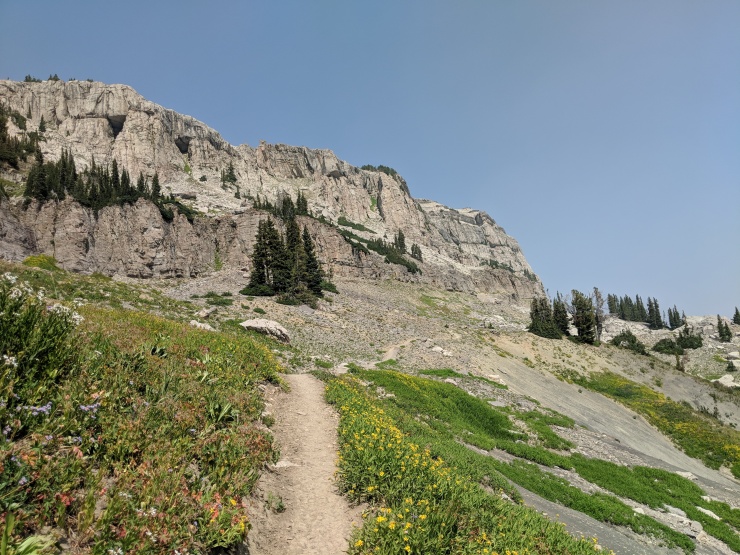
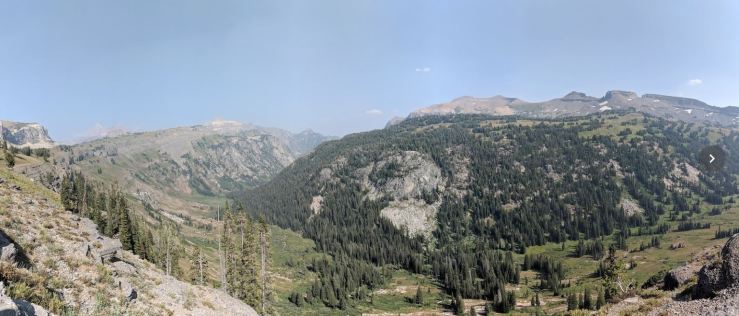
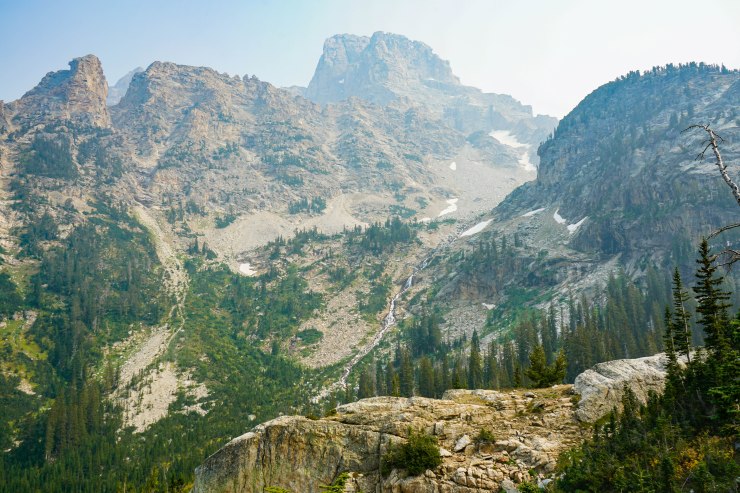
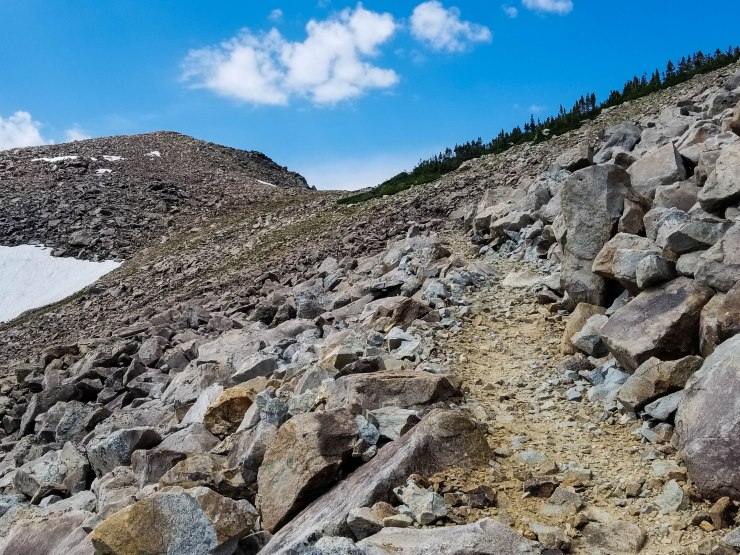
On the 3rd day, you are treated to another hike with amazing views. This is arguably the best day of the this itinerary as you get to see the Tetons up close when you hike over Hurricane Pass. The hike over Hurricane Pass is a tough climb, but is incredibly scenic.
To begin, you hike along the Death Canyon Shelf to Mount Meek Pass and then enter into the Jedediah Smith Wilderness area again. This portion of the hike provides more great views of Death Canyon and the Death Canyon Shelf. Be sure to turn around and look at where you hiked the previous day. The views of Death Canyon Shelf as you climb towards Mount Meek are awesome.
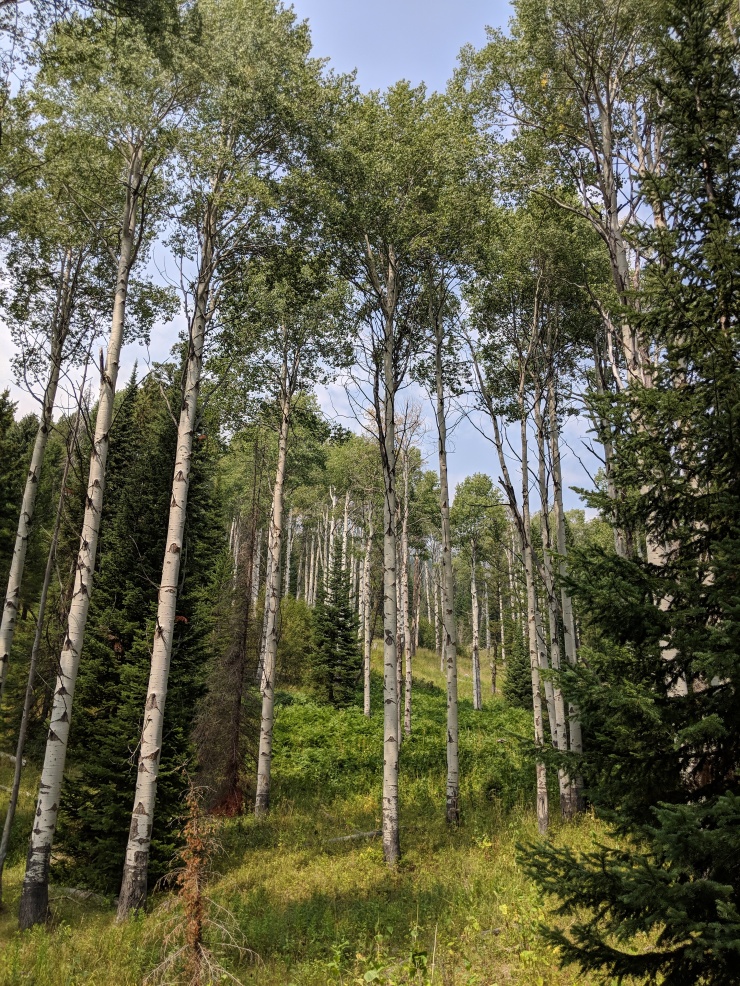
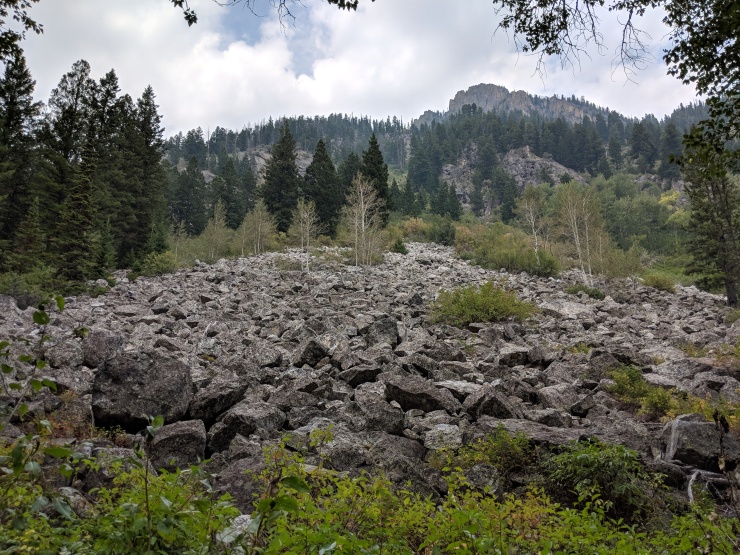
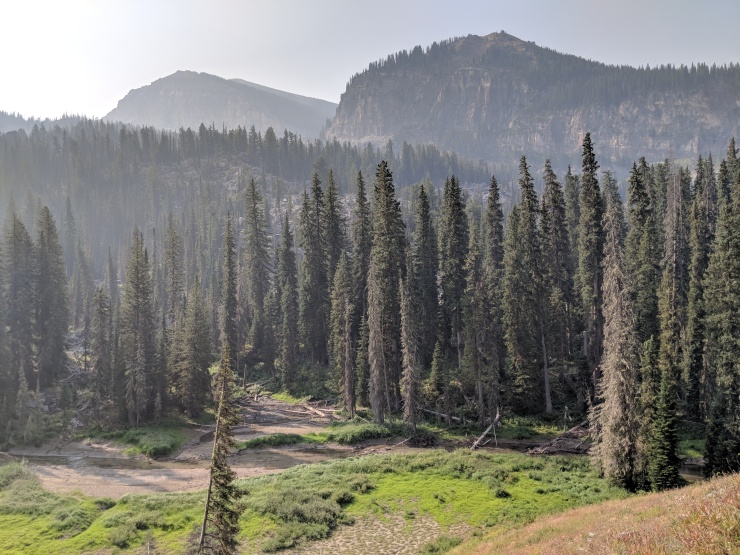
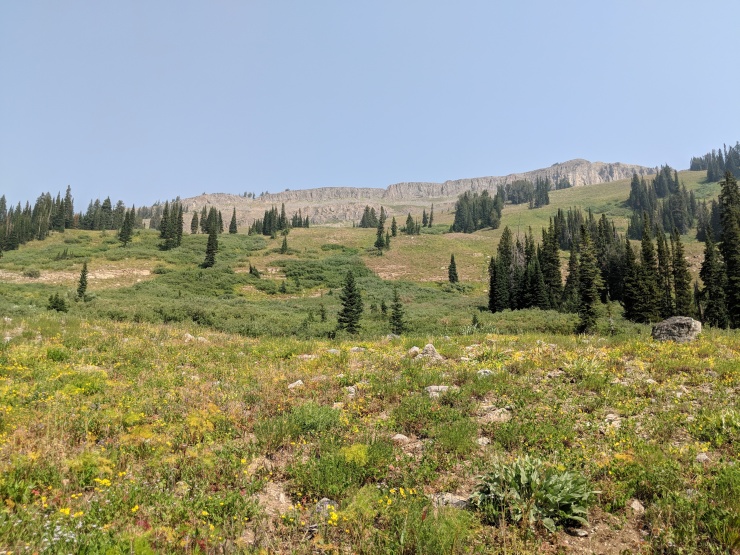
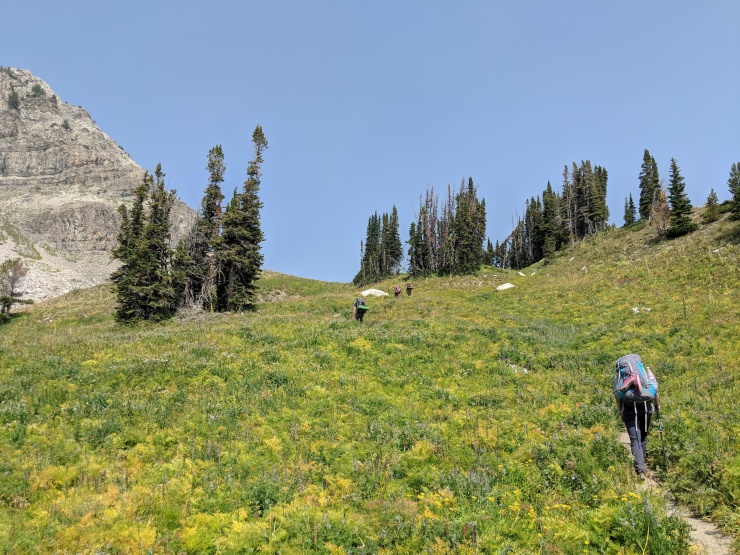
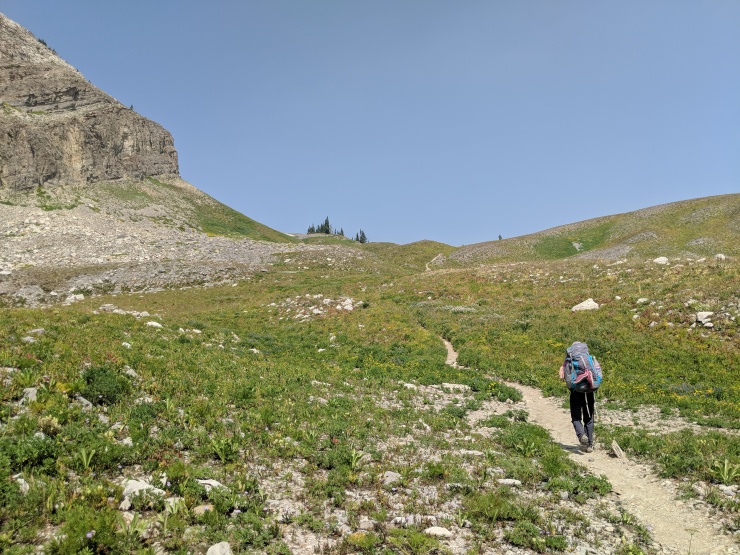
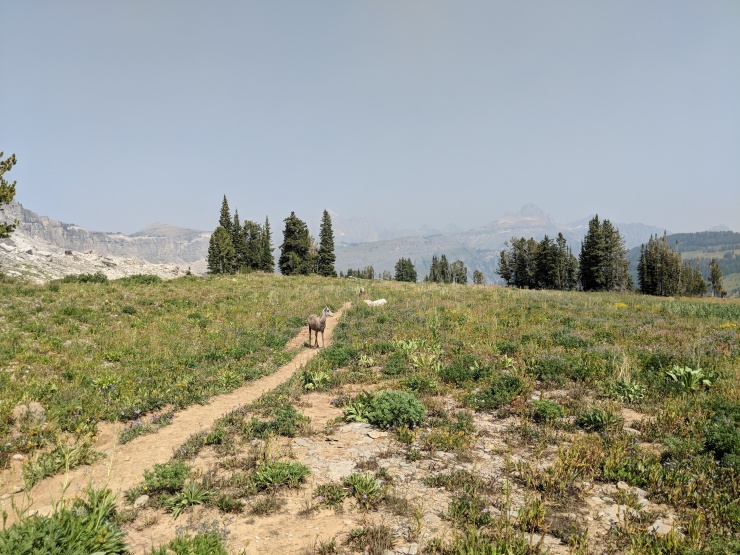
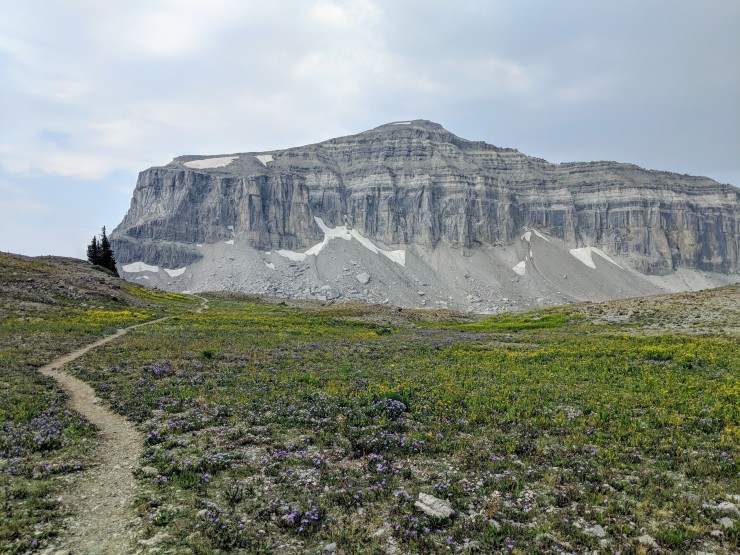
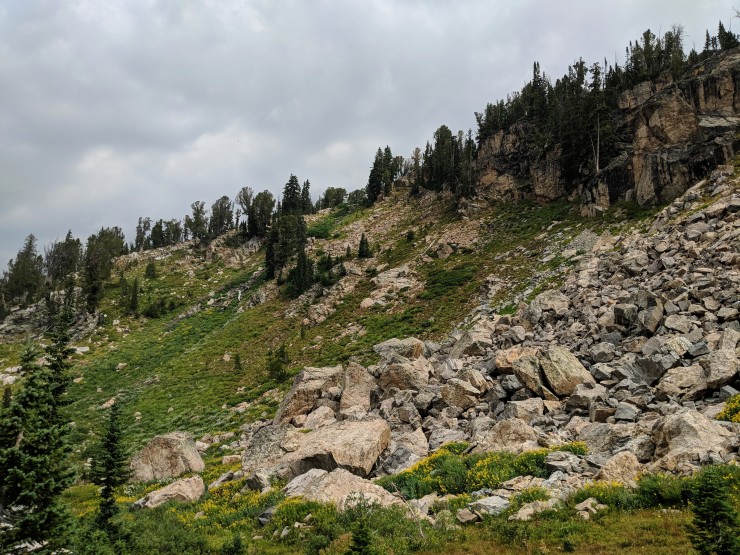
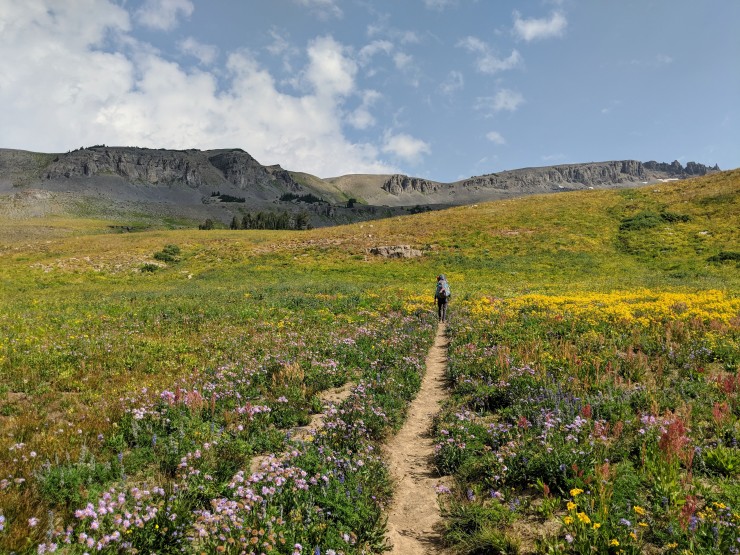
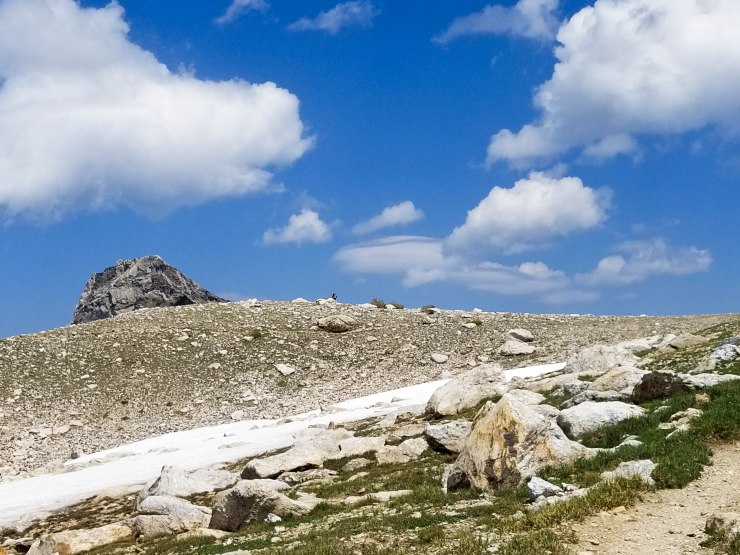
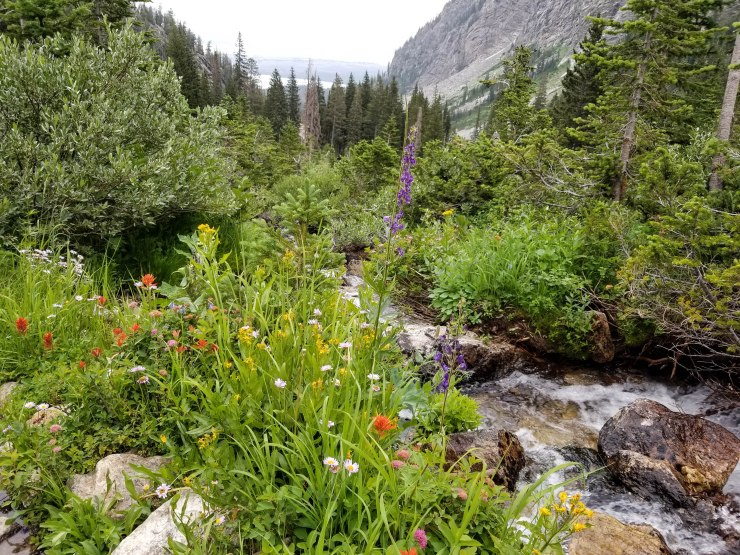
After you go over Mount Meek Pass, you enter into another sparse region of wilderness. There are wide open views as you continue to hike towards the Alaska Basin. In late August, there were many wildflowers blooming throughout this section of the trail. Around the 3 mile mark, you reach some switch backs which lead down into the Alaska Basin area. The terrain in the basin is much different from what you just hiked through and has many trees, streams, and large rocks. The whole basin is surrounded by mountains, which provides dramatic views.
About a mile into the hike through the Alaska Basin, the trail begins a steep climb up several switch backs. Once you reach the top of the switchbacks, you get a great view of Sunset Lake in the distance. You then follow the trail down to the shore of Sunset Lake, which makes for a nice spot for a snack.
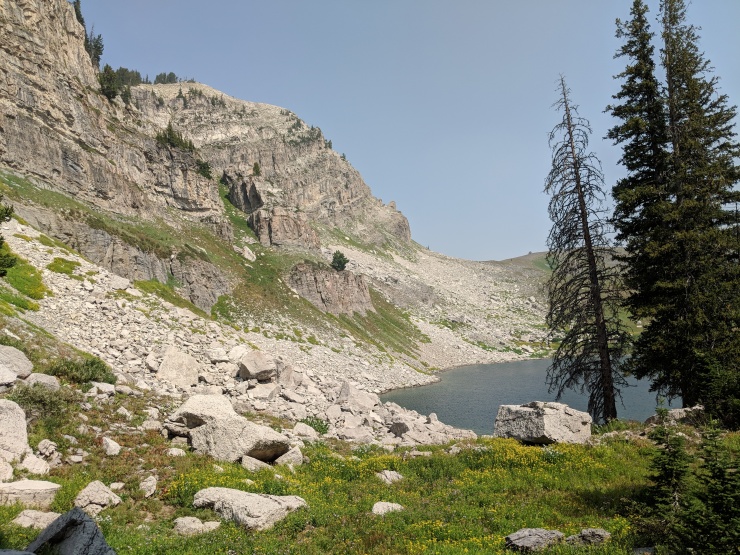
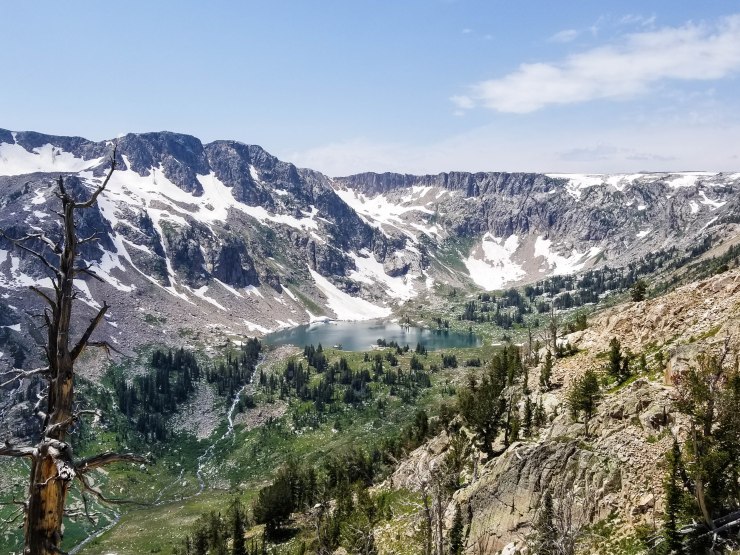
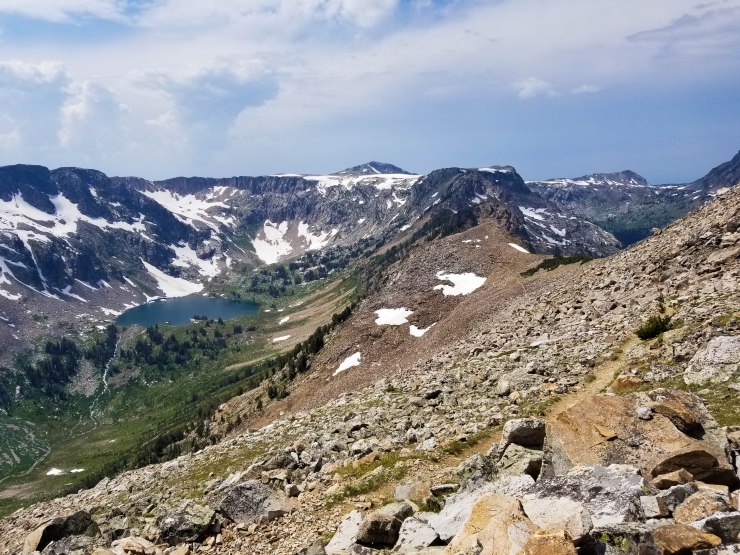
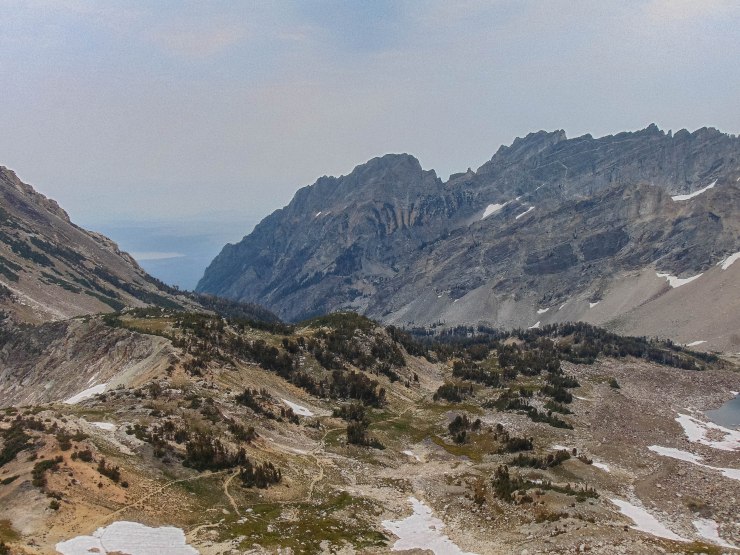
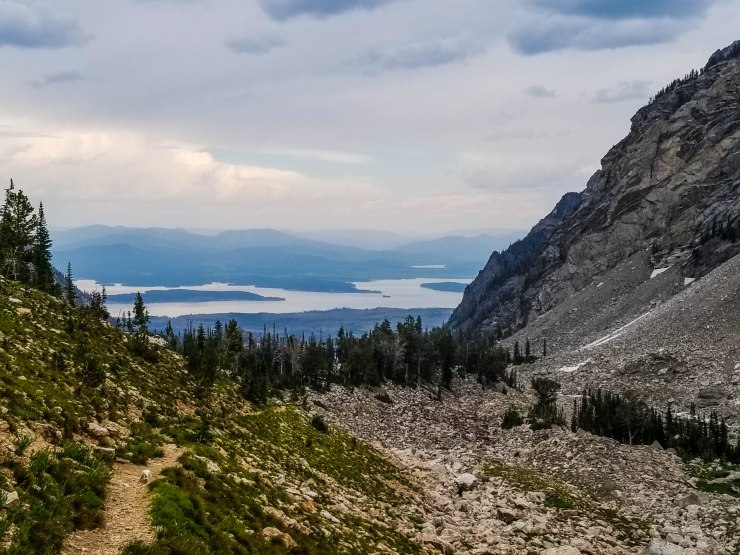
Leaving from Sunset Lake, you begin a 1.5 mile climb up to Hurricane Pass. This section of the trail provides incredible views of the Alaska Basin behind you. As you approach the top of the pass you also get your first up close glimpses of Grand Teton, Middle Teton, and South Teton. The view gets better and better as you approach Hurricane Pass. Eventually you reach the top of the pass and are treated to an amazing view of the Teton Range, the Schoolroom Glacier, and the South Fork Cascade Canyon. The top of the pass was very windy, but it was worth taking a few minute break to take in the views.
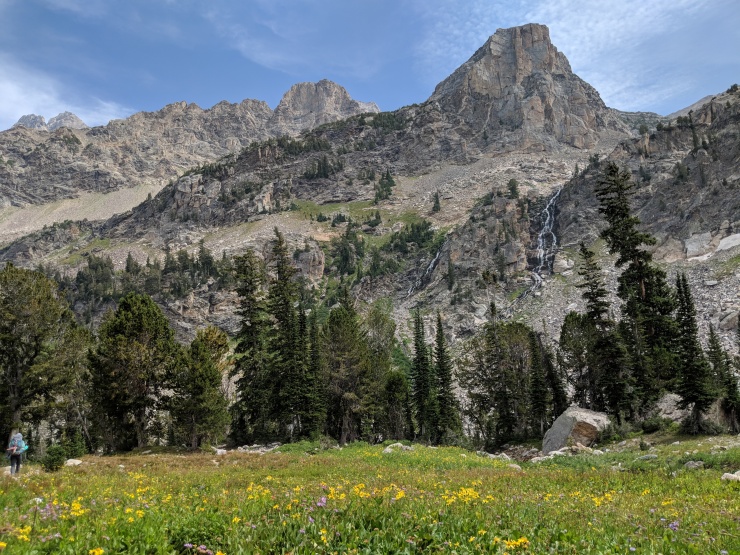
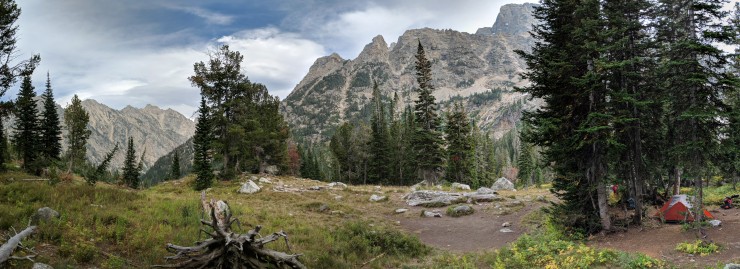
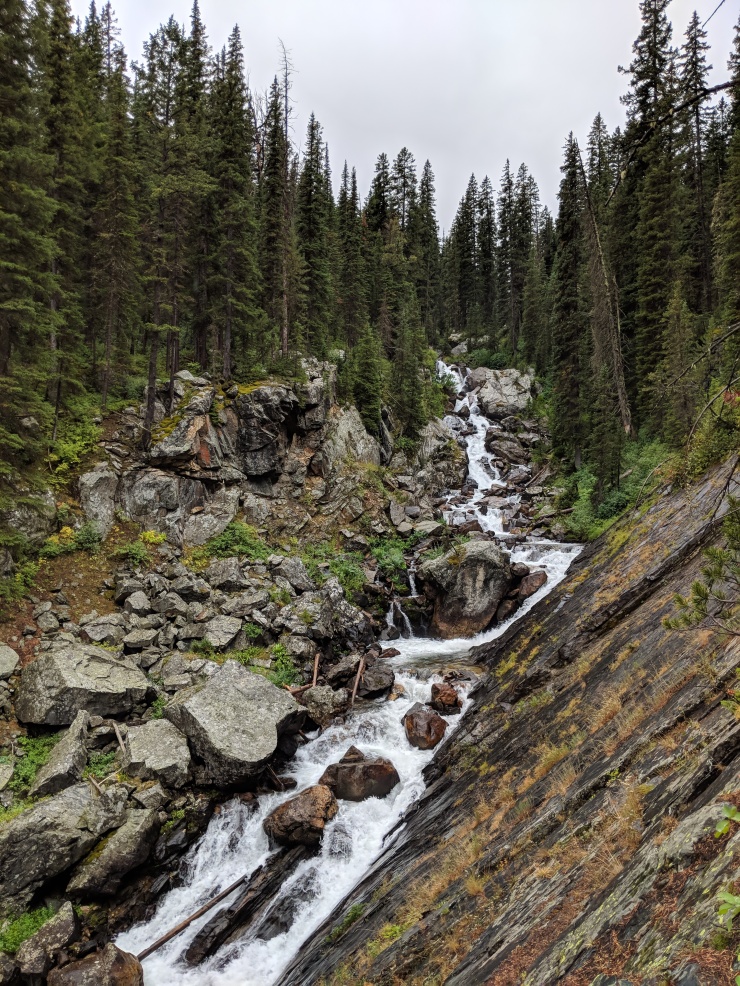
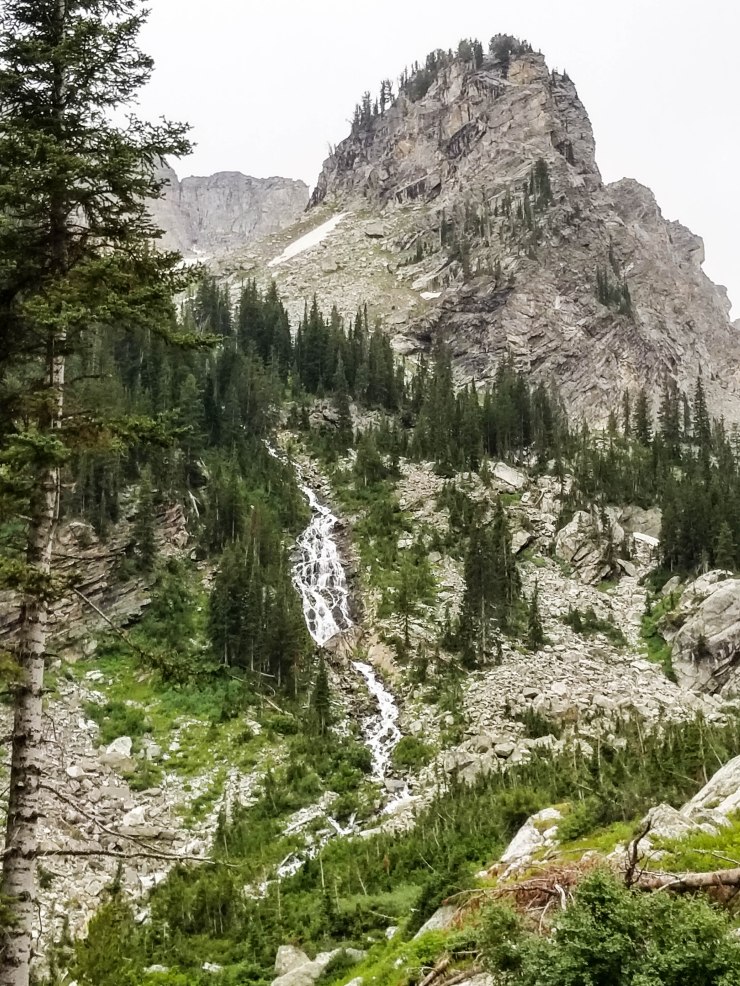
From the top of Hurricane Pass, the trail begins a long and steep descent into the canyon South Fork Cascade Canyon. Along the way down be sure to take the side trails that lead to the Schoolroom Glacier and the turquoise lake beneath it. It is awesome to get an up close view of the glacier and lagoon. Eventually you reach the South Fork camping zone and there are many great campsites with views of the Tetons. This section of the trail is tough on the knees because of the long descent, but the views more than make up for it. You see many waterfalls and get views of the Tetons the whole way. We ended up camping near the end of the South Fork camping zone. The views from our site were not the best, but we wanted to cover as much mileage as possible this day to make the next days hike more manageable.
We started hiking at about 9:00 am and arrived at camp at 3:30 pm on this day.


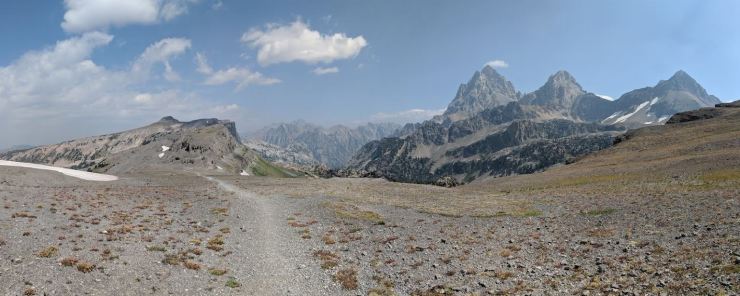
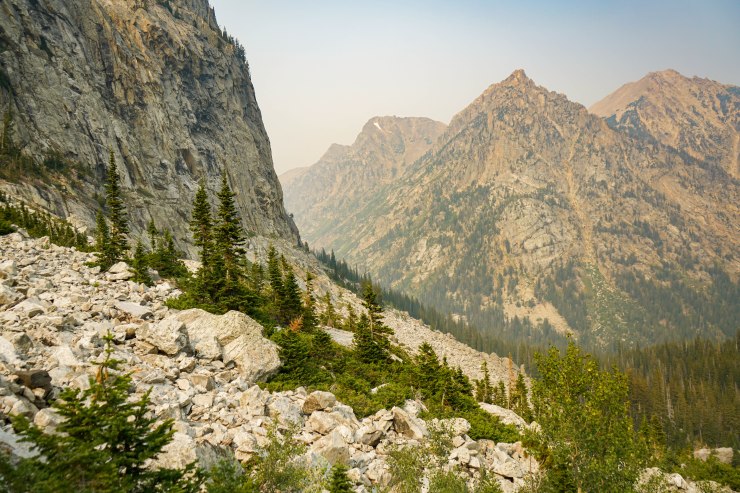
The view looking west from Hurricane Pass (into the Jedediah Smith Wilderness).


……….
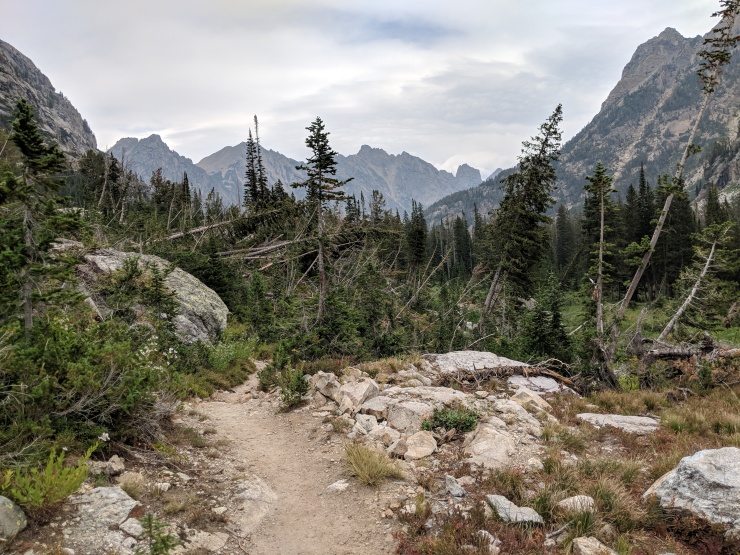
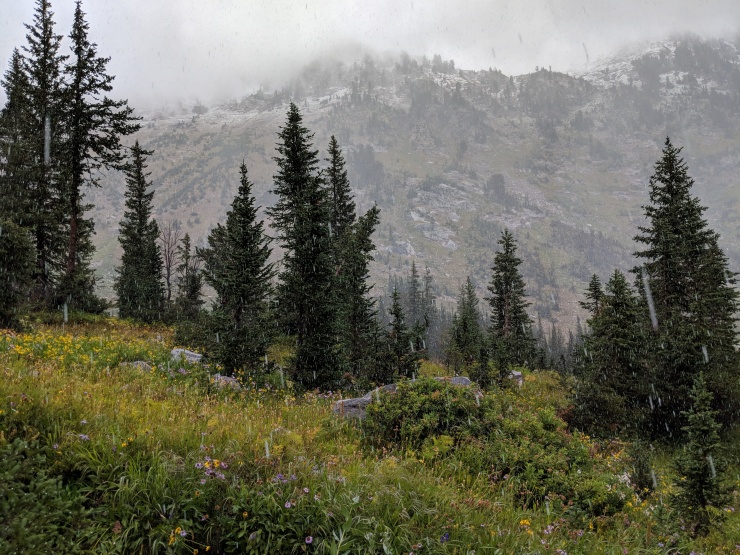
Day 4: 7.8 miles; +2,930 / -2,310 feet; South Fork Cascade to Holly Lake
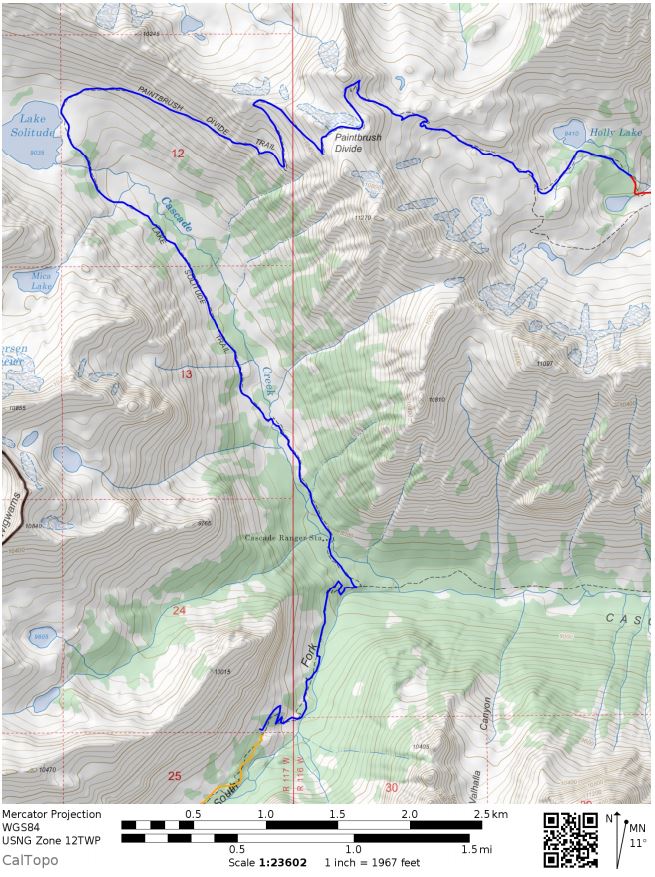
PDF Map of Teton Crest Trail Day 4 Hike
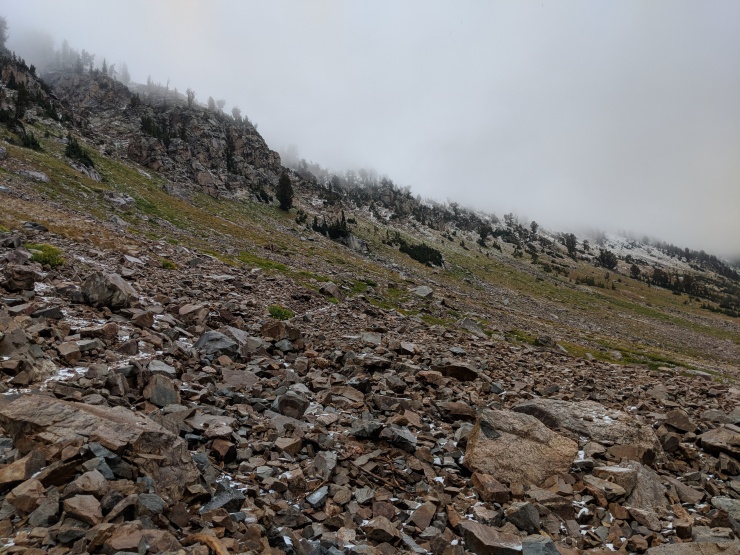
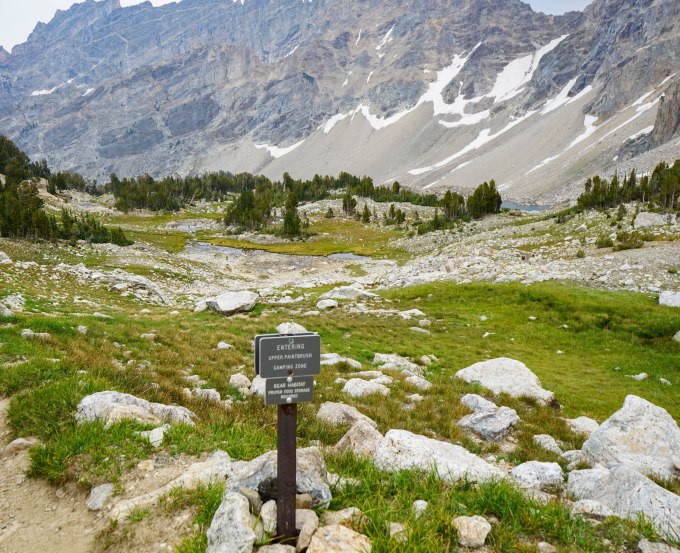
It had rained for a solid several hours the previous night and we woke up this day to heavily clouded skies. The rain stopped briefly while we packed up camp, which gave me some hope that we would be fine to continue our trek as normal. However, it began to snow pretty heavily at about the 3 mile mark when we were hiking through the North Fork Camping Zone. We could still see the trail and visibility was decent so we continued to Lake Solitude. At this point we had a quick snack and then decided we would head up the trail towards the Paintbrush Divide pass and decide whether to continue or not based on the weather conditions.
About a quarter mile up the Paint Brush Divide Trail, we met two hikers coming down from the pass. They told us they tried to get over Paintbrush Divide but ran into >6 inches of snow and visibility of <30 feet. They said the hail and snow was coming down hard and they decided to turn around because they could not see the trail at all. At this point we decided it was best to not attempt to cross the pass. We simply did not want to lose the trail at the top of Paintbrush Divide in a blizzard. Even if we would have made it to Holly Lake, there would have been no views from Paintbrush Divide since the visibility was terrible.
In the end, we turned around and just decided to head out of the park a day early. We backtracked a few miles and then took the Cascade Canyon Trail to Jenny Lake. From there, we took the Jenny Lake Shuttle across the lake, went to the Jenny Lake Visitor Center, and changed out of our soaked clothes. The guests at the Visitor Center took pity on us, so it was super easy for one of us to grab a ride to the Taggart Lake Trailhead to grab our rental car.
It was certainly a bummer to miss out on the views going over Paintbrush Divide and to cut our itinerary short. We also missed out on views of the Tetons as we hiked up to Lake Solitude since the clouds all the mountains. That said, sometimes you get crappy weather in the mountains.
Note: From here on, I will describe the hike as if we were able to hike over the Paintbrush Divide and continue our itinerary as planned. This section of the trail is beautiful and my cloudy pictures don’t do it justice, so I will include my pictures and pictures of the trail in better conditions.
This is how the hike would have been if we didn’t get stuck in a snow storm…
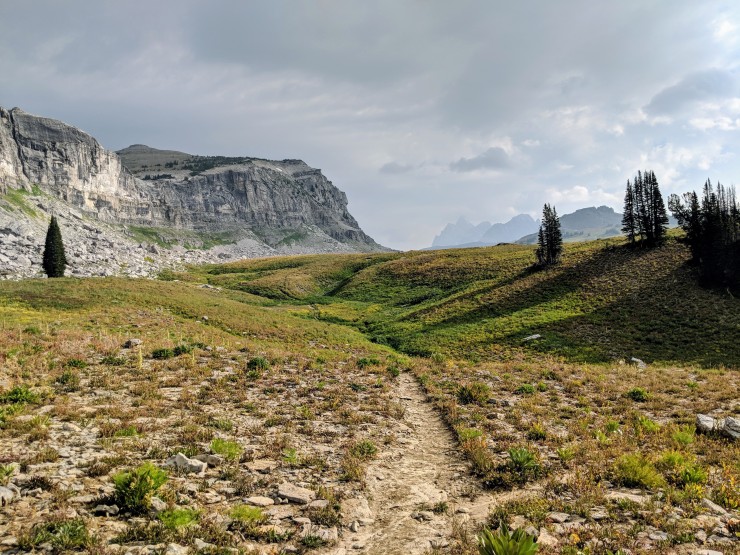
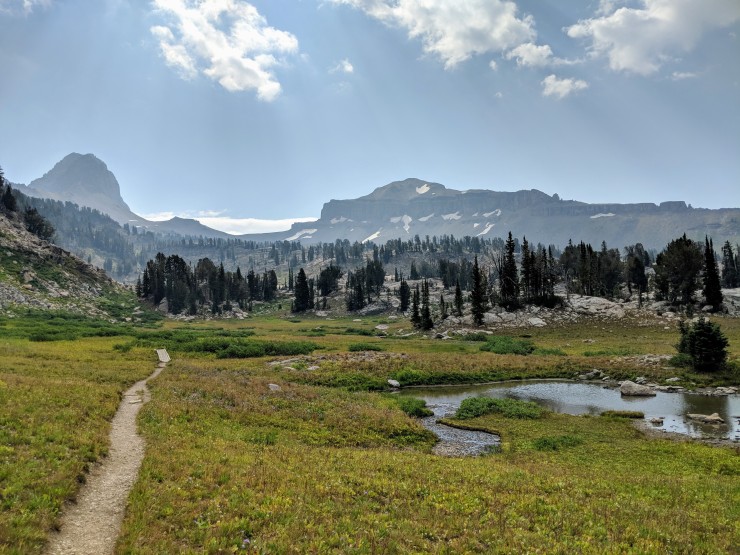
From the end of the South Fork Camping Zone you continue to descend towards Cascade Canyon for another ~1.5 miles. The trail enters a forest at the bottom of the Cascade Canyon. From there you reach the junction with the Cascade Canyon Trail, which leads back to Jenny Lake. To continue the this loop as planned, you head North towards Lake Solitude and the Paintbrush Divide.
The trail to Lake Solitude climbs for roughly 2.5 miles. Shortly before reaching the North Fork Camping Zone the trail emerges from the forest and you get great views of mountains on either side of the canyon. Grand Teton is visible behind you to the southeast. This section of the trail is view nice and was full of wildflowers. We saw two moose along the trail, so keep your eyes open for wildlife.
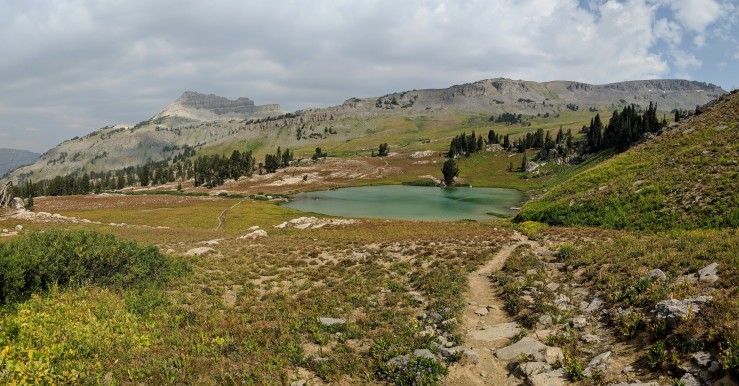
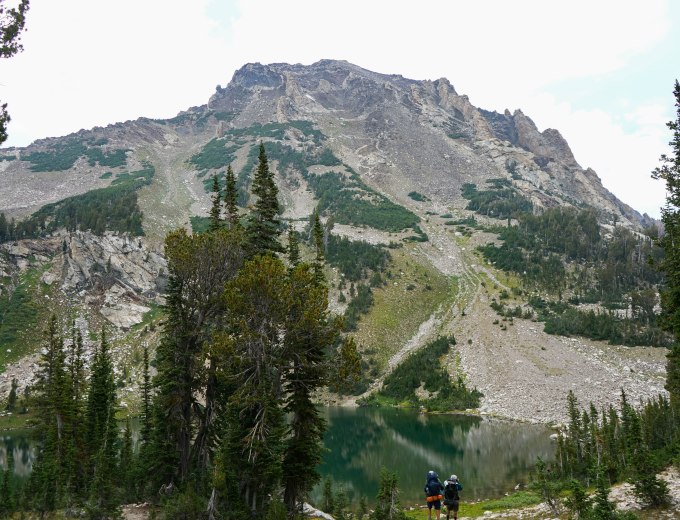
When you reach Lake Solitude you likely will want a snack. The views here are nice and you can see the trail leading up to the Paintbrush Divide that you will soon climb. You can also still see Grand Teton to the southeast. After a break, we headed up the trail to the Paintbrush Divide pass. The climb is roughly 1,700 feet over 2.3 miles. At the top of Paintbrush Divide you get great views of the surrounding mountains and lakes. After taking in the views, it is a steep ~2 mile hike down to Holly Lake.


……….
Day 5: 9 miles; +490 / -2,980 feet; Holly Lake to the Jenny Lake Ranger Station

PDF Map of the Teton Crest Trail Day 5 Hike

The hike on the last day is roughly 9-10 miles depending on exactly which trails you take near Jenny Lake. The hike ends at the Jenny Lake Visitor Center. From there, we asked another park visitor for a ride to Taggart Lake Trailhead. It should be easy to convince someone for a ride since Taggart Lake is on the way to Jackson and is only 8-10 minutes from the Jenny Lake Visitor Center (it would be a harder sell to get a ride all the way to Jackson or Teton Village). After getting to Taggart Lake Trailhead, a member of our party grabbed the rental car and brought it back to the visitor center to pick everyone up.
If you want to hike a full loop, you could either hike an additional 7 miles all the way to Taggart Lake Trailhead on this day or you could get a permit to camp at Bradley Lake and stay an extra night in the park. If I were hiking the full Teton Crest Trail Loop again, I would start and end the hike in Teton Village and would camp a 5th night at the Bradley Lake campsite. This would shorten the first day significantly and would cut a few miles off of this days hike.
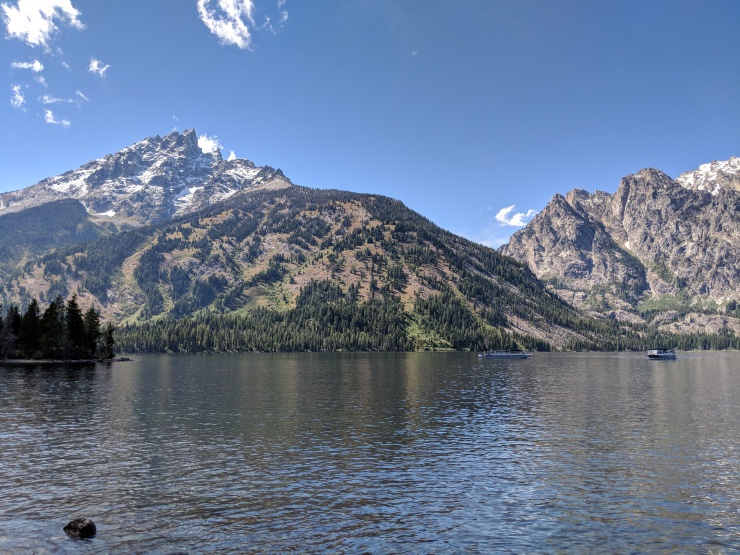
The hike from Holly Lake to Jenny Lake is all down hill and should not be difficult after all the climbing on the previous days. Along the hike you get nice views of the Paintbrush Canyon and of Leigh and String Lakes. When you get to Jenny Lake, you are also be treated to the views looking across Jenny Lake towards the Tetons.
If you did not discharge your bear spray during the trek or have any unused camp gas canisters, stop at the Jenny Lake backcountry ranger station (not the visitor center) and drop off those supplies. Some other hiker can then use them when they start their trek.


After our hike, we had an extra day in Jackson to relax. We went and explored the area near the Mormon Row to take some photos of the iconic view.


Here are some related trip reports:
Rocky Mountain National Park – Continental Divide National Scenic Trail
Rae Lakes Loop – Kings Canyon National Park Backpacking
Sequoia National Park – Mineral King Area – Sawtooth Pass and High Sierra Trail
Yosemite Highlights Loop – Yosemite National Park (40 mile loop)
Cirque of the Towers Loop – Wind River Range, WY (45 mile loop)

Excellent trip report! Planning a trip to the Teton and Will definitely reference this again. What is name/location of the cabins you stayed in after your trip?
LikeLike
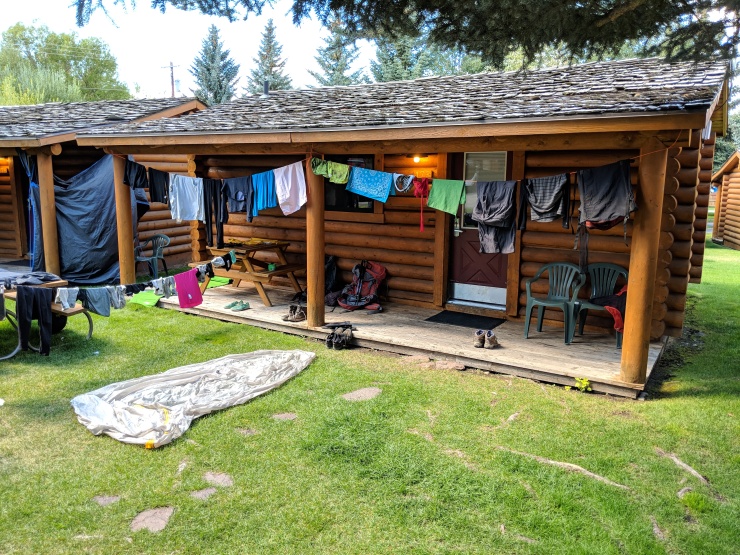
We stayed at the Cowboy Village Resort. It was not the cheapest, but we liked it because we got our own cabin with a patio to dry all our gear. It is also walking distance from the brewery in Jackson.
LikeLike
Love your pictures! What type of camera did you use on the trail? Im debating if I should bring a DSLR camera or not this summer.
LikeLiked by 1 person
Hi Tracy, I just used my smartphone to take the pictures of the Teton Crest Trail. I use a Pixel 2 phone and love the camera. If you are a very serious photographer, the bigger camera may be worth it. Otherwise, new smartphones have really great cameras now!
LikeLiked by 1 person
Was it hard to hitch a ride after you finished the hike? Thinking about starting at the Phillips pass trailhead and hiking the whole teton crest trail but am worries about getting a ride all the way back to Phillips or to Jackson.
LikeLiked by 1 person
We just needed a short ride from Jenny Lake back to the Taggart Lake TH, so hitching was easy. We also only sent one person (without and gear) to get our car and then had him come get us. It would be a little tougher if you need a ride for multiple people plus gear. I think it would be doable to hitch all the way to Jackson. You may get denied a few times, but will eventually find someone. It would be a lot tougher to get a ride back to the Phillips TH. I doubt many people are going all the way there from Jenny Lake. Maybe you can convince a generous person or pay someone $50-100 to do it…
I think it would maybe be a good call to get an uber or taxi out to the Phillips TH the morning you start the hike. Then, you can leave your car in Jackson or Teton Village or wherever you are staying. When you finish your hike, you just need to hitch to town and don’t have to worry about getting all the way back to Phillips! Good luck
LikeLiked by 1 person
Thank you for writing this report it’s helpful. I want to do this trip in August but didn’t get permits. Is it hard to get the walk up permits at the ranger station?
LikeLiked by 1 person
Hi Patty – Walk-up permits for the Teton Crest Trail are quite competitive, especially in August (peak hiking season). If you are relying on getting a walk-up permit, I would be flexible with your dates and get to the ranger station very early (like wait for the office to open) the day before you want to start the hike. It also is probably a good idea to start the hike mid week to avoid everyone who wants to hike Friday-Monday. I think if you do those things, you will have a decent shot at getting the permits you need. The main thing is to not show up at 3pm the day before your hike and think that you will get all the prime camp sites. Show up early, be flexible with the itinerary, and the rangers will try to get an itinerary for you that works.
LikeLiked by 1 person
How was the water access along this trail, wondering how much I need to carry at a time?
LikeLiked by 1 person
Hi Daniel – water access was never an issue for us, so we carried just our 2.5 liter bladders. There was a stream or lake available to fill up at every several miles. The only area of concern was the stretch between Marion Lake and Fox Creek Pass. You want to fill up with water at Marion Lake because there are no streams in this section. Hope you have a good trip!
LikeLiked by 1 person
Would it be easy to visit the grand Tetons and yellowstone in the same trip? My wife wants to drive through yellowstone too if we do the teton crest trail.
LikeLiked by 1 person
Hi Joe – Yellowstone National Park is roughly a 2 hour drive from Jackson and Grand Teton National Park. If you plan to visit both parks, I would say you will either want to visit Yellowstone first or build in a rest day after backpacking the Teton Crest Trail. A rest day would give you some time to explore Jackson, WY and pack up or return your backpacking gear. After that, you could then move on to Yellowstone. Whether you should keep your base in Jackson and just drive to Yellowstone for the day or move hotels to somewhere in Yellowstone probably depends on how long you plan to visit Yellowstone. If you just want to go for a day, maybe just drive there and back from Jackson. If you want to spend a few days, you will want to move hotels to somewhere closer to the attractions in Yellowstone. Hopefully that is helpful!
LikeLiked by 1 person
Your pictures are great… the best collection of pics and maps for the Teton crest trail that I have found. Thanks for putting this report together!
LikeLiked by 1 person
Was lucky enough to snag permits for this hike in early August this summer!! We are going to try to start at Phillips Pass and hike the whole thing to String Lake. Hopefully we don’t run into any snow like you guys did 🙂 🙂
LikeLiked by 1 person
Just want to let people know that the trail is still under a decent amount of snow! As of a few days ago there was snow between Marion Lake and Hurricane Pass and Paintbrush Divide was still snowy. If hiking the teton crest trail soon, be prepared with ice axe and crampons!!!
LikeLiked by 1 person
Thank you for the update Tom. Backpackers without snow experience should probably wait till August before giving the Teton Crest Trail a shot!
LikeLiked by 1 person
Awesome report. i’ll be referencing this when i head to the tetons in mid august. We are gonna try for walkup permits but have a flexible schedule and figure we can try for permits a couple times if we have to.
LikeLiked by 1 person
I just wanted to say thank you for your brilliant report on the Teton Crest Trail. For us Germans your report was the best reference we could find online about the trail. It helped us immensely in planning our trip and knowing what we should expect.
We just finished the trail a week ago as part of our four week roadtrip through the American West (excluding coast) and we just got back to Germany after another few nights at Yellowstone. It was a trail for the ages. We loved it so much! We had perfect weather and the icefields on Paintbrush Divide were almost gone. Just a week or two it must have been totally different.
We actually followed your itinerary as close as possible. We stayed in the same camping zones as you did (Death Canyon Shelf was amazing even though in late August there wasn’t so much water left). The Upper Paintbrush Camping zone was a bit confusing as it was really rocky and it was quite difficult to find a good spot in the lower parts of the Camping Zone. We ended up at a beautiful spot but had to cross 10 minutes of boulders and rocks. Hitchhiking from Jenny Lake to Taggart Lake was quite easy. We were lucky enough to meet a family who was interested in what we had done and the father volunteered to drive us to Taggart Lake even though they had wanted to rent a canoe on Jenny Lake. Other hikers we met needed to hitchhike back to Teton Village, which was much harder I reckon.
Again, thank you so much! We couldn’t have done this trip without your help!
LikeLiked by 1 person
Thank you for the kind words and glad you had a great trip!
LikeLiked by 1 person
Hi,
What were your Trip Dates for your hike?
LikeLike
August 23-28, 2018
LikeLike
Is this trail open in May?
LikeLike
The trail should technically be open, but many of the high elevation areas will be under snow in May. In the Winter/Spring you can still go into the backcountry, but do not expect to cover much ground and be prepared for very snowy conditions and dangerous mountain passes.
LikeLike
Thank you for the very informative and inspiring trip report. Myself and three others will be hiking the Teton Crest Trail over Hurricane Pass and Paintbrush Divide from July 12th to 17th this year, and were wondering if hiking poles would be sufficient to climb over these passes, or if crampons and/or an ice axe would be necessary as well.
LikeLike
Hi Zach – It’s great that you’ll be able to hike the Teton Crest Trail this summer! It’s one of my all-time favorite treks (even though we had some weather issues on our attempt).
I wish I could directly answer your question, but it really will depend on the weather over the next month. My advice is to keep an eye for updates on the backcountry info page (http://tetonclimbing.blogspot.com/) and to give the park rangers a call a week before your trip. The rangers will be able to give you their opinion on what is safe or not.
Also keep in mind that you should be comfortable using crampons and an ice axe if the conditions are still snowy. This means practicing or taking a course or something of that sort. You don’t want to just show up and wing it when crossing a dangerous snow field.
Hope you have a good trip!
LikeLike
Thanks so much for taking the time to assemble this amazing resource. I have spent hours browsing. I am specifically interested in your Teton Crest loop. What year and timeline was it? I am planning a similar hike and I am flying into the area on 7/5/20. I am curious to know if the mountain passes are historically passable at that time. Thanks a million!
LikeLike
I’m glad you have found the site helpful! We hiked the Teton Crest Trail in late August 2018. I can’t speak to the current conditions, but my guess would be that the passes still have some snow on them. You can check for more recent updates here: http://tetonclimbing.blogspot.com/ or could give the ranger station a call.
Perhaps things will have melted out by July 5th – it is hard to predict. I would keep an eye on things and check in with the rangers every now and then. It could be the case that some of the pases are safely hikable on the 5th and some are not (without specialized equipment and training). In that case, you may need to be flexible with your itinerary.
Hope you have a good trip!
LikeLike
Thank you so much for the detailed report!! One thing I haven’t been able to find info on anywhere is, are there campfires allowed at any of the campsites? Of course it would depend on the fire danger in many cases but I just wondered if it is ever allowed in the right conditions.
LikeLike
Hi Bryana – I believe fires are prohibited at the majority of the backcountry campsites. On the backcountry trip planner, the NPS notes “Fires are permitted only at designated lakeshore sites and only in the metal fire rings provided. Keep fires small and do not leave them unattended.” If it is important to your, I would give the rangers a call and verify!
LikeLike
As others have already said, this is an excellent post, thank you very much. I have been using this to prepare for my trip for the last two years almost and I am finally going in August.
I have followed your list of gear/supplies almost exactly and I have two questions.
1. Is there anything you wish you had taken or not taken?
2. This might sound strange, but can you describe how you packed? I have almost your exact set up and I’m having a hard time packing my bag and getting everything to fit well.
Thanks again.
LikeLike
Hi Cathan – We used pretty much all the clothing we brought along as the weather was extremely variable for us (ranging from sunny and hot to snow). Since writing that post, I have mostly stopped bringing along any lanterns or extra lights besides my headlamp. Another item that I skip if I want to drop some weight is the camp chair.
For your second question… packing is always tough, especially when carrying a bear canister. For my pack, I put my sleeping bag and camp sandals in the bottom pocket. Then, I put my filled up BV500 canister in the bottom of the main chamber. If I push it in hard, it fits horizontally in the pack, which helps save space (note you can keep your first nights food out of the bear canister, since you will not be storing those meals overnight). I then pile all the clothing and other loose items on top of the horizontal bear canister. I clip my tent on the outside of my pack, at the bottom in front of the sleeping bag chamber. I also typically clip my sleeping pad to the outside of my pack, usually on one of the sides (and put the water bladder on the other side). I hope that helps!
LikeLike
The grand Teton national park 48 mile loop
Is this trail on All Trails looks like I might be able to get partials of the 48 miles loop from All Trails or is this on Gut Hook or is it on any other apps where I can down load the whole 48 mile loop
I have a Garmin solar instinct and a Garmin in reach explorer i would like to up load it too
Thanks
Andy
LikeLike
This route on Alltrails looks the same as mine, though the mileage is a bit different. https://www.alltrails.com/explore/trail/us/wyoming/granite-canyon-and-teton-crest-trail-loop?mobileMap=false&ref=sidebar-static-map
LikeLike
Hy
I just send an e-mail to you ,before I found that session.
Thanks for your fabious job you did for us.
One question : Is the Teton Crest Trail the same as the Teton Loop ( not the driving one!!)
Sometimes people use Teton Loop for a trail. I am not sure.
We have been there two times and I am planning the loop in 2022,
Thanks for a short answer.
Kindly regards from Norway
Michael
LikeLike
Hi Michael – I’ve found that there is a wide variety of itineraries that are called the Teton Loop. I would recommend looking carefully at the actual routes because the names will not be very descriptive. Almost all the itineraries will include the some portion of the Teton Crest Trail through Grand Teton National Park, but the differences will be in the where the routes start/stop and how much of the Teton Crest Trail you traverse. I hope that helps and hope you have a great trip.
LikeLike
Thanks for the quick answer and your wishes .
Maybe I will come back later with further questions.
Kindly refards Michael
LikeLike
We plan on driving across the country with our dogs and are searching for hikes where we can bring our retrievers. What are the rules in Grand Teton? Are any trails dog friendly? thanks for any leads.
LikeLike
In general, National Parks are not very friendly to dogs. In Grand Teton National Park, you cannot have dogs on hiking trails, even if they are on leash. Basically, you can take your dog anywhere you can take your car within the park. So, your dog is welcome in along the road, in parking lots, at the drive up campgrounds, or in picnic areas.
LikeLike
Hey! Great trip report and stunning pics! What an amazing adventure.
Okay so I know this comment/question is a long shot as this was posted awhile ago but I’m running this route solo (I’m an experienced mountain runner) in September and just curious if you had any cell service ever? Figuring out whether or not to bring my mini inreach. Thanks so much!
LikeLike
Hi! Unfortunately, I don’t remember what the cell coverage was like. It gets pretty remote once you get up onto the Teton Crest Trail, so I would guess the service is bad. I would probably lean towards bringing the inreach simply because, as a runner, you won’t have many backup supplies if you get injured and need to stay a night in the park.
LikeLike