


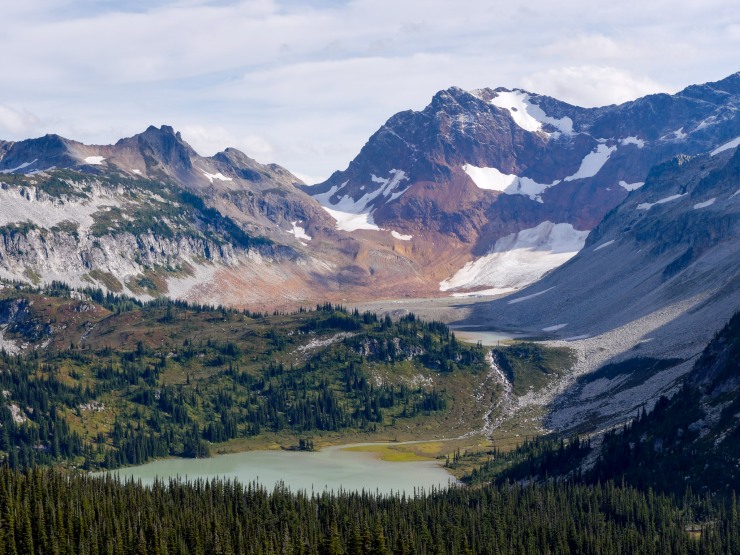
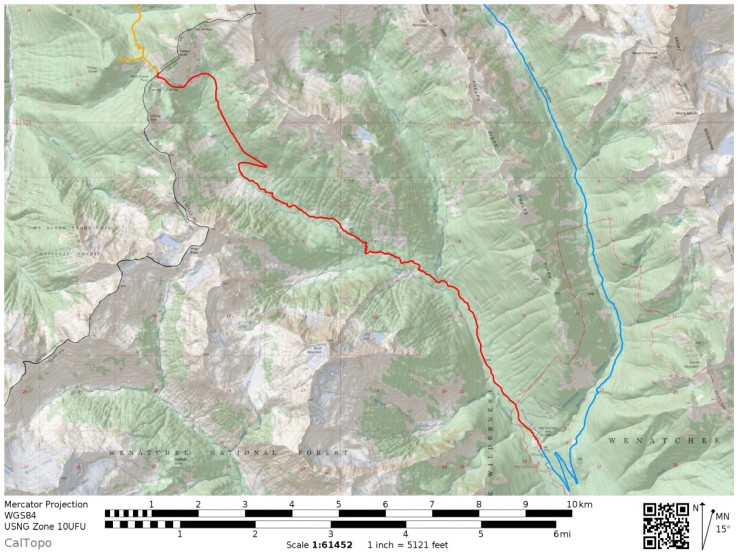
Trip Overview: The ~40 mile Spider Gap – Buck Creek Pass backpacking loop sits within a beautiful section of Glacier Peak Wilderness in the northern Cascade Mountains of Washington state. Over the course of the loop you hike from 2,750 feet of elevation up to 7,070 feet as you go over several ridges and visit multiple lakes. Highlights include glacial-fed alpine lakes, alpine meadows, spectacular views of Glacier Peak, and several small glaciers.
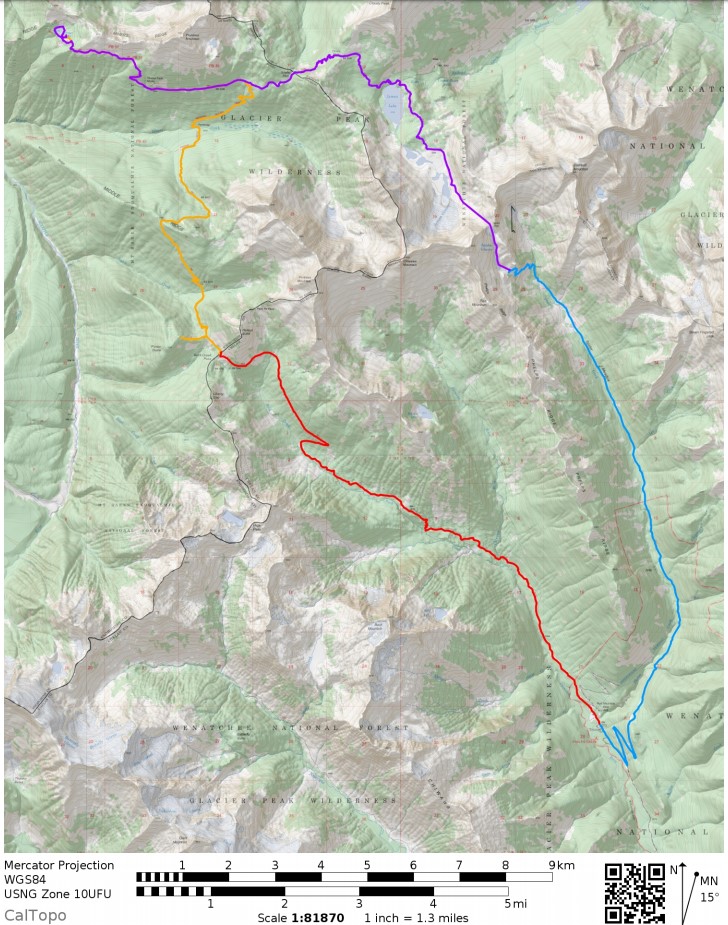
- Higher res version of the overall map for Spider Gap, Buck Creek Pass Loop (PDF)
- Topographic map of Glacier Peak Wilderness for purchase (amazon link)
Jump to Day 1: Trinity Trailhead to Spider Glacier
Jump to Day 2: Spider Glacier to Image Lake
Jump to Day 3: Image Lake to Buck Creek Pass
Jump to Day 4: Buck Creek Pass to Trinity Trailhead
Shop Deal of the Day at REI Outlet (up to 50% off)!
Preparations:
Click here to read more about Permits
Permits: The only permit required to backpack here is related to day use parking fees for the Trinity Trailhead. This fee is $5 per vehicle per day or a valid Recreation Pass works as well. No advanced backcountry permits are required to enter the wilderness here. Backpackers are simply asked to sign in at the trailhead register.
Click here to read more about Logistics
Logistics: Backpackers can start/end this loop from either the Trinity Trailhead or the Phelps Creek Trailhead. These trailheads are separated by ~2.5 miles and are connected by a dirt road. To complete the full loop you must walk these ~2.5 miles along the road either at the start or end of your trek (if you have two vehicles, you could also park one at each trailhead). I prefer the Trinity Trailhead because you can hike along the road towards the Phelps Creek Trailhead to start your trek and then do not need to worry about hiking the road at the end of your trip. The Trinity Trailhead also has restrooms and is near the Phelps Creek Campground if you want to camp near the trailhead before your trek. This campground has 7 tent sites and costs $16 per night.
Click here to read more about Difficulty
Trail Conditions and Difficulty: This itinerary in the Glacier Peak Wilderness is moderate to difficult when hiked in 4 or fewer days. There is a upwards of 10,000 feet of elevation gain over the entire loop, so be prepared for climbing. The peak elevation is just over 7,000 feet, so thin air may be an issue for some. The trails are generally well marked with the exception of Spider Gap. When approaching Spider Gap, you must hike along an unmaintained route and many hikers traverse across the Spider Glacier. In addition the trail can be snowy as you descend from Spider Gap down to the Lyman Lake Basin. Backpackers should be prepared to hike off trail and be prepared to traverse along the surface of the glacier in this section. Some backpackers find microspikes/crampons and an ice ax useful for this section, but others report traversing this section fine without these items.
Supplies: There is not much concern for bears in the Glacier Peak Wilderness so there is not a requirement for bear canisters. That said, rodents and small animals in the area are known to forage through hiker supplies. At the very least, you should hang your food in an ursack to prevent animal issues.
You likely will want bug spray because the mosquitoes can be out in force in certain areas where the snow has recently melted. I prefer a picaridin based spray because it does not damage plastics and synthetic fibers like high concentration DEET sprays do. I also like to pre-treat my clothes and tent with permethrin spray repellent. The permethrin treatment stays on your clothes for up to 7 washes, so it helps reduce the amount of spray you need to put on your skin. In addition, many hikers find trekking poles very helpful in the Cascades since they help your knees on the steep climbs and descents.
Below is a list of the gear recommended for this backpacking trek:
Hiking clothes
- a lightweight hiking rain jacket (North Face Venture 2 Jacket)
- fast drying synthetic hiking pants (prAna Zion Pants)
- a quick drying long sleeve hiking shirt (Columbia Silver Ridge L/S Shirt)
- wool outer socks (People Socks Moreno 4-pack)
- thin blister preventing base socks (WrightSock double layer Coolmesh)
- quick drying synthetic boxer briefs (ExOfficio Give-N-Go)
- Gore-tex hiking shoes (adidas Outdoor Terrex Fast R Gore-Tex Shoe)
Clothes for camp
- wool leggings (Minus33 Merino Wool Kancamagus Midweight Bottom)
- wool base layer shirt (Minus33 Merino Wool Chocorua Midweight Crew)
- warm wool overshirt (Pendleton Long Sleeve Classic-Fit Board Shirt)
- lightweight down jacket (Patagonia 800-fill Down Jacket)
- lightweight camp shoes (Xero Z-Trail lightweight sandal)
Hiking gear
- trekking poles (Black Diamond Trail Ergo Cork Trekking Poles)
- 2 liter hydration bladder (Platypus Big Zip Water Reservoir)
- 65 liter backpack (Osprey Atmos 65 Liter pack)
- water filtration system (Platypus gravity filtration system)
Camp gear
- strong tent with rain-fly (Alps Mountaineering Chaos 2 Tent)
- inflatable sleeping pad (Therm-a-Rest Trail Pro Sleeping Pad)
- sleeping bag (REI Co-op Igneo 25 Sleeping Bag)
- inflatable camping pillow (Ultralight Inflating Pillow)
- lightweight backpacking chair (Helinox Chair Zero)
- lightweight lantern (MPOWERD Luci Outdoor 2.0)
- headlamp (Black Diamond Cosmo Headlamp)
- multi-tool with knife (Gerber MDime Mini Multi-Tool)
- Ursack (Ursack Major bear bag) or bear canister (BearVault BV500)
- lightweight stove (MSR PocketRocket 2)
- lighter (BIC plastic lighters)
- 2 liter pot (GSI Outdoors Halulite Boiler Pot)
- coffee cup (GSI Outdoors Glacier Stainless Cup)
- lightweight spork (Snow Peak Titanium Spork)
- small, quick drying towel (REI mutli towel mini)
Random
- wet wipes (Stall Mates individually wrapped wipes)
- mole skin for blisters (Blister medic kit)
- lightweight trowel (GSI Sanitation Trowel)
- small amount of duct tape for gear repairs
- chapstick and sun screen
Food and drink
- a variety of my favorite dehydrated meals
- electrolyte replacement (NUUN Hydration Tablets)
- quick snacks (Clif Shot Bloks and Clif energy bars)
- instant coffee (Starbucks VIA)
- small plastic water bottles filled with whisky 🙂
……….
Day 1: 9.9 miles; +3,700 feet / -270 feet; Trinity Trailhead to Spider Glacier

Map of the Day 1 hike in the Granite Peak Wilderness (PDF)

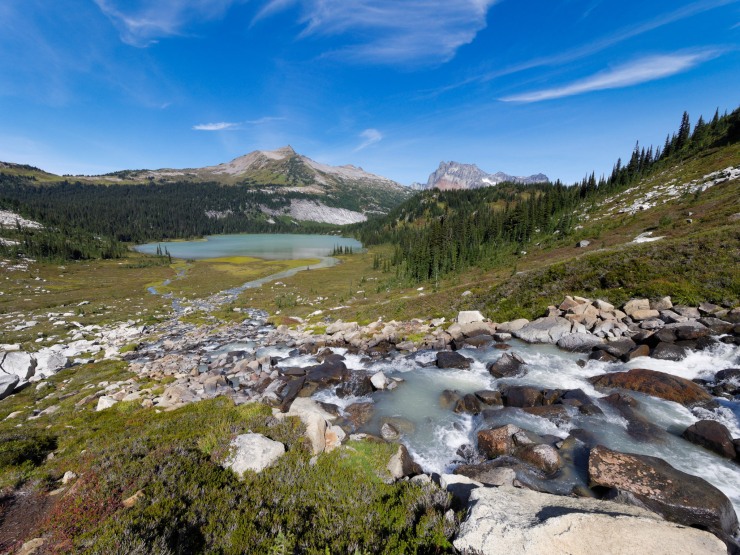
The trek on the first day starts with a ~2.5 mile walk along a dirt road that leads between the Trinity Trailhead and the Phelps Creek Trailhead. This section of the trek is not exciting, so it’s good to get it out of the way at the start. After you reach the Phelps Creek Trailhead, you begin hiking along the Phelps Creek Trail towards Spider Meadow. The trail follows Phelps Creek for roughly 4-5 miles before you reach the meadow. There are several campsites in the Spider Meadow area. For the 4 day itinerary, it is best to continue hiking and camp closer to the Spider Glacier. There are several campsites scattered near the bottom of the glacier. These sites have great views and set you up nicely to climb up the glacier in the morning when the snow is solid. If you are taking your time and doing the loop in 5 or 6 days, you could camp at Spider Meadow and then camp at Lyman Lake the next day.


……….
Day 2: 10.2 miles; +3,540 feet / -3,630 feet; Spider Glacier to Image Lake

Map of the Day 2 hike in the Granite Peak Wilderness (PDF)
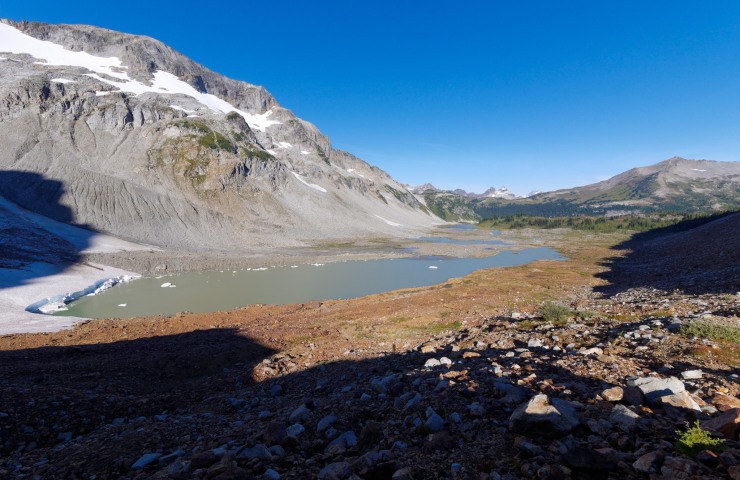
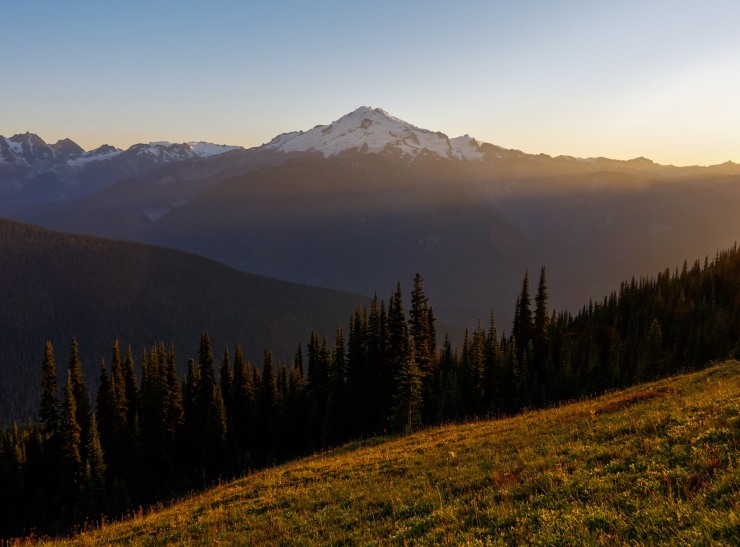
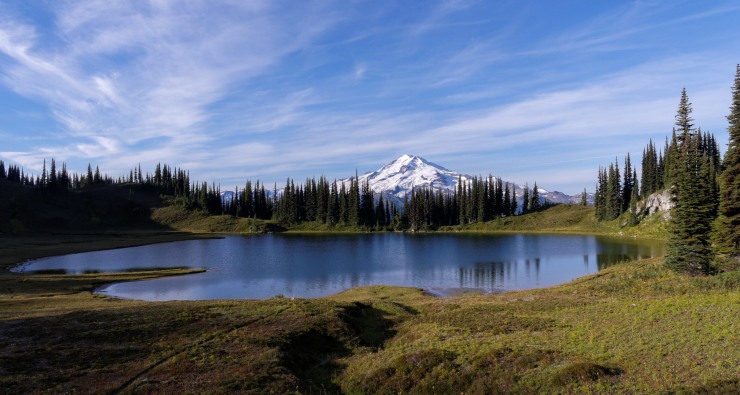
Day two is probably the most scenic day along the Spider Meadow – Buck Creek Pass Loop. You go over three passes (Spider Gap, Cloudy Pass, Suiattle Pass) and see several beautiful lakes. At over 10 miles with 3,000+ feet of elevation gain, this day is tough. Take it slow and enjoy the scenery! You camp next to Image Lake, which has some fantastic views of Glacier Peak. The day starts with a traverse of the Spider Glacier. Microspikes and trekking poles can be helpful in this section. The trail is not defined here, but it is not very difficult to find your way up over Spider Gap and down to Lyman Lake. Hikers just need to be cautious on the snow and avoid sliding, which can be dangerous.


……….
Day 3: 10.1 miles; +3,550 feet / -3,760 feet; Image Lake to Buck Creek Pass

Map of the Day 3 hike in the Granite Peak Wilderness (PDF)

The third day of this loop is another tough ~10 mile hike with a good amount of elevation gain. You hike from Image Lake over Middle Ridge and then up to Buck Creek Pass. Near Buck Creek Pass there are several campsites to stay at for your last night. There are also some worthwhile short side trips you can take. These include hikes to the Flower Dome and to Liberty Cap. Both areas have some very nice views and are not too far from Buck Creek Pass.


……….
Day 4: 9.2 miles; +520 feet / -3,650 feet; Buck Creek Pass to Trinity Trailhead
Map of the Day 4 hike in the Granite Peak Wilderness (PDF)

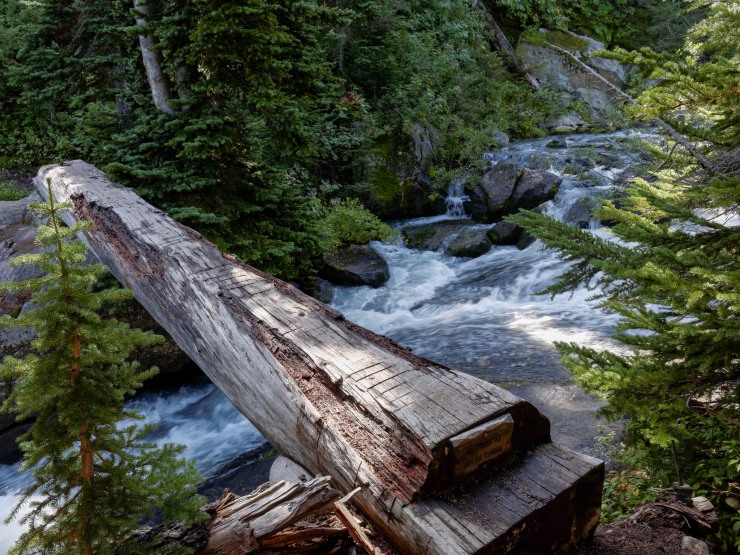
The last day involves a mostly downhill hike from Buck Creek Pass back to the Trinity Trailhead. The almost the entirety of the hike, the trail follows Buck Creek through a forested valley. If you want, you can take the side trip to Liberty Cap or High Pass in the morning before leaving camp at Buck Creek Pass.


Here are some similar trip reports!
The Enchantments Traverse – Alpine Lakes Wilderness (18 mile point-to-point)
Titcomb Basin – Wind River Range, WY (40 mile route)
Cirque of the Towers Loop – Wind River Range, WY (45 mile loop)
Four Pass Loop – Maroon Bells Snowmass Wilderness, CO (28 mile loop)

Really enjoyed this loop but my husband and me thought crampons would have helped on the spider glacier. We were slipping in our tennis shoes.
LikeLike
Thanks for the detailed review! What month did you go in? I’m trying to go in March but I dont know if it is possible then. What do you think?
LikeLike
Hi Rose – The photos in this trip report are from a mid September trip. I would worry about snow in many areas of Glacier Peak Wilderness in March. Your best bet will be to call up one of the nearby ranger stations to get an expert opinion. My gut says it would be a long shot to backpack this loop in March though. The peak season is generally July through September.
LikeLike
Just completed this route. June 24th lots of holding snow only areas with no snow was spider meadow and on the downward. Side of buck creek trail.
It won’t be snow free until mid July at the earliest.
LikeLike
Thank you for the update!
LikeLike
Excellent report! I’ve heard about this route and wanted to learn more about it. Hoping to give it a try maybe in early August. How was campsite selection? Could you more or less camp anywhere or only in designated pads?
LikeLike
You can camp most anywhere along the trail. The only prohibited places are as follows:
Prohibited: Camping within 1/4 mile slope distance from the shoreline of Image Lake or within 200 feet of the shoreline of Holden Lake and Lyman Lake
LikeLike
Best trip report i’ve seen. which trail head did you park at? trying to decide between loop and out and back to image lake. was 2nd half of loop as pretty? hiking back to the other trailhead when you tired sounds terrible but if the loop is worth it i’ll do it.
LikeLike
Hi Jen – We parked at the Trinity Trailhead. The best views are between the Spider Glacier and Buck Creek Pass. Image Lake is more or less in the middle of the loop, so I am not sure doing an out and back saves much effort (unless you have two cars and exit west of Image Lake).
LikeLike
Awesome summary, very helpful! Some friends and I are planning on doing it in a couple weeks. Question for you though: AllTrails among other sources have the loop totaling 43 miles without Lake Image. So you camped at Lake Image, night two, right? Did that additional out and back not add to the total mileage so that it was above 40? And on day three, you had to hike back to the Miners Ridge/PCT intersection, so did that make your day three total above 10 miles?
Thanks!
LikeLike
Hi Michael – Yes, my itinerary includes camping at Image Lake on night 2. My 40 mile number is what I get when I measure the distance of the loop using caltopo.com and the USFS map (including the extra to Image Lake and back). I did not actually use GPS on the route, so I can’t confidently tell you whether it would be 40 miles exactly or 43+ miles as AllTrails says. The mileage listed for each day includes the whole route for that day as measured on Caltopo. So for day three it includes going from Image Lake to Miners Ridge/PCT to Buck Creek Pass (10.1 miles).
In my experience caltopo can miss some switchbacks and underestimate a bit, but personal GPS can bounce around a lot and overestimate. Sorry I can’t be more definitive on the mileage. Sometimes AllTrails is right on and sometimes it’s off, so I always prefer to measure on the map using Caltopo. I guess I would just prepare to hike ~11 miles each day and you will either be right on track or pleasantly surprised if it ends up being on 10 miles 🙂
LikeLike
Hi. Thanks for providing so much info! My friend and I are hoping to hike this loop next week, but both have low clearance sedans and are nervous about getting to the trailhead. Could you tell me if you think the road to Trinity would be accessible with a Honda Civic? Thanks!
LikeLike
Hi Emily – We drove in with our all-wheel drive SUV, so I cannot comment specifically on whether your sedan would be ok. I can note that the rode was rough (at least it was last year) and you are off the pavement for like 10 miles. It may be fine with a sedan at slow speed, but I cannot say for sure either way. Sorry!
LikeLike
Hello! I’m looking to do this trip in August 2021, do I need to purchase passes or reservations for these campsites? Were campsites mostly empty with plenty of space, or should I be concerned about finding spots during peak season? Thanks so much!
LikeLike
The only permit required to backpack here is related to day use parking fees for the Trinity Trailhead. This fee is $5 per vehicle per day or a valid Recreation Pass works as well. No advanced backcountry permits are required to enter the wilderness here. Backpackers are simply asked to sign in at the trailhead register.
If you backpack on a popular weekend with nice weather, you likely will see other backpackers/campers on the trail. You should still be able to find suitable campsites, but maybe there will be some competition for the best sites. It’s best to just build a little flexibility into your itinerary and have a couple potential camping areas in mind for each night. This way if you arrive to your first choice camping area and can’t find a spot, you can just continue on to your backup!
LikeLike
This hike summary is amazing! Great maps, beautiful pictures, and a lot of helpful tips, tricks, and resources in here. Thank you for putting this out here! We’re looking to hike this loop at the beginning of September. Our dog is coming with us, and is also an experienced hiker, but do you recommended any sort of booties for his paws? Just curious because there are so many inclines (and some snow) throughout this trip and I want to make sure he can handle the journey with ease.
LikeLike
Hi Lindsay – it’s a bit hard for me to say because I don’t have much experience backpacking with dogs! I would say the roughest portion of the trail for paws is going to be near the Spider Glacier. The are rocks and gravel before the glacier, there is slushy snow on the glacier, and there there are some more rocks and gravel after you cross the glacier. Other than that section, I think the trail is much more standard.
LikeLike
Do you have any physical map recommendations for this area / hike segment? Thank you in advance!
LikeLike
Hi there! Do you know if there is any campground between Buck Creek Pass and Phelps Creek? Between those 13 miles.
LikeLike
Hello, Sorry – I don’t remember if there were any established campsites along this stretch of trail. It mostly follows the creeks though, so I would guess you can find at least a few sites along the trail that are near water sources.
LikeLike