


Trip overview: ~24 mile out and back backpacking trip starting/ending at Ha’ena Beach Park with a midpoint destination of Kalalau Beach. +/- ~5,000 feet of elevation with a starting elevation of ~20 feet and a peak elevation of ~800 feet.* Highlights include great views of the famous Napali coast along the Pacific Ocean and terrain varying from beaches to tropical forests. We completed the trip over 3 days in August of 2015.
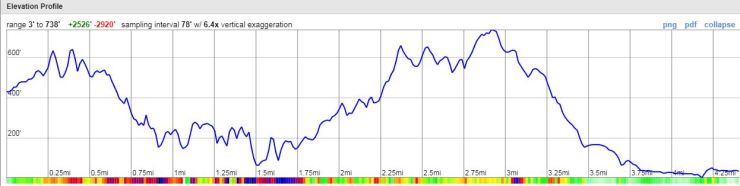
*note: many sites will say the elevation gain of this trek is 600-800 feet, but this is just the difference in elevation between the starting point and the highest point. The trail constantly goes up and down and most reputable sources say the overall elevation change for the round trip is +/- 5,000 feet. So, expect to climb 5,000 feet over the course of the ~22 miles. My GPS data from the trek says the elevation gain is higher than this, but I think the GPS gets confused because the trail is so narrow and close to the ocean.

High resolution topo map of Kalalau Trail (PDF)
Preparations:
Permits: The Kalalau Trail is very popular and permits are required to spend the night along the trail. The cost for non-residents is $20 per night and you can book the permit for the Napali Coast Wilderness Park online. There is a quota for the number of permits each day, so it is best to book months in advance. I recommend getting a permit for at least 3 nights, even if you plan to hike all the way to Kalalau Beach in one day. After reaching the beach, you will want to stay there an extra day and relax/explore and will not want to wake up and hike right back out. We never met any rangers or had our permits checked, but hike without a permit at your own risk…
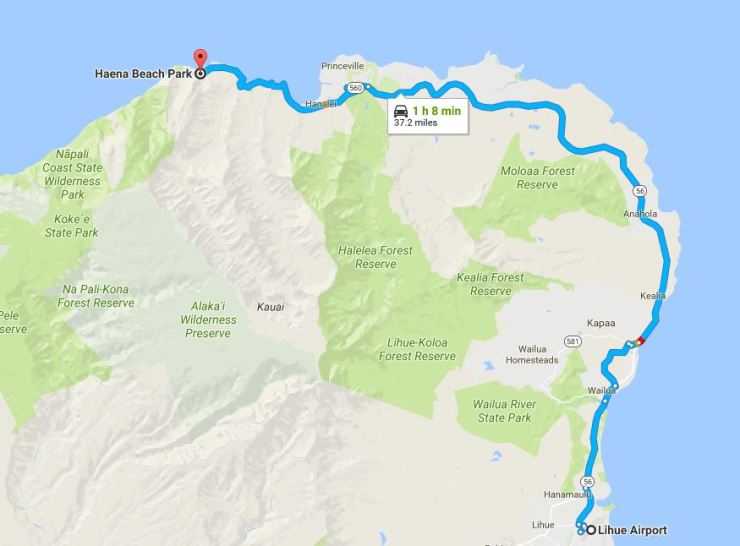
Logistics: Given that you will be flying into Kauai’s Lihue Airport before starting this trek there are few things you must consider. First, you must consider how to get to the trailhead at Ke’e Beach. We chose to rent a car at the airport because having a car is very useful for getting around Kauai and we wanted to explore the rest of the island after our trek.
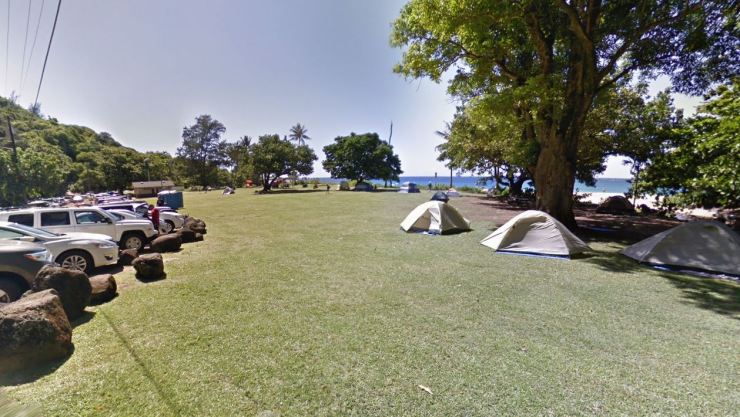
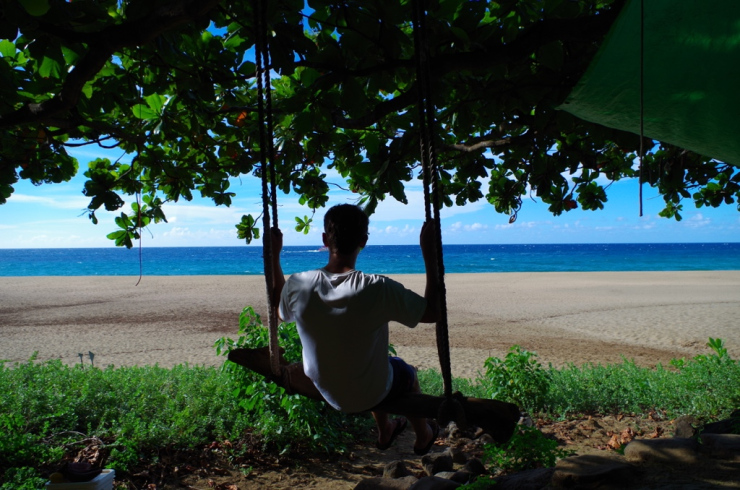
Next, you must decide where you want to stay the night before you start the trek. We chose to camp at Ha’ena Beach Park because it is only 1 mile from the trailhead and would allow us to hit the Kalalau trail early in the morning. The cost of camping at Ha’ena Beach Park is $3 per night and you can reserve a site by mailing in an application with a money order. You can leave your rental car parked at the lot here as well, and we read from multiple sources that this lot is safer than the lots closer to the trailhead. There are apparently frequent break-ins in the area, so it is best to leave no valuables in your car and to park in an area that is lit up at night. The downside of parking at Ha’ena Beach Park is that you must hike an extra mile to the trailhead (hence why I say in the overview that the trek is 24 miles instead of 22 miles).
Supplies: You must also decide where/when you will buy gas for your backpacking stove (assuming you plan to cook), since you likely cannot fly with gas. We chose to buy gas the night we arrived in Kauai so that we did not have to worry about running any errands in the morning before leaving on the trek. Pedal N’ Paddle in Hanalei sells gas as does Kayak Kauai in Kapaa. We actually purchased gas at Sports Authority in Lihue because our flight arrived late and the other stores were closed by then. However, this store is now closed, so you need to plan accordingly and pay attention to store hours. Some specific gear I recommend for this hike are: trekking poles, picaridin bug spray
, permethrin repellent clothing treatment
, and a good pair of water shoes
.
Hiking clothes
- a lightweight hiking rain jacket (North Face Venture 2 Jacket)
- fast drying synthetic hiking pants (prAna Zion Pants)
- a quick drying long sleeve hiking shirt (Columbia Silver Ridge L/S Shirt)
- wool outer socks (People Socks Moreno 4-pack)
- thin blister preventing base socks (WrightSock double layer Coolmesh)
- quick drying synthetic boxer briefs (ExOfficio Give-N-Go)
- Gore-tex hiking shoes (adidas Outdoor Terrex Fast R Gore-Tex Shoe)
Hiking and camping gear
- strong tent with rain-fly (Alps Mountaineering Chaos 2 Tent)
- inflatable sleeping pad (Therm-a-Rest Trail Pro Sleeping Pad)
- sleeping bag (REI Co-op Igneo 25 Sleeping Bag)
- inflatable camping pillow (Ultralight Inflating Pillow)
- lightweight backpacking chair (Helinox Chair Zero)
- lightweight lantern (MPOWERD Luci Outdoor 2.0)
- headlamp (Black Diamond Cosmo Headlamp)
- multi-tool with knife (Gerber MDime Mini Multi-Tool)
- lightweight stove (MSR PocketRocket 2)
- lighter (BIC plastic lighters)
- 2 liter pot (GSI Outdoors Halulite Boiler Pot)
- coffee cup (GSI Outdoors Glacier Stainless Cup)
- lightweight spork (Snow Peak Titanium Spork)
- small, quick drying towel (REI mutli towel mini)
Random
- wet wipes (Stall Mates individually wrapped wipes)
- mole skin for blisters (Blister medic kit)
- lightweight trowel (GSI Sanitation Trowel)
- small amount of duct tape for gear repairs
- chapstick and sun screen
Food and drink
- a variety of my favorite dehydrated meals
- electrolyte replacement (NUUN Hydration Tablets)
- quick snacks (Clif Shot Bloks and Clif energy bars)
- instant coffee (Starbucks VIA)
- small plastic water bottles filled with whisky 🙂
Weather and Trail Conditions: Lastly, you must make sure that the trail is open on the day you plan to start the trek. You can check the trail status online; if the trail is closed, there will be a red notification at the top of the page (there will also be a sign at the trailhead). The trail tends to close after a large storms because the rivers swell and become impassable. If you check the weather before you go and it looks stormy, it is wise to proceed carefully!
Difficulty: Simply put, this trail is a difficult hike (though the difficultly is affected by how much rain has fallen recently). There is a lot of elevation change and the trail is often slippery and muddy due to frequent rain. If you plan to hike all the way to Kalalau Beach in one day, I recommend leaving very early in the morning. This will give you plenty of time and will also get you through the first ~3 miles of trail before all the day hikers arrive. If you are afraid of heights and slow to ford streams, then plan for the hike to take you a significant amount of time!
Shop Sale & Clearance Items at REI.com (up to 50% off)!
Day 0: renting a car, driving to buy gas, and driving to 1st night campsite.
Once we arrived at Lihue Airport, we went ahead and picked up our rental car. Then, we drove to Sports Authority (now closed!) to buy some butane gas for our backpacking stove. Finally we proceeded to drive up to Ha’ena Beach Park.
Unfortunately, we arrived in Kauai during a large rain storm in which it had rained ~2.4 inches a couple days before we arrived and the trail had been closed the previous couple days. It only rained ~0.2 inches the night we arrived, so we were hopeful that the trail would be open by the next morning.
Much to our surprise, we found that the road was flooded by the rushing Manao Stream about 0.1 miles before Ha’ena Beach Park. There were some police officers there who advised us not to try to drive through the stream, so we were forced to sleep on the side of the road rather than at the park. This was the first in a series of setbacks…
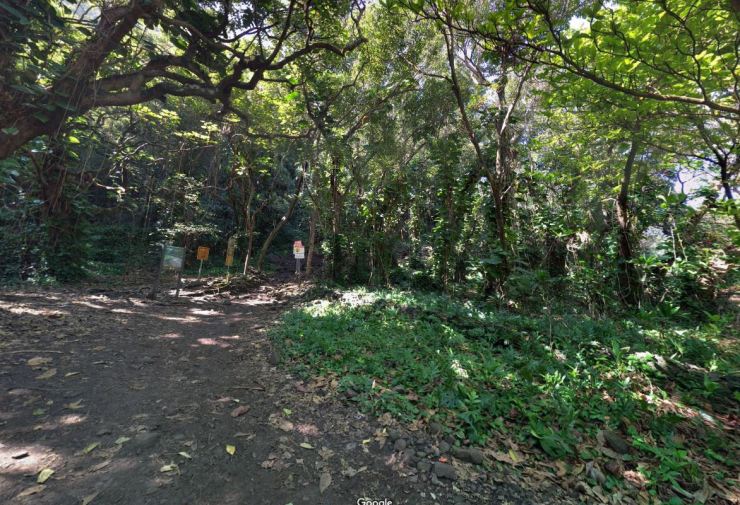
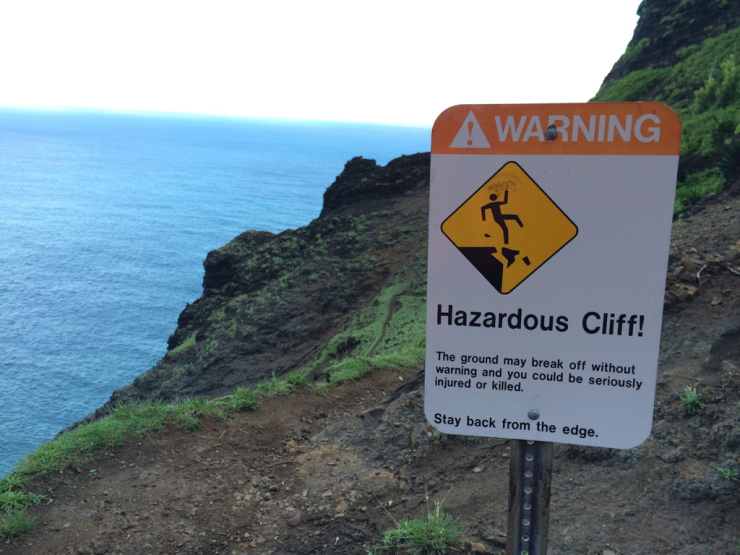
In the morning, we drove across the somewhat less rushing stream and made it all the way to the trailhead at Ke’e Beach. Unfortunately, we were met with the following sign saying that the trail was closed.

Other hikers were waiting at the trailhead, and no one really knew what was going on. We decided to just go back to Ha’ena Beach to freshen up after sleeping in the car. While there, we talked to some park employees who advised us not to hike and said the trail would be in bad shape since it rained a lot that week. Of course we ignored them and decided to hike to the trailhead leaving our rental car at Ha’ena.
After waiting around at the trailhead for an hour or two, a park employee finally removed the trail closed sign and everyone began to hike. Apparently they send a park employee to hike the first 2-3 miles up to Hanakai’ai stream and check the level of the water in the stream. The employee then reports whether the stream is passable and they open the trail if the stream is passable (or keep it closed if not).
Of course we were happy that the trail opened, but we were starting the trek at ~10:00 am instead of 8:00 am as planned.
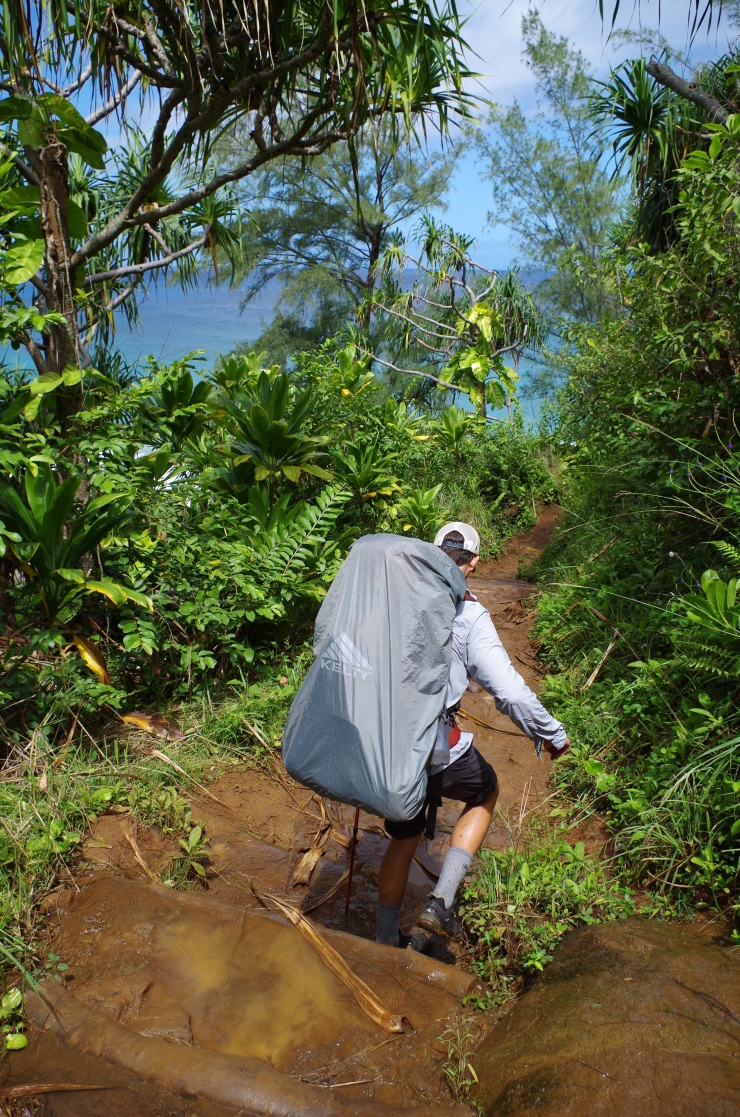
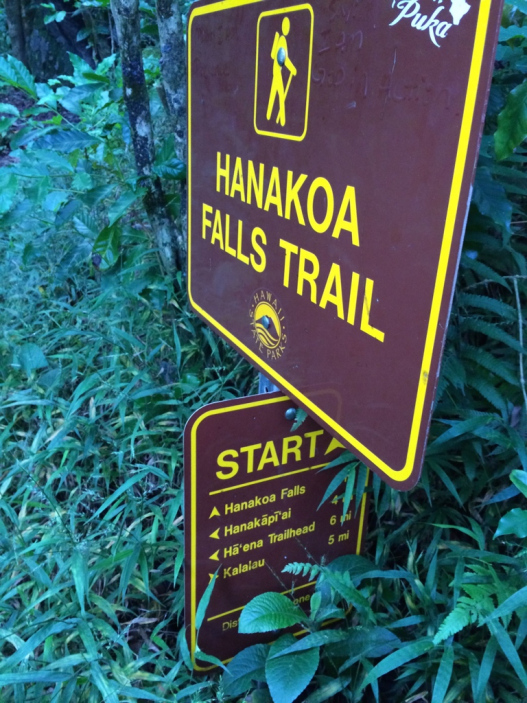
Day 1: ~7 miles; +1,500 / -1,000 ft; Ha’ena Beach Park to Hanakoa Camp.
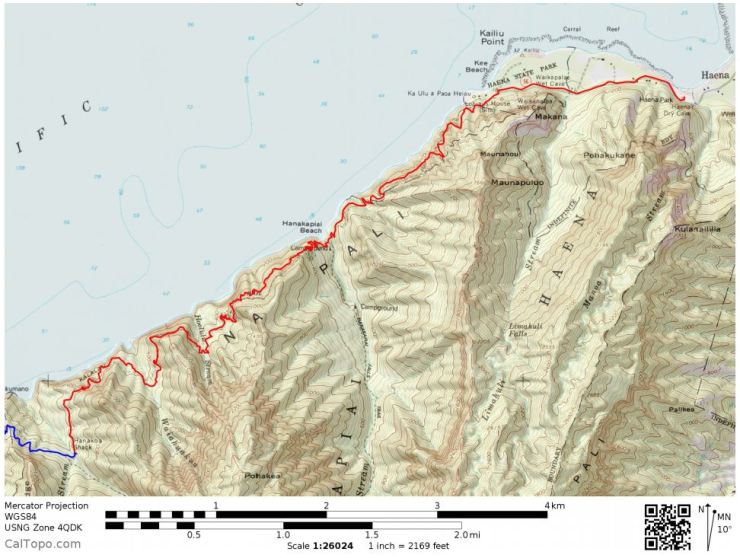
Kalalau-trail-backpacking-day-1-map (PDF)

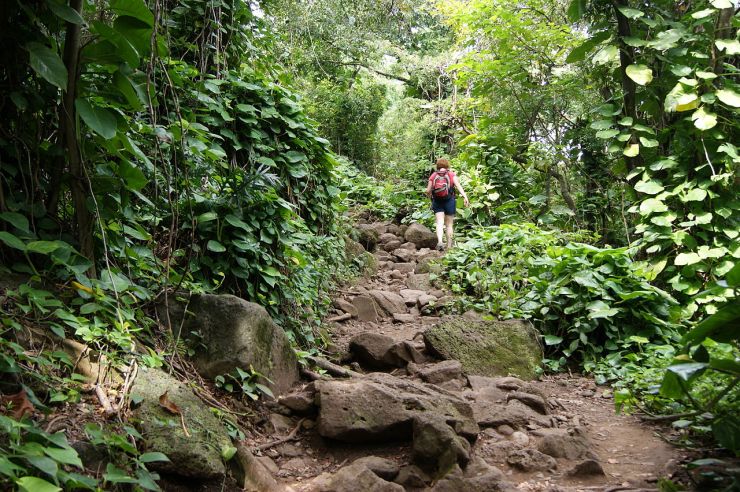
The first few miles of the hike are popular and there are lots of day hikers. I strongly advise starting early to avoid the day hikers. Many day hikers wear flip-flops and are entirely unprepared for the slippery and steep trail. We got stuck behind a lot of these people and it really slowed us down.
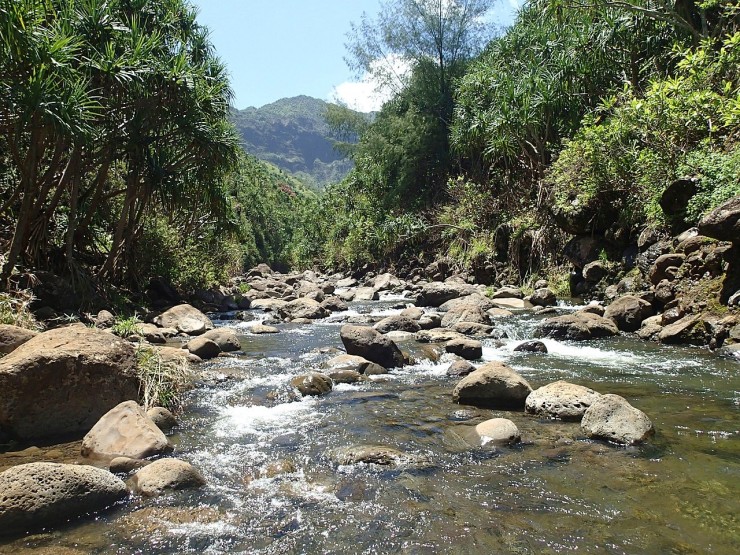
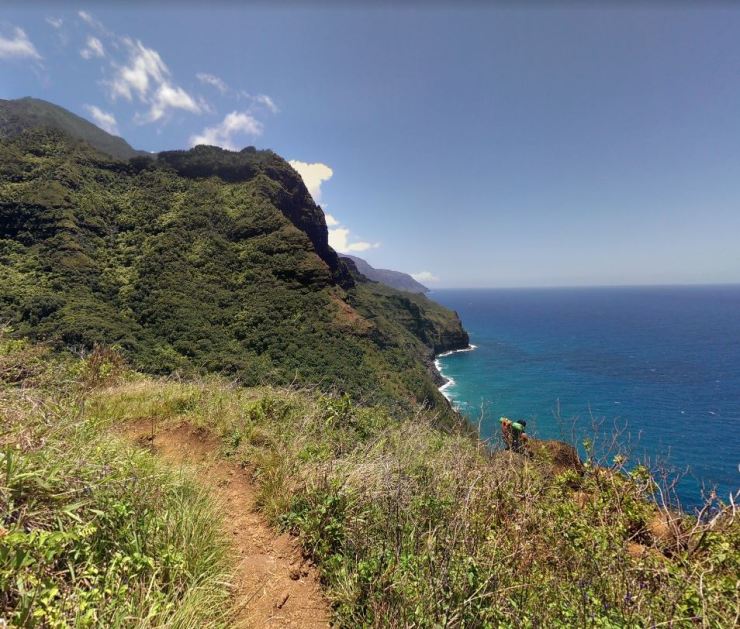
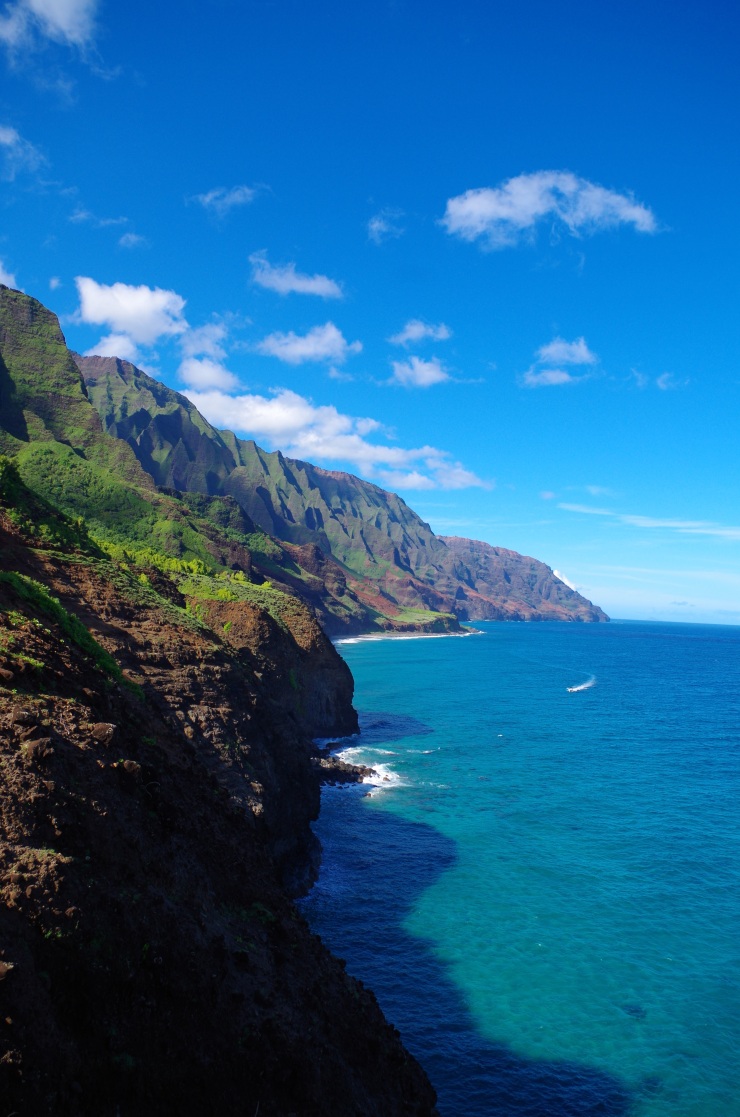
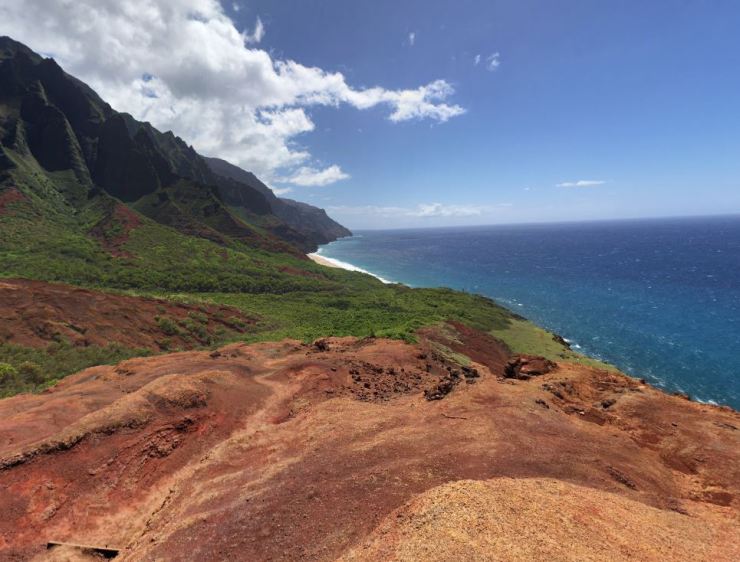
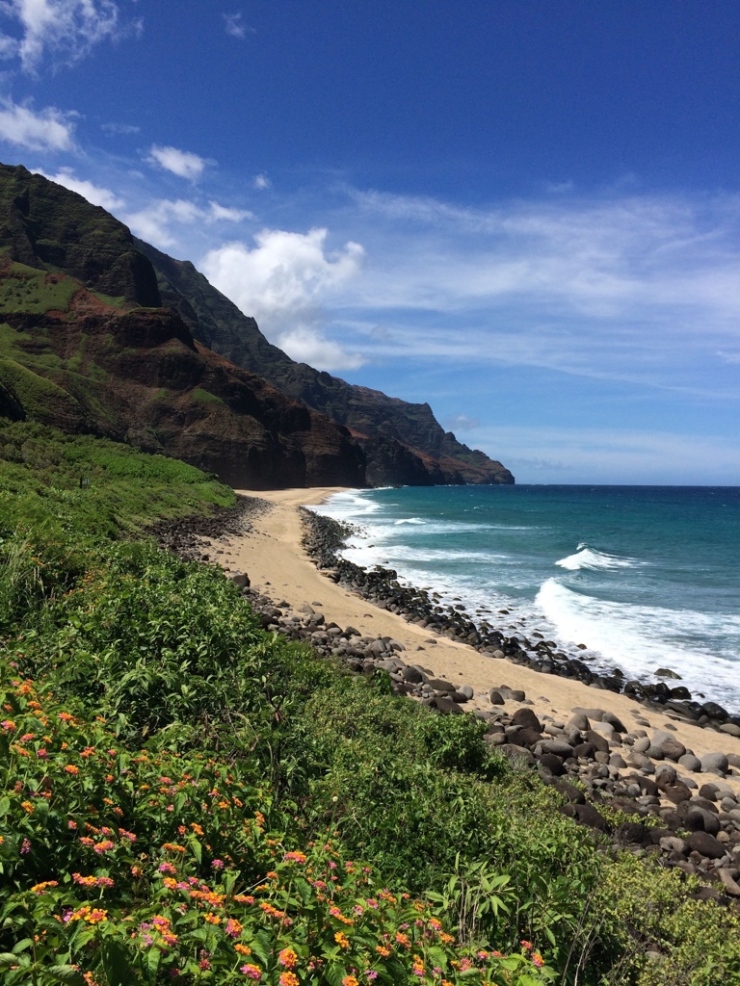
The first mile of the trail is a fairly steady uphill climb up. After a bit of the climb you are treated to your first views of the coastline. Then you begin the descent down to Hanakapi’ai Stream for the first stream crossing.


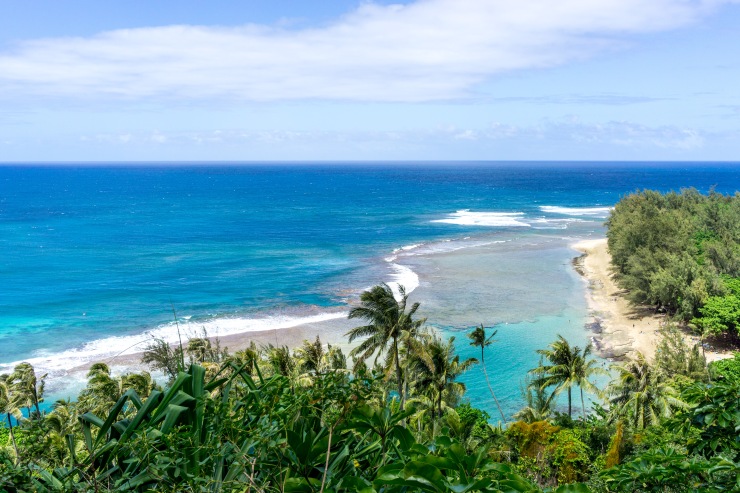
The first views of the coastline after the initial climb.


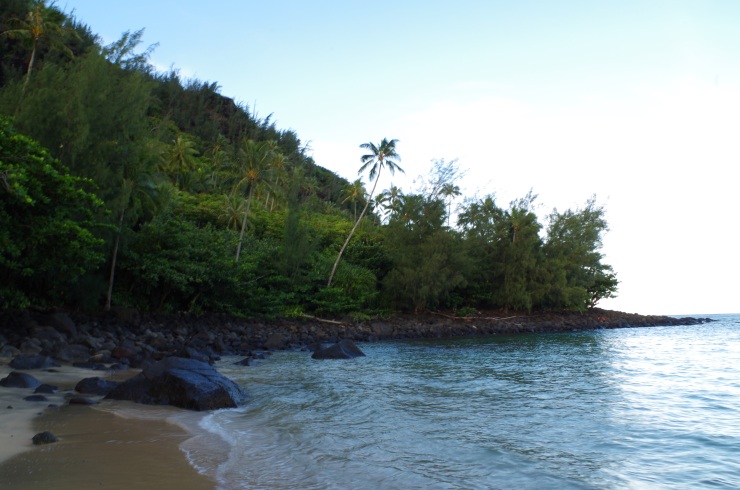
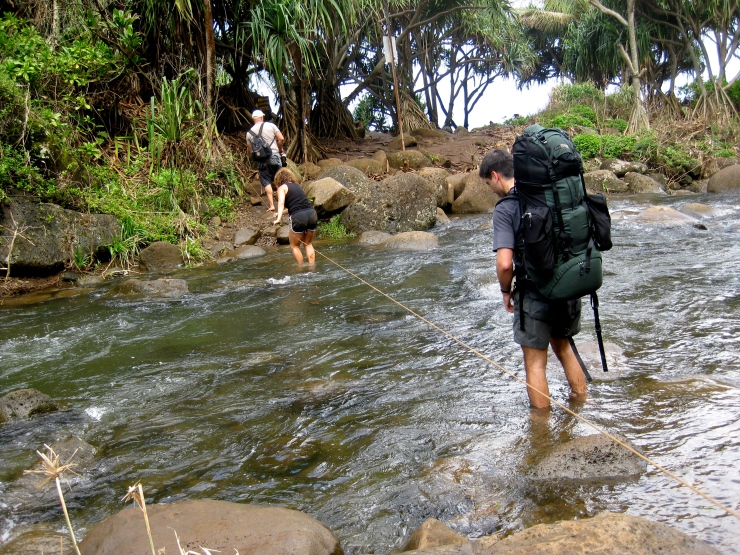
As you approach the stream and beach, you are treated to a variety of warning signs telling you not to swim in the water and to ford the stream with caution. The stream swells significantly after rain, so definitely be advised. Day hikers occasionally get stranded across the stream after storms and need to be airlifted from Hanakapi’ai Beach. This is not so much a concern with backpackers though, because they have supplies to filter water and stay the night and cross the stream the next day. The main point is just to not cross the stream when it is swelled and dangerous. On the day we crossed the stream, it was high enough that we had to take off our shoes and wade through knee-to-waist high water. After crossing the stream, we took a short break at Hanakapi’ai Beach.


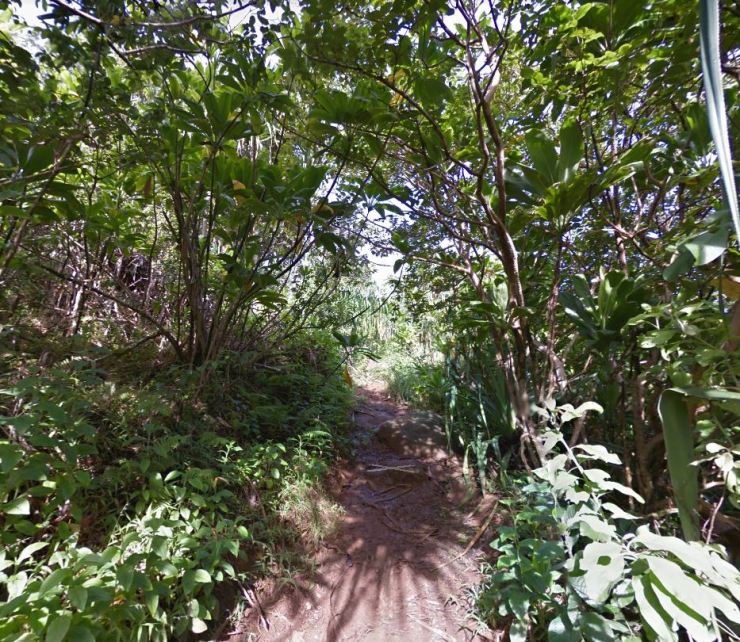


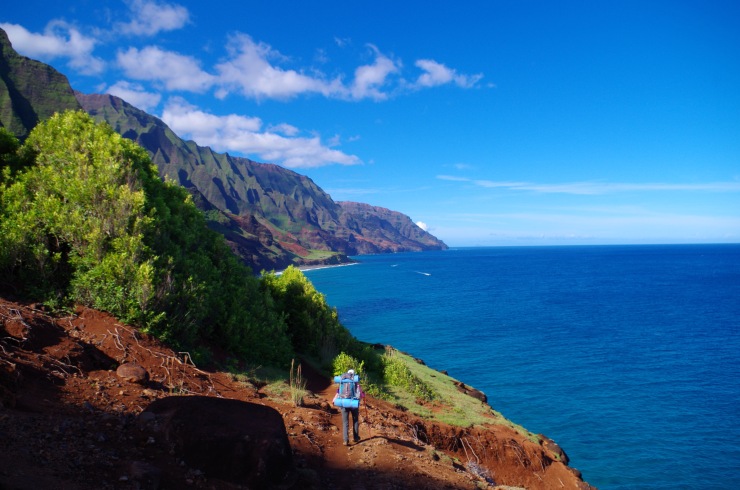
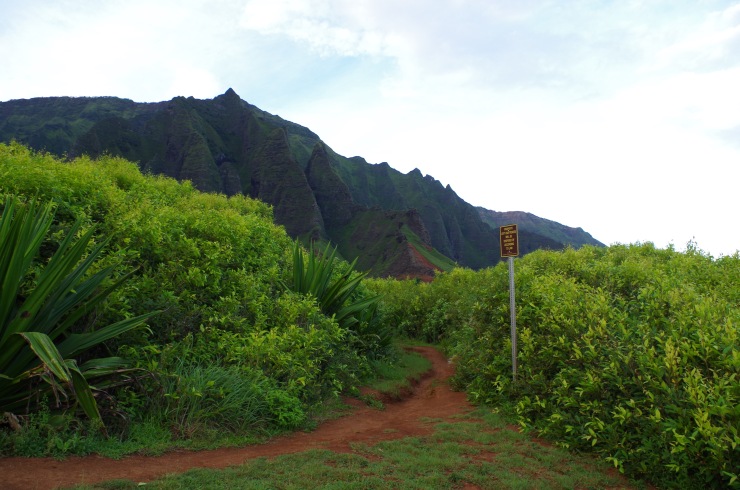
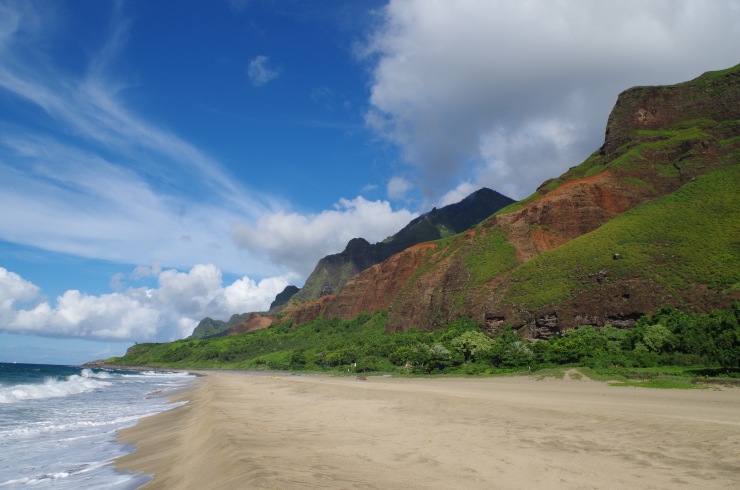
As you continue along the trail, there are fewer hikers because most people stop and hang out at Hanakapi’ai Beach. Some day hikers go to Hanakapi’ai Falls, but most stay at the beach and then head back. The trail from here on out alternates between hugging the coastline and going through the rain forest. About another mile past Hanakapi’ai Beach you will cross a sign that marks the point where you need a permit to continue hiking. After this point you likely will only encounter backpackers or Kalalau Beach locals who are getting supplies for their camps.


You then hike across the valley and meander through some forests.
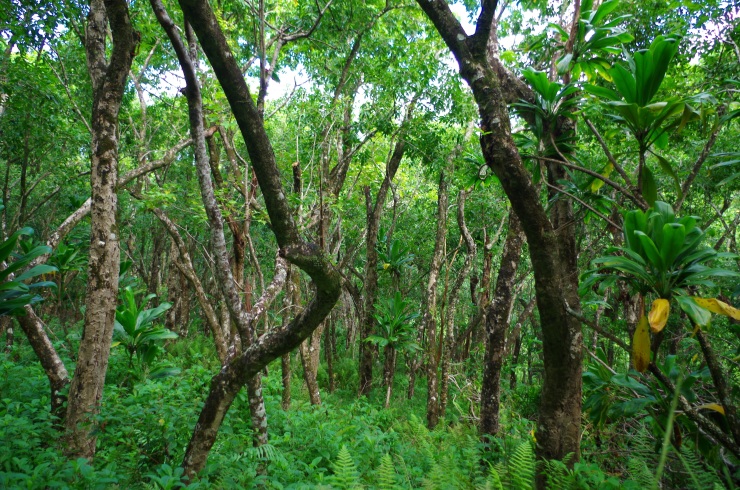


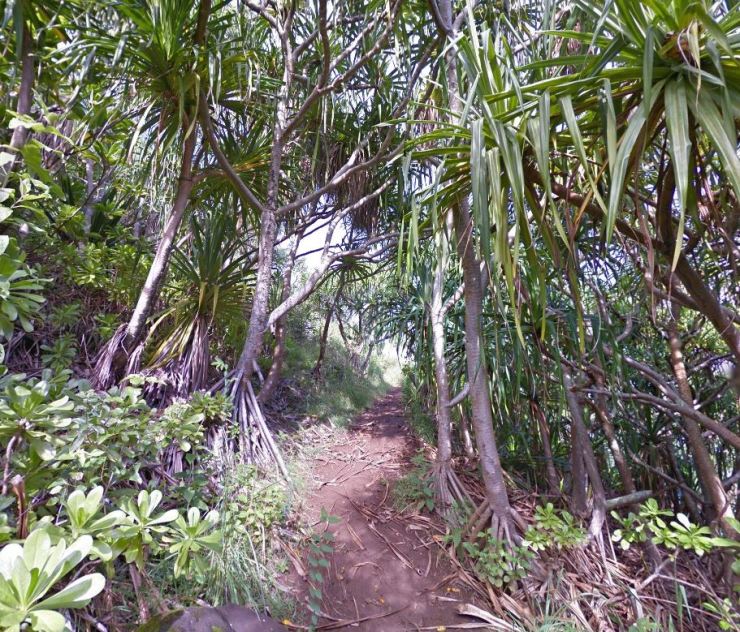
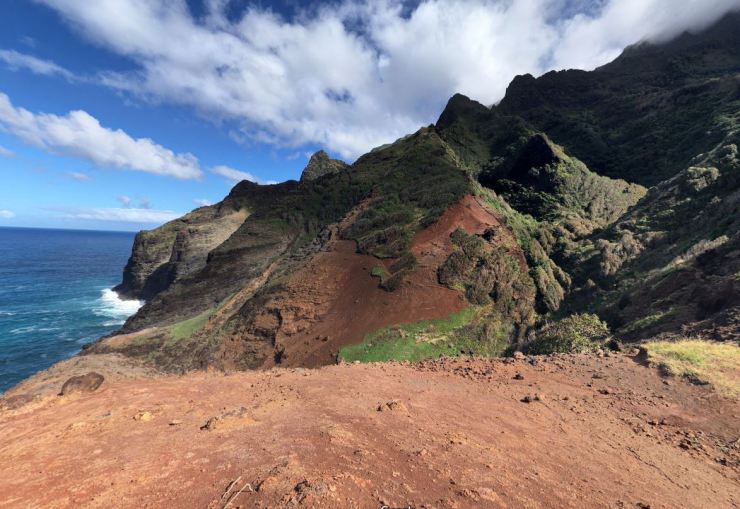
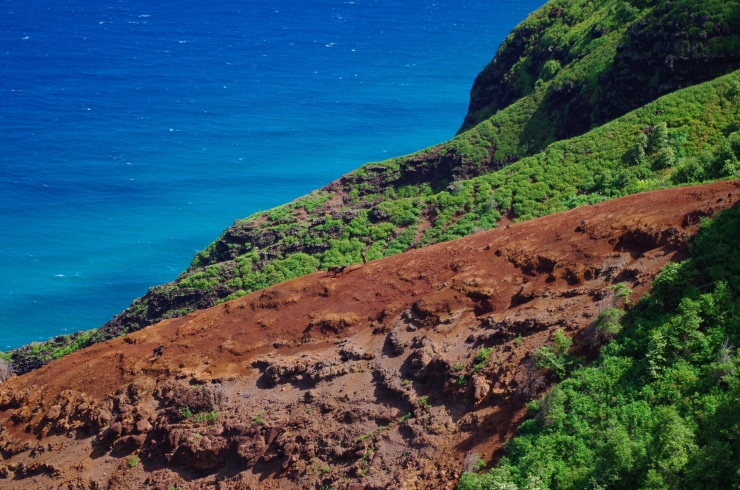
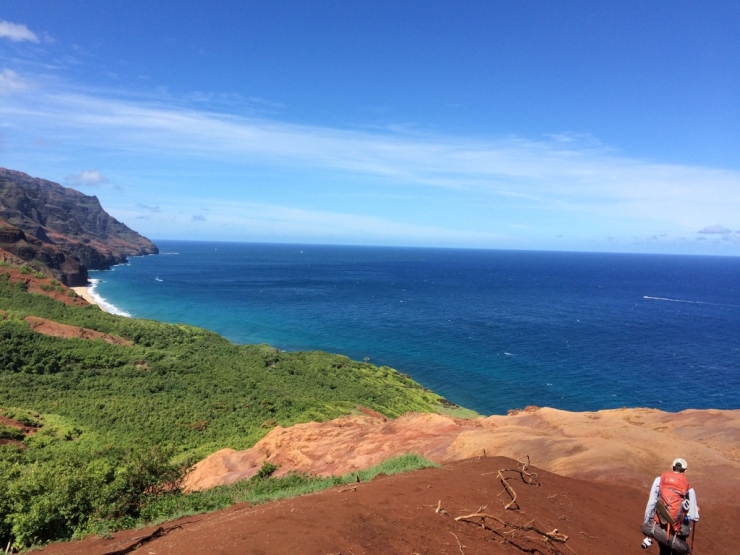
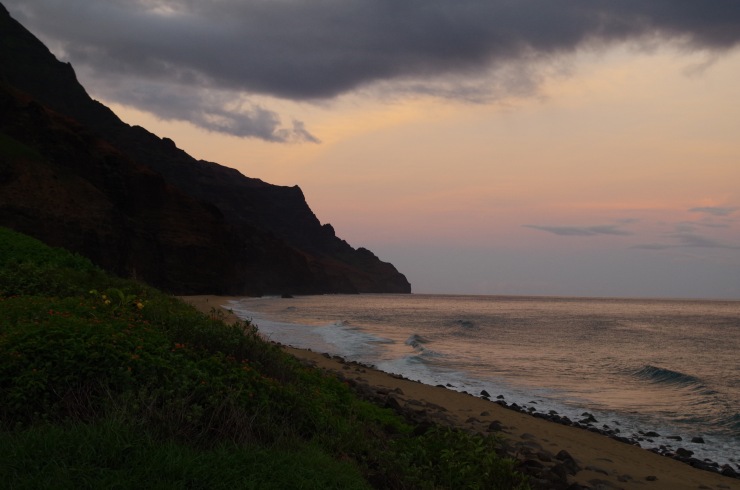
After hiking through the forest for a bit, you emerge back along the coast and get some more very nice views as you make the hike towards the Hanokoa camping area.


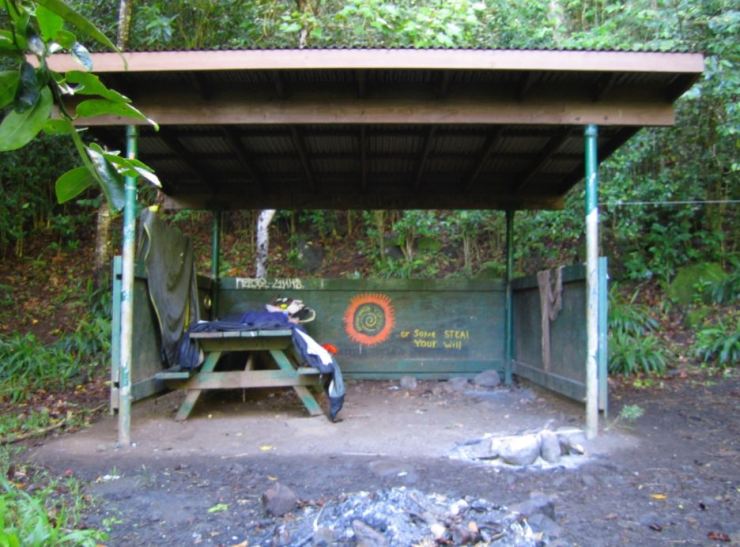
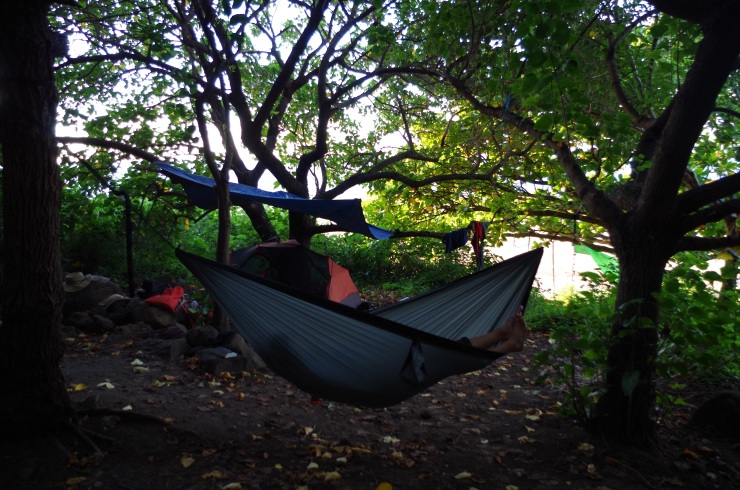
Our pace on the hike was much slower than we expected, so we decided to stop at Hanakoa and spend our first night there. It was getting a bit dark and we did not want to hike the more dangerous steep slopes ahead when it was dark out. Hanakoa felt like it was in a jungle and there were mosquitoes everywhere. If you can make it to Kalalau Beach in one day, I would strongly advise it. There is a stream at Hanakoa that you can get water from or rinse off in. But, you will be attacked by bugs the moment you take your clothes off to rinse. There is also a shelter to cook or eat in, and there is a composting toilet. However, everyone we spoke to at the camp was in a similar situation to us and had hoped to get to Kalalau Beach but ran out of energy and day light. Most everyone just cooked and ate in their tents to avoid the bugs. Simply put, Hanakoa is not really a desirable place to camp… it is just a midway point.


Day 2: ~5 miles; +1,000 / -1,500 ft; Hanakoa Camp to Kalalau Beach.
The next morning we woke up at 6:00 am and began hiking so we could maximize our time at Kalalau Beach.

Kalalau-trail-backpacking-day-2-map (PDF)
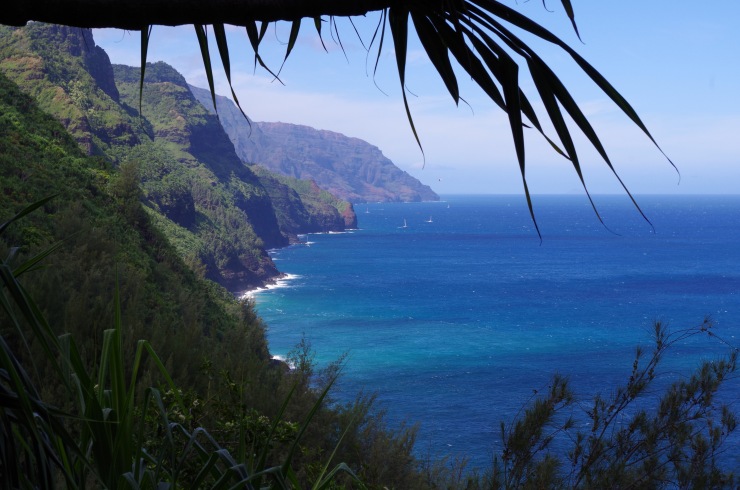
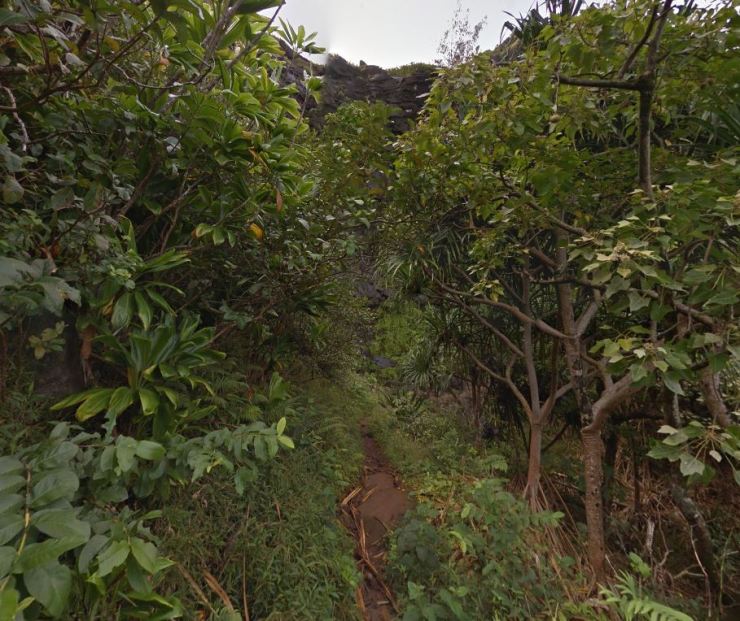
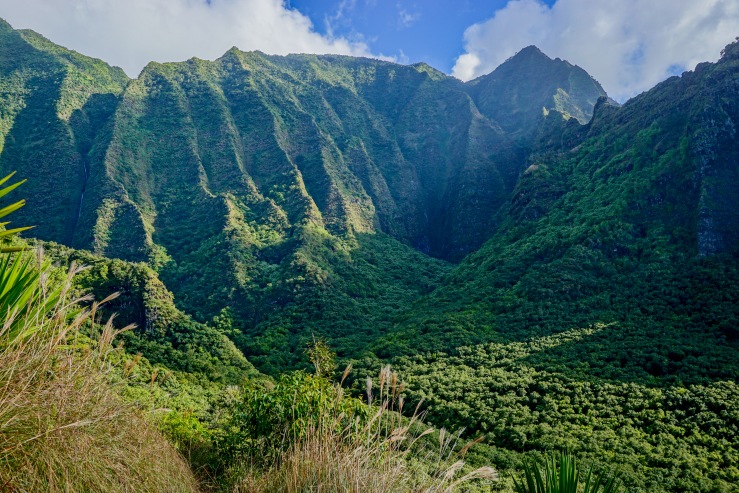
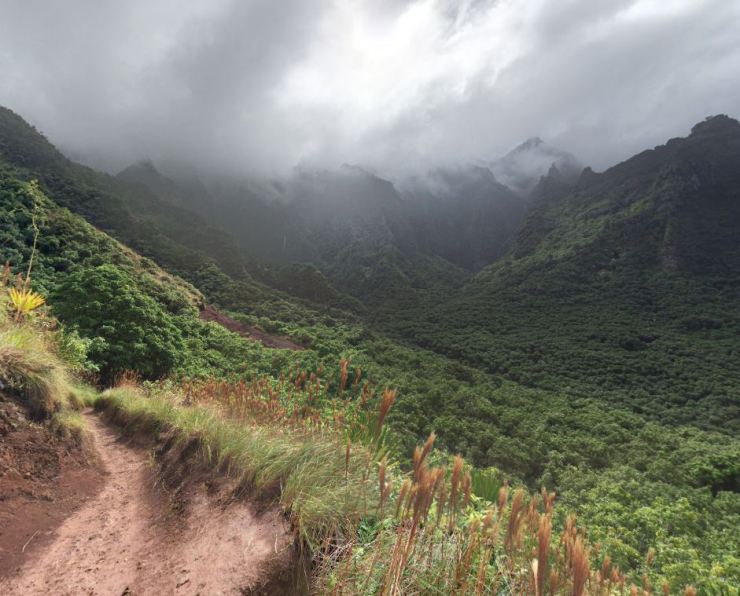
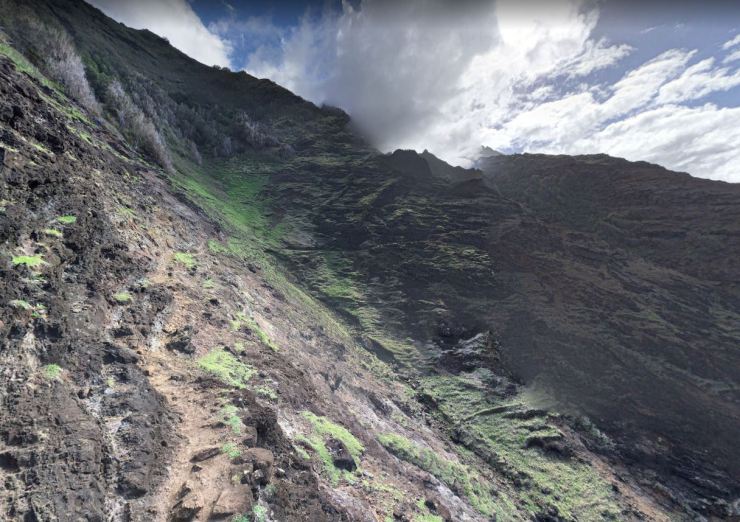
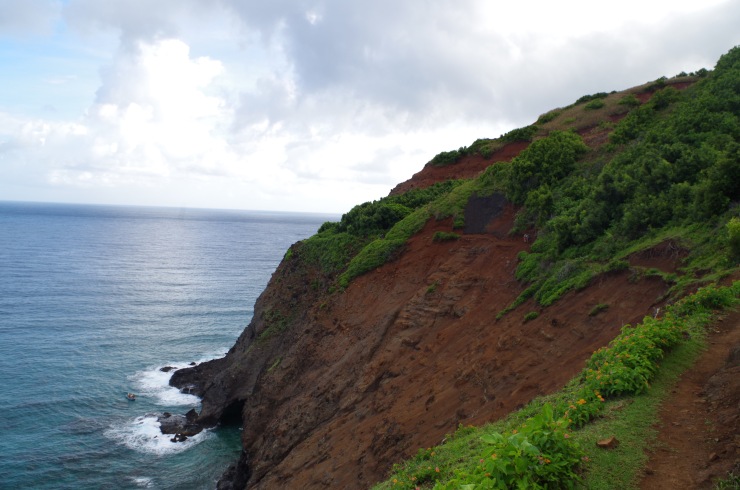
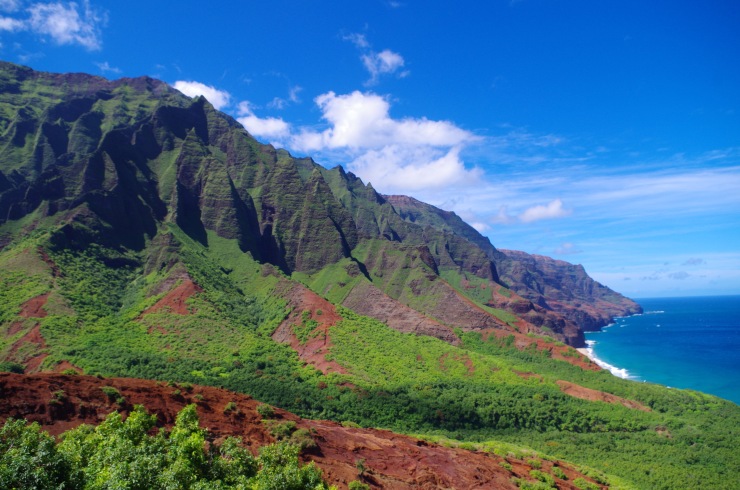
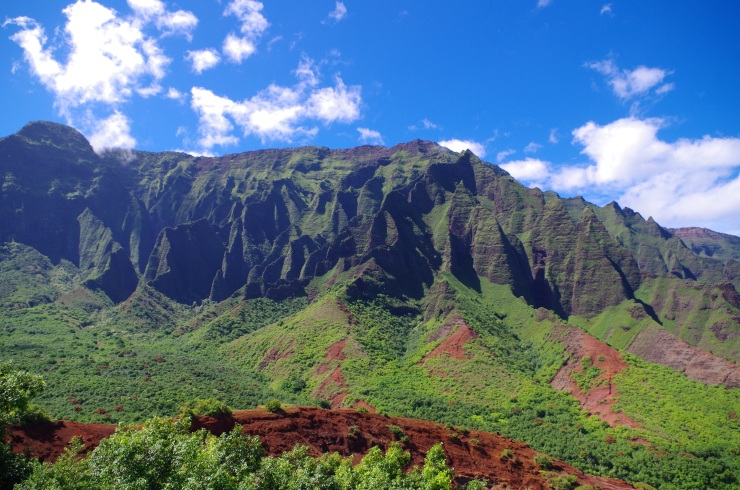
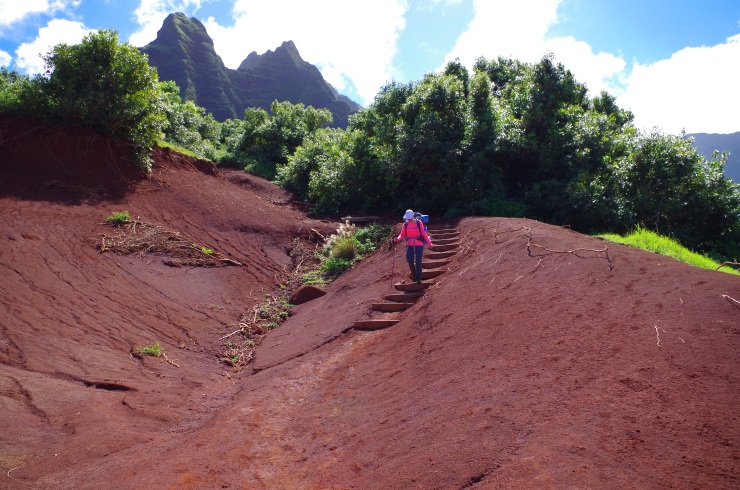
This section of the hike was the most scenic in my opinion. Less of the hike is in the trees and you see the first close-up views of the amazing backdrop behind Kalalau Beach. Some sections of the trail (the infamous Crawlers Ledge) are very steep here, but are manageable if you take your time. At first you need to hike out of the jungle area around Hanakoa. Once you get out of the trees, the views really open up!


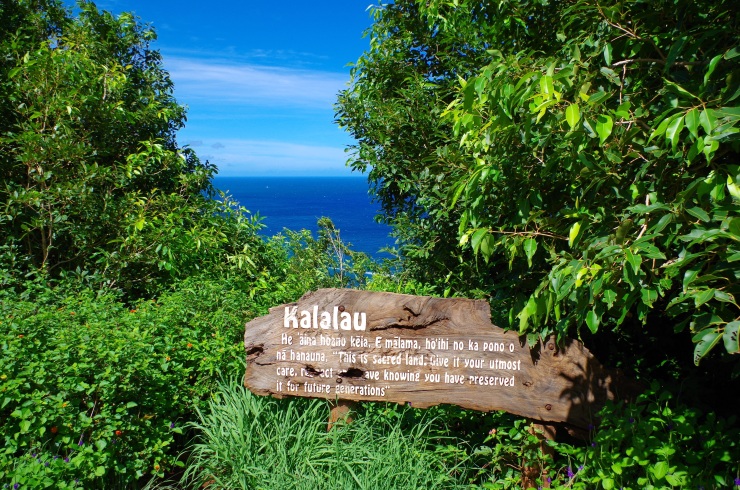


You will reach a sign the welcomes you to the Kalalau Beach area. From here you have a bit more hiking before reaching the actual beach. Along the way you will see some signs designating camping areas. We ended up camping near the waterfalls on the ocean side of the trail. Make sure you camp in a site that is already well developed and do not try to make your own site. Also, make sure not to camp in the areas with signs warning of falling rocks. These sites make look nice, but the warning signs are there for a reason.
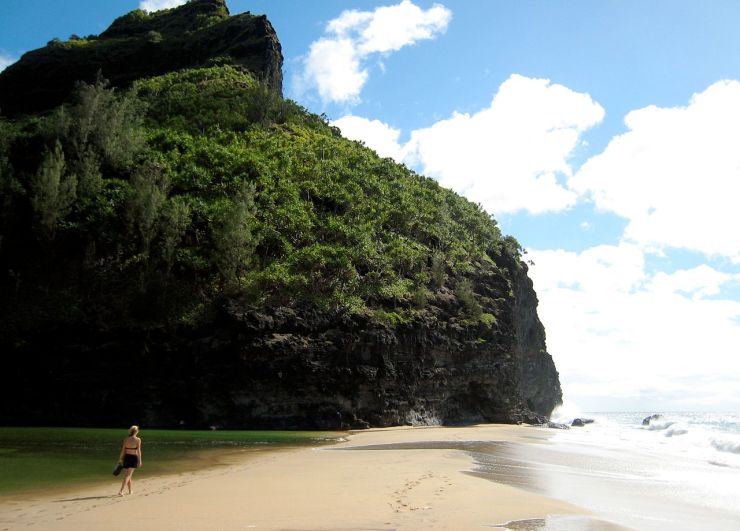
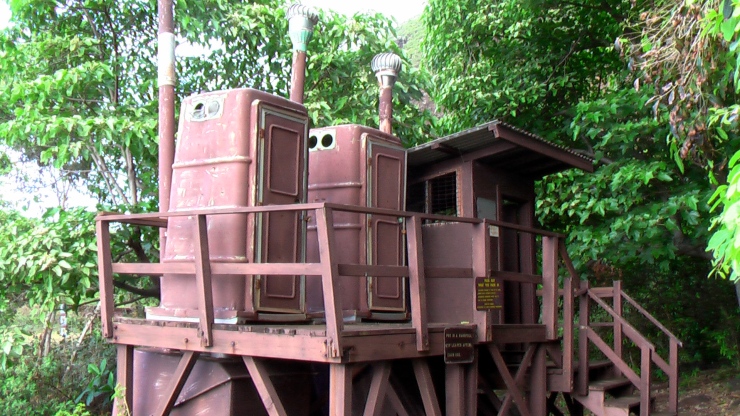
At the beach you can get water from the waterfall and also use the waterfall to rinse off and bathe. There is a composting toilet in the trees, but it was not in the best condition… The beach is beautiful and has an interesting mix of inhabitants. There were both backpackers from all over the world and locals who seem to have near-permanent residences on the beach. Everyone we met was very nice, and I would recommend staying at least two nights at the beach.
There is plenty to explore in the area. There are additional trails to do day hikes, you can walk to different areas of the beach, and you can even swim to the more secluded Honopu Beach (we did not do this because it requires and open water swim in the ocean…). Overall, you will not be disappointed or bored.


Day 3: 12 miles; +/- 2,500 ft; Kalalau Beach to Ha’ena Beach Park


On our last day, we woke up early at 5am and began hiking. We had to make it all the way to Ha’ena today, so we hiked with a little more purpose. It had not rained a significant amount in the last 3 days, so the trail was in decent shape. Thus, we were able to hike a bit faster and made it to the end of the trail before dark.
On the hike out we carried much less water than we did on the way in, since we now knew that you crossed streams every couple miles. This helped lighten our packs. As you hike out, you will get lots of interesting looks from day hikers who wonder why you are so dirty, smelly, and tired. You can just explain to them that you hikes all the way to Kalalau Beach and they will be highly impressed.
When we made it to the Ke’e Beach trailhead, we took our packs off and stretched. I went to get the rental car at Ha’ena, while my wife watched our supplies at the trailhead. I drove to Ke’e, we packed up, and then we headed to our hotel to have a drink and take a well deserved hot shower. Sometimes there is a van selling shave ice to Ha’ena Beach, so this is a nice treat at the end of the hike!

It’s a typo. They happen. Thanks for pointing it out.
LikeLike
Nice review, thanks for posting. Your description makes Crawler’s Ledge sound do-able. Some accounts make it sound pretty risky. I’m curious because I would love to do this hike with my elementary school aged kids. They are all good hikers and love a challenge, so they’d be up for the distance and are usually more sure-footed than me in mud and such. BUT of course I don’t want anyone falling to their death off a cliff…. any advice?
LikeLike
That’s a tricky one. There are certainly areas where you can die if you fall off the trail. If you bring kids, you certainly would want to keep them close and be sure they don’t rush or race or mess around.
LikeLike
Crawlers ledge wasn’t anything like I hyped it up to be. Granted it was in great condition that we went on. If it’s windy or raining I would be a bit more nervous. Otherwise I definitely think it’s doable, just be mindful and cautious.
LikeLike
Wow what an amazing hike! Thanks for the detailed review. I’m planning on doing Kalalau next year with my then-wife as part of our honeymoon. A few questions for you:
1.) Was theft ever a concern when you got to Kalalau?
2.) What day trips did you do while you were at the beach?
3.) What types of meals did you cook with your backpack stove?
Thanks!
LikeLike
Also! Is it possible to set up camp in a sea cave?
LikeLike
We saw people set up their tents on the beach in some of the caves. There were definitely signs saying not to do it though. So… possible, but illegal and maybe not safe?
LikeLiked by 1 person
Ah I see. Thanks – didn’t know that staying the caves was illegal.
Are there camping spots that are better than others? Is the only legal place to camp in the place that you mentioned in your review?
Thanks!
LikeLike
Illegal might be the wrong term, but there were definitely signs saying not to do it. I think they were warning of falling rocks. There are plenty of campsites along the trail that leads to the waterfall at the beach. We liked the sites best near the waterfall.
LikeLike
We read that car theft at the parking lot can be a problem, but did not experience any ourselves. We left our luggage at our Airbnb just in case and did not leave any valuables in our car.
Since we didn’t make it to the beach in one day, we didn’t have time for any day trips at the beach. We just relaxed and walked up and down the beach. If you have multiple days, there are some hikes you can do. I can’t comment on them though, but imagine there is info online.
For meals, we just buy dehydrated backpacking meals. We like the backpackers pantry chana masala and most mountain House meals. They are a bit pricey but are easy!
LikeLike
What is the distance of Crawler’s Ledge? You said that other sections were equally dangerous – was that based on mud? You made it back in one day so do you think you could have made it out in one day?
LikeLike
Crawlers ledge is a fairly short section. I do not remember exactly, but the very scary ledge is maybe 30-50 feet long. The other scary sections are just areas where the trail is narrow with a step drop to the ocean on one side. These are not as dramatic as crawlers ledge, but the trail can be narrow in steep in spots. It will mainly be scary/bad if you are afraid of heights. The trail being muddy also did not help for us.
We could have made it out in one day if we were able to leave early as planned and if it was less muddy for us. The conditions on our first day just were not conducive to fast hiking. Coming out the conditions were much better.
LikeLike
I haven’t been there in a long time (went in ’89 and ’91) but can answer a few of the questions above.
First, day trip options while out at Kalalau. It’s fun to hike up into Kalalau Valley – I assume there is still a good trail that goes fairly far up valley. One of the “locals” living out there in ’89 told us that there was also a very nice fruit orchard/garden that you can find up there, but we weren’t able to find it despite trying to follow his verbal directions. Nonetheless we did get some fine oranges from a large orange tree that was just there in the middle of the trail (we were there in late November; I assume the oranges are seasonal). I’ve seen reports of being able to follow “trail” all the way from the head of the valley up to the end of the road above Waimea Canyon, where the photo showing Kalalau Valley from above in this trip report was taken, but it sounds like a sketchy venture unless you’re up for very steep, brushy, and muddy terrain. You can also spend a fair while just exploring around the beach area if you’re so inclined. In mid-winter the surf is strong so we didn’t try to get around the rocky headland at the end of the beach, but I did spend a fair while catching freshwater prawns in the Kalalau River which made for an excellent dinner that evening along with some cooked green papaya.
Second – making it to Kalalau in one day. It’s a somewhat strenuous day but do-able depending on your fitness. Be expedient. On our first trip we arrived at the trailhead late in the day and camped at Hanakapia and went the rest of the way the next day (and then spent 2 or 3 nights at Kalalau – I’m forgetting how many). On our second trip, we got to the trailhead mid-morning (we hitchhiked to avoid the parking risks mentioned above) and made it all the way to the end, but we’d also managed to significantly lighten our loads on this trip, as we realized we didn’t need much in the way of warm clothing or sleeping bags. We just slept on a sheet over our camping pads with a light synthetic fabric blanket we’d picked up at Long Drug in Lihue, which was more than enough for sleeping comfort even in late November. With lighter loads and minimization of rest stops, we made it to Kalalau just before dark.
A few other comments. Now that I regularly use hiking poles on rough terrain, I’d want them for the badly eroded sections near the end of the trail, especially if those sections were wet. Speaking of wet – on multiple trips to Kauai, I’ve found that in the rainy season, the area out by Kalalau is considerably more dry than the area around Ke’e beach. If you are there during a big storm all bets are off, but when you’re dealing with typical “trade wind rain” it can be quite delightful at Kalalau, with brief inconsequential rains periodically refreshing you between bouts of sun and cloud.
It’s interesting that there were “residents” at Kalalau in August. When we were there in ’89, they were there in force, but some of them told us that they were only there in wintertime when the zodiac boats can’t land on the beach due to the surf. This kept the rangers, who patrolled via boat, away. By ’91 there were just a few residents living upvalley, who said that the rangers had started to patrol by helicopter which forced most folks out, and left just a few who were more willing to spend most of their time away from the beach. In ’89, these folks seemed to be having a grand time, and they hunted and ate the goats that frequent the pali avove the beach, as well as fresh fruit and veggies farmed in the valley. We met a little girl who said she was born out there.
LikeLike
This is great info – thank you!
LikeLike
I am planning to take my little one 18 months to this trail. I would really want to make it to the end. The part that I am concerned is the Crawler’s Ledge. He would be strapped when crossing, Would that be possible or still too dangerous? I would like to get an idea of how narrow it it. Is it extremely narrow with an accidental slip and I could fall off?
LikeLike
Hello, It is really is hard for me to say what is possible vs too dangerous. I can say that the trail is indeed narrow and an accidental slip and sideways fall definitely could lead to death. That said, most hikers are steady and rarely slip, so the trail is actually not THAT dangerous (I believe you are much more likely to get hurt crossing a high stream). The ledge is maybe 18 inches wide at the narrowest section (a rough approximation), and there is a wall on one side of the trail and a drop off on the other side of the trail. This video does a pretty good job of showing what the trail looks like: https://youtu.be/M0N4oOYtXCo
LikeLike
Any idea when the kalalau trail is going to open up again? I’m going to be in Kauai this summer and would love to give it a run.
LikeLike
Hi Gabriel – The Kalalau Trail is still closed, but there are reports stating that the trail and road will reopen in June of this year (2019). Keep an eye on this website to see when it opens (http://dlnr.hawaii.gov/dsp/parks/kauai/napali-coast-state-wilderness-park/). Remember that you will need a permit to hike the Kalalau Trail. Good luck!
LikeLike
Love the report! Can’t wait for the trail to open up again, Ive hiked Kalalau three times and am dyin’ to go back ASAP!!
LikeLike
Grabbed a permit for hiking Kalalau this weekend. I’m SOO happy the trail is open again! Appreciate all the photos and maps. Your report is one of the best I have found.
LikeLike
Amazing pictures. Thanks for sharing all of this. I just wanted to highlight that we got our permits through https://gokalalau.com/ and we highly recommend it. It was pretty easy to go with them and not have the whole hassle on trying to log in midnight HST time 🙂
LikeLike