


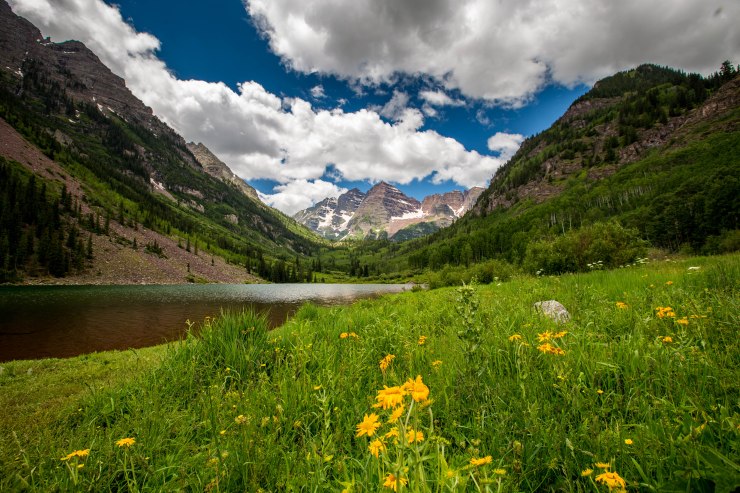
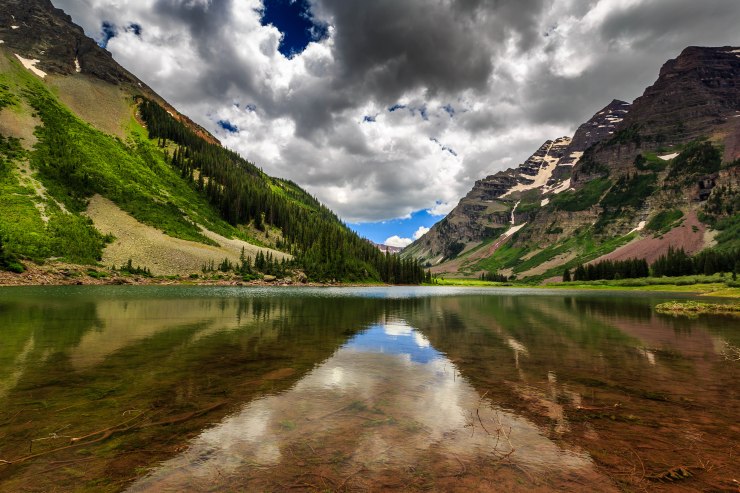
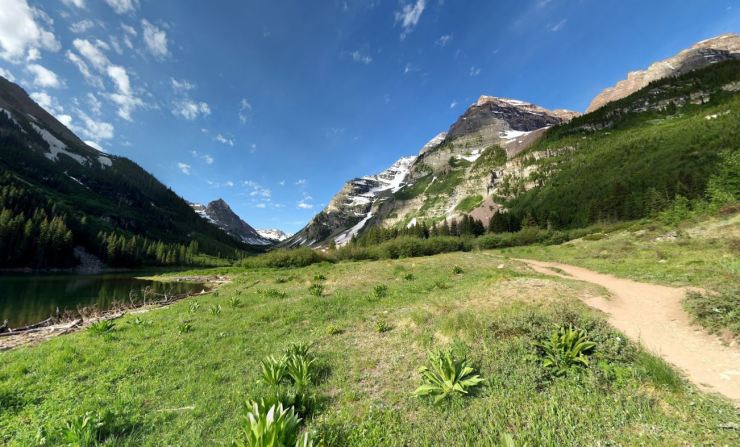
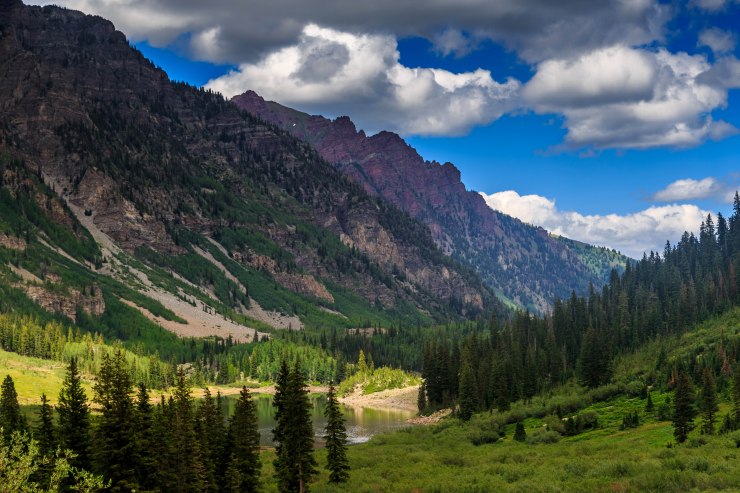
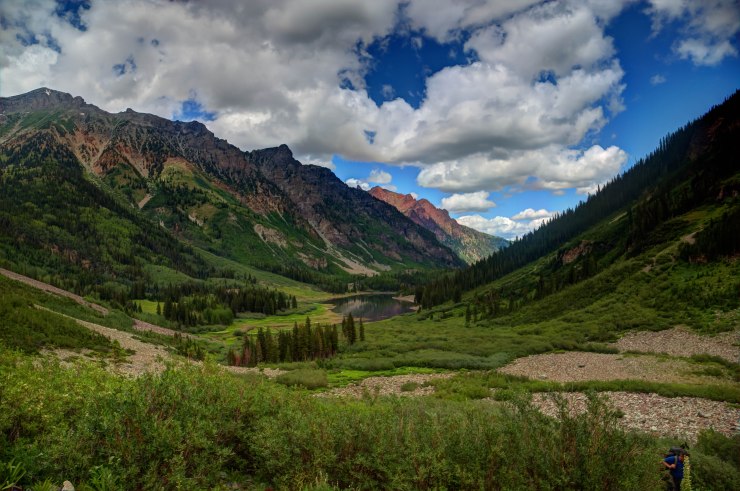
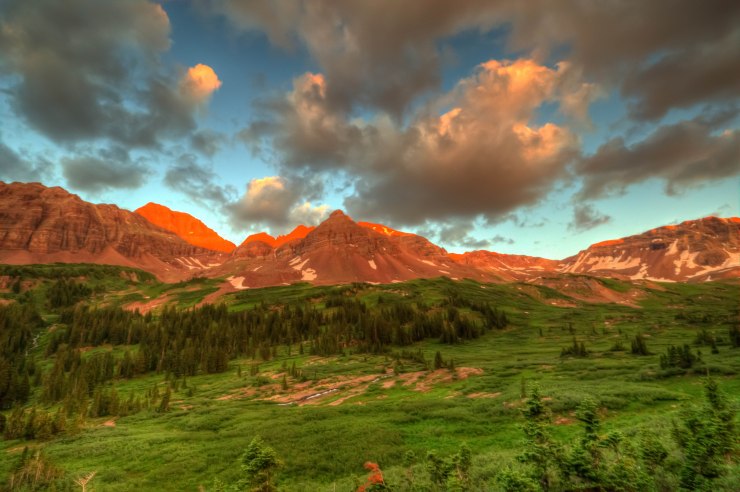
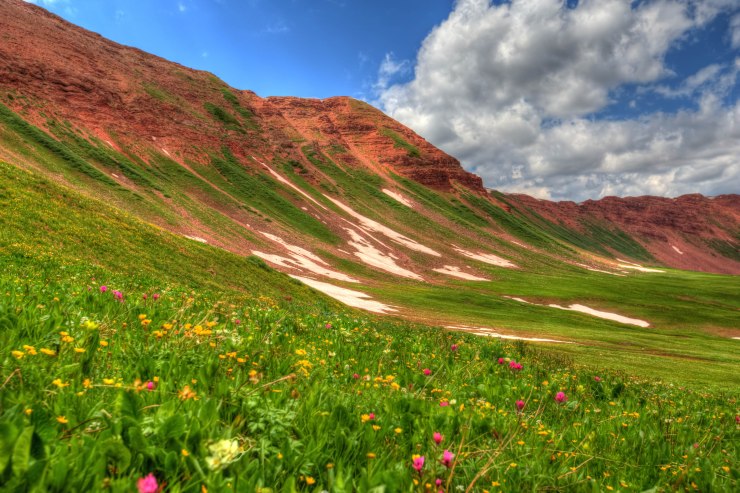
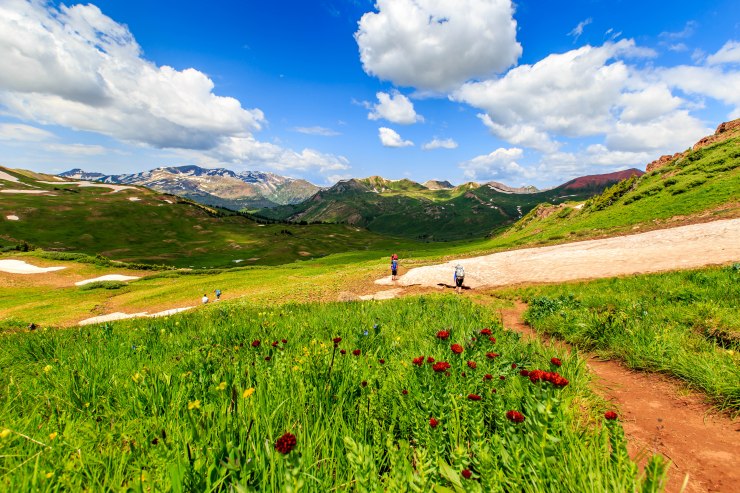
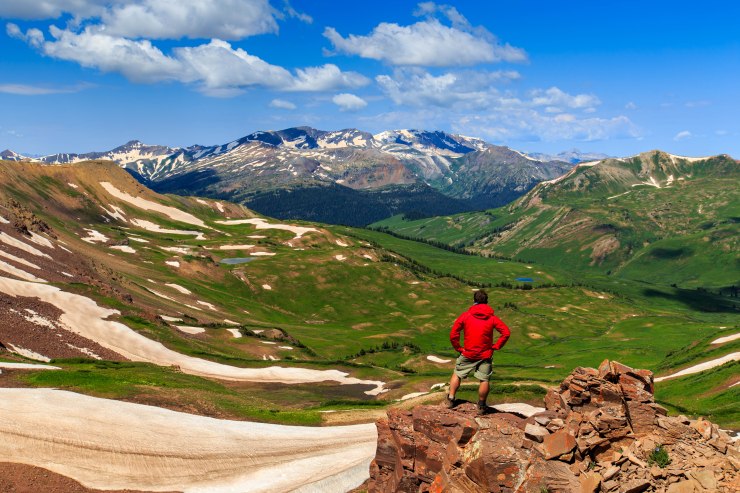
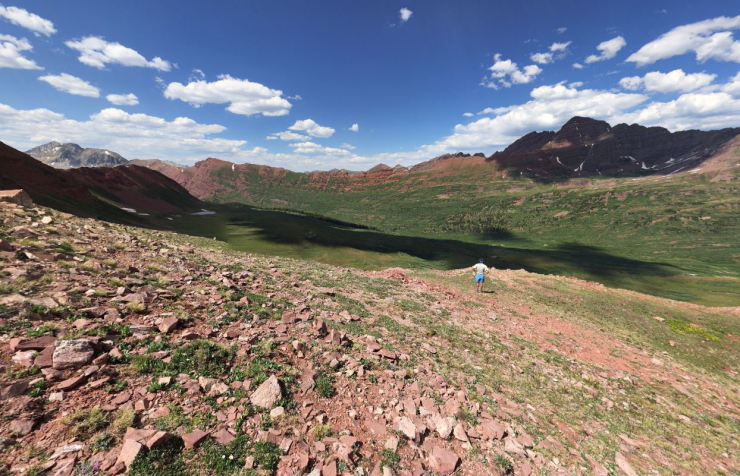
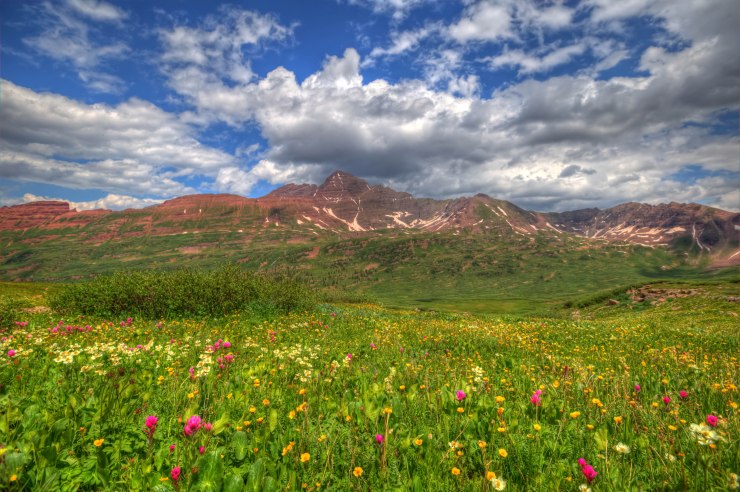
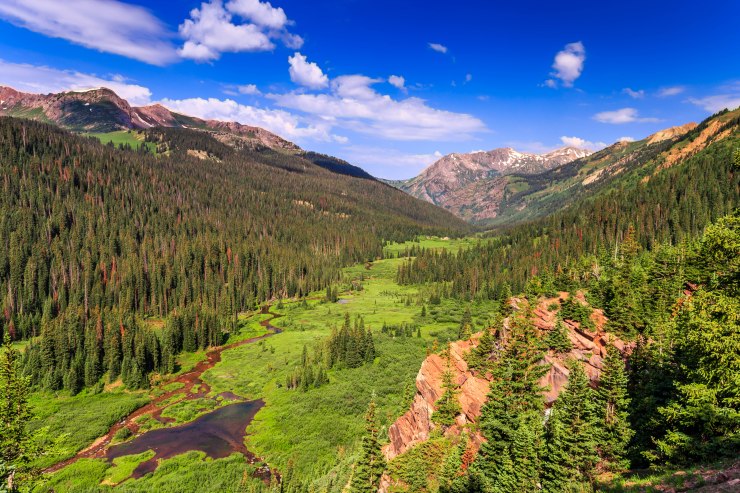
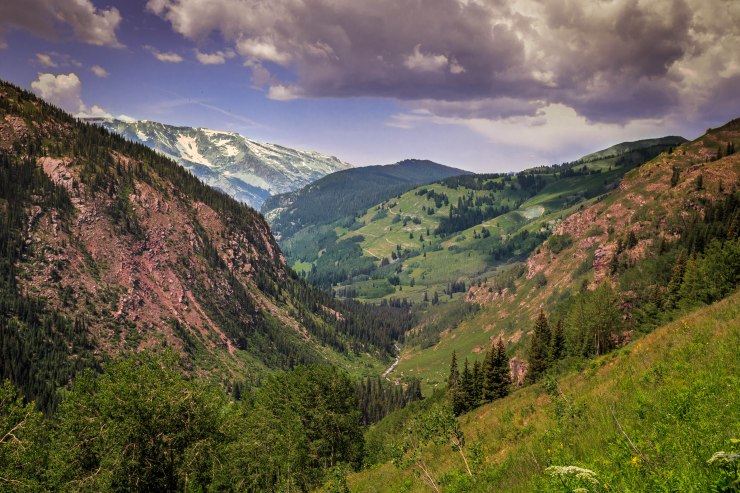
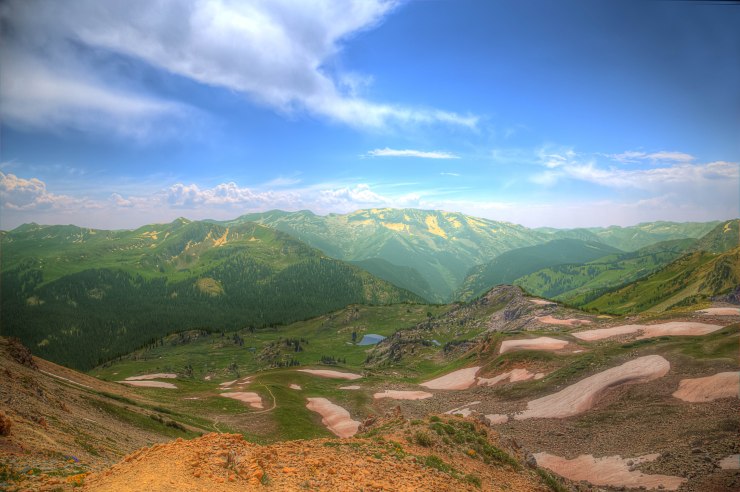
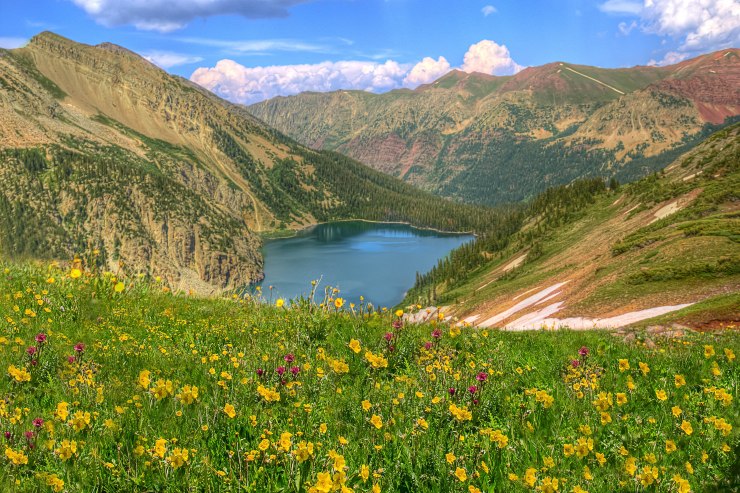
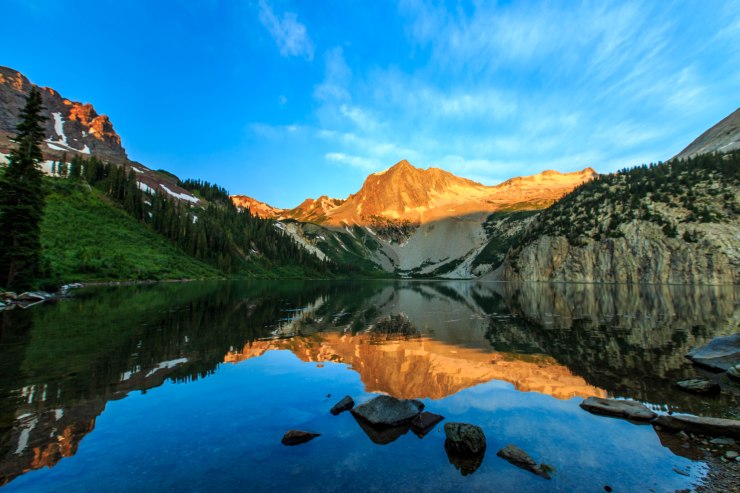
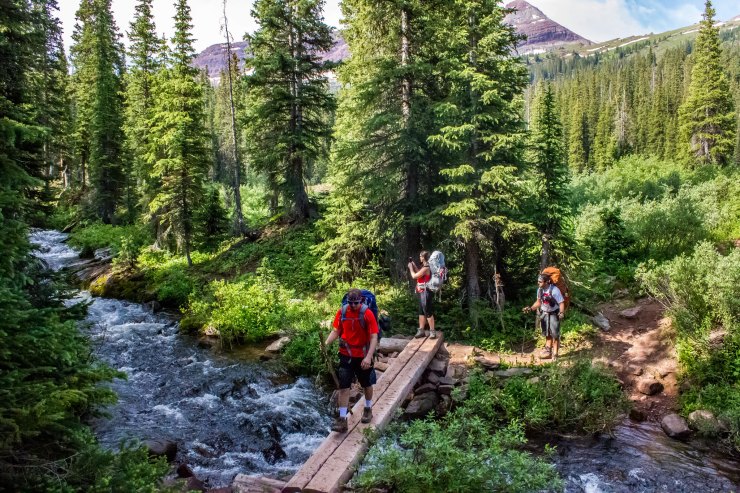
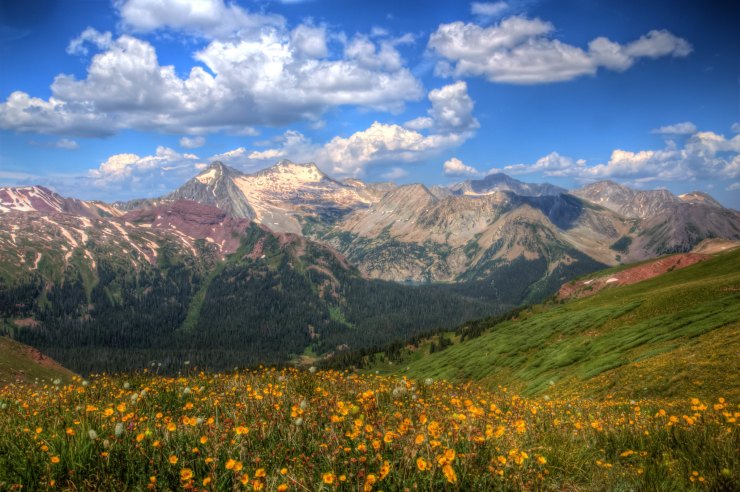
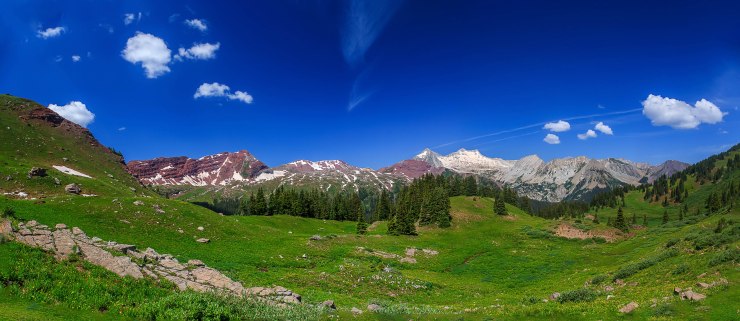
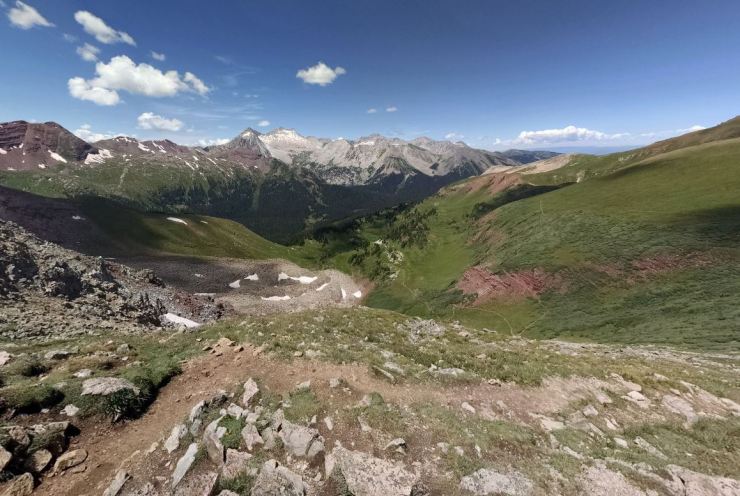
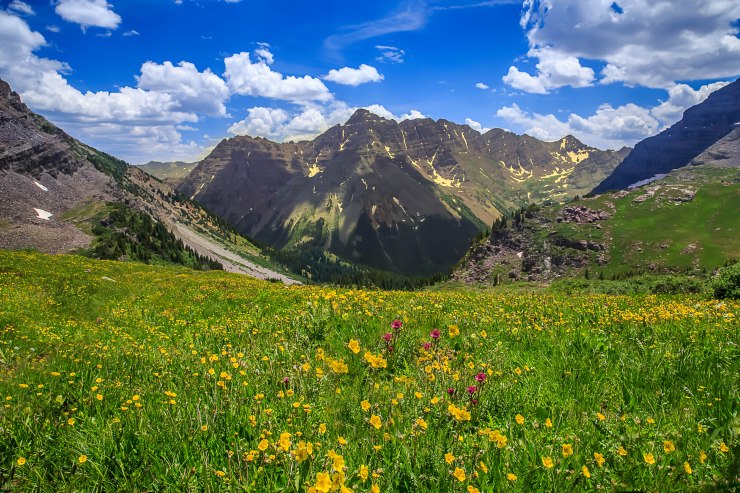
Trip Overview: The Four Pass Loop in the Maroon Bells-Snowmass Wilderness is one of the premiere backpacking loops in Colorado. At 28 miles in length, this loop is typically hiked over the course of 3 to 5 days depending on your fitness level. During the trek you hike over four high elevation mountain passes, reach a peak altitude of ~12,500 feet, and climb nearly 9,000 feet of elevation. Highlights of the Four Pass Loop include epic views of the Maroon Bells and several nearby mountain peaks, expansive views from atop mountain passes, summer wildflower blooms, and views of alpine lakes and idyllic rivers. The majority of the images are from a trip that took place in early August.
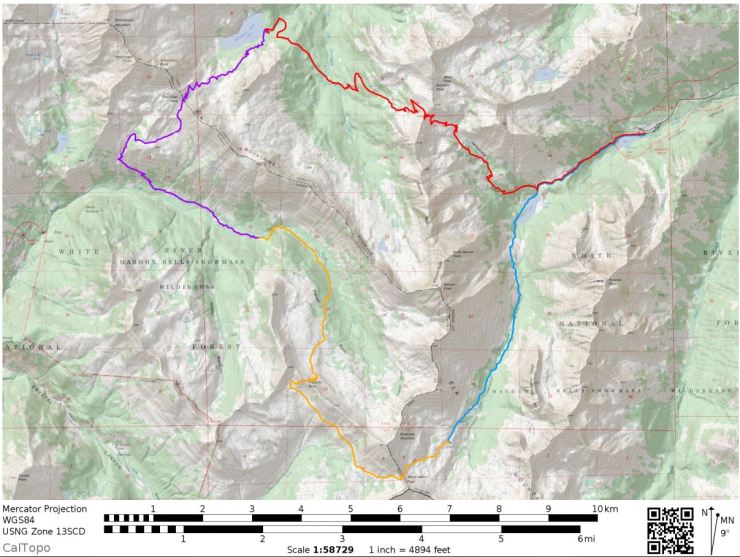

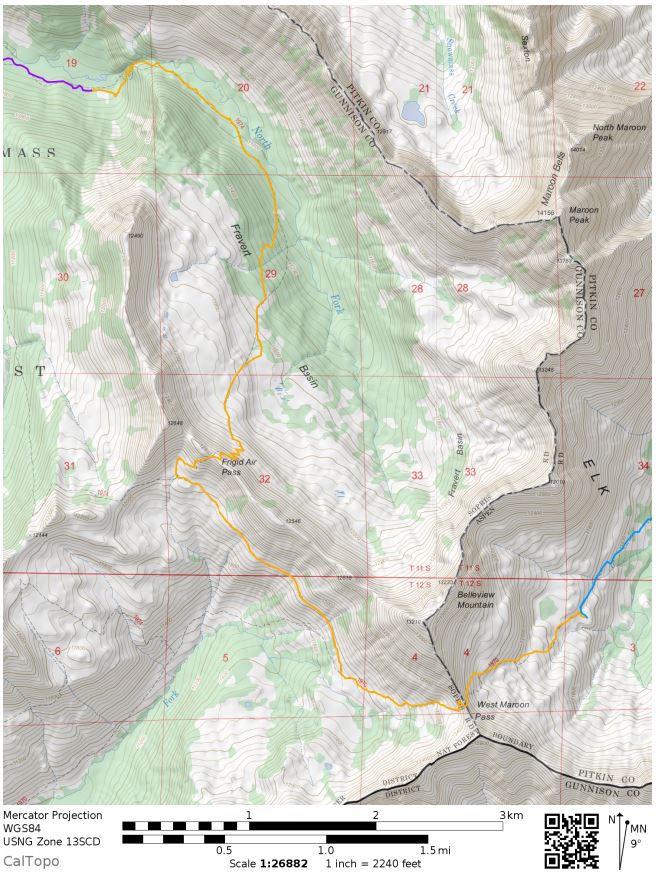
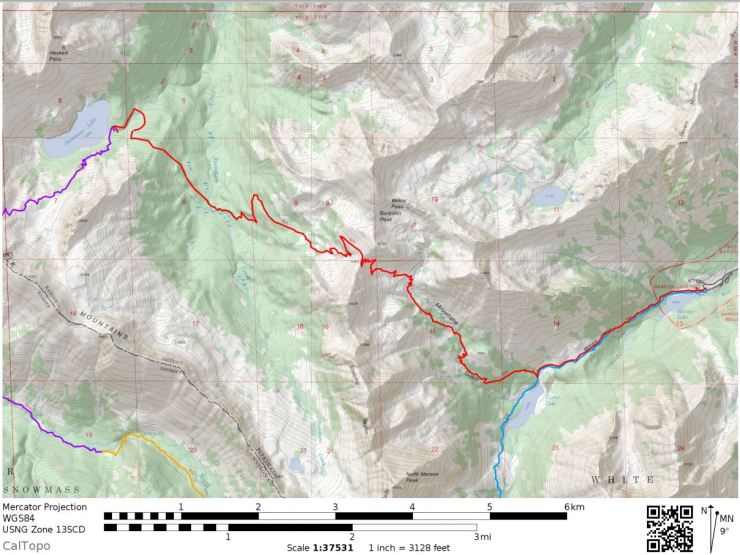
- Overall map of the Four Pass Loop in the Maroon Bells-Snowmass Wilderness (PDF)
- Link to purchase a topographic map of the Maroon Bells area (here)
Jump to Day 1 hike – Maroon Lake Trailhead to West Maroon Pass
Jump to Day 2 hike – West Maroon Pass to North Fork
Jump to Day 3 hike – North Fork to Snowmass Lake
Jump to Day 4 hike – Snowmass Lake to Maroon Lake Trailhead
Shop Deal of the Day at REI Outlet (up to 50% off)!
Preparations:
Click here to read more about Permits
Permits: To backpack and camp within the Maroon Bells-Snowmass Wilderness, you must self-register and fill out a permit at the trailhead before starting your hike. There is currently (as of 2019) no quota on the number of hikers allowed to start the Four Pass Loop each day, so no advanced reservations are required. Note that group sizes are currently limited to 10 hikers. Because there is no permit quota system and the trail is very scenic, expect there to be some crowds during the peak summer hiking season. If you are looking for more solitude, consider hiking the Four Pass Loop earlier or later in the hiking season or hike mid week instead of on the weekend.
Due to the popularity of the Maroon Bells area, it is very important to follow all regulations. Backpackers are required to store food and scented items in bear resistant canisters. Furthermore, all human waste must either be packed out in human waste (WAG) bags or must be properly buried. Lastly, there are some campfire regulations that prohibit fires near Crater Lake and any above 10,800 feet of elevation. A trail guide listing all regulations provided by the Forest Service can be found here.
Also, note that a permit quota system for the Four Pass Loop may be implemented starting in the summer 2020 hiking season (Aspen Times article). Backpackers planning to visit in 2020, should keep an eye on the Forest Service website to see if permits need to be reserved.
Click here to read more about Logistics
Logistics: The Maroon Lake trailhead is about a 40 minute drive southwest from Aspen, CO. Near the trailhead there is a parking area reserved for overnight backpackers (you must pay a $10 fee if you drive a private vehicle here). Note that the number of parking spots in the overnight lot is very limited. If the lot is full upon arrival, you will be forced to turn back and use the shuttle bus. If you are lucky enough to get a parking spot in the overnight lot, you can stay for up to 5 days. Also, note that traffic on the road to Maroon Lake Trailhead is restricted between 8am – 5pm. If you plan to drive yourself to the trailhead and park there, you should arrive before 8am.
By far the easiest way to access Maroon Bells is to take the Maroon Bells shuttle , which costs $8 per adult (more info here). The shuttle service service that operates between 8am-5pm from June to October leaves from the Aspen Highlands Ski Area.
If you are visiting Colorado from a lower elevation state, it is recommended to spend a couple days acclimating to the elevation before starting your trek. Whether you stay in Denver or Aspen (or somewhere else) is up to you, but acclimating will help prepare you for the hike. The Four Pass Loop starts at roughly 9,500 feet so the air is fairly thin at the trailhead.
The Four Pass Loop can be hiked in either the clockwise or counter clockwise directions. In this report, we describe the clockwise route. I prefer this route because you can hike a relatively easy 6 mile first day where you do not need to cross any mountain passes. If you plan to hike further on your first day and will hike over a mountain pass, you should plan to begin hiking quite early in the morning. Afternoon thunderstorms are common in the Colorado Rockies, and you do not want want to be exposed atop a pass in the afternoon when storms frequently roll in.
Click here to read more about Difficulty and Weather
Difficulty and Weather: The Four Pass Loop is very popular so the trail is well marked. There is little risk to get lost or be stranded. The primary risks are altitude sickness, lightning strikes, and exhaustion. To mitigate theses risks hikers should acclimate to the altitude before setting off on their trek. You should also remember that this is a strenuous hike with lots of elevation gain. If you are not used to backpacking at high altitude, plan to complete the trek over 4 to 5 days rather than 3. Furthermore, hikers should avoid getting stuck on any of the four mountain passes during the late afternoon when thunderstorms are frequent. Plan to cross passes in the morning and keep a keen eye out for storm clouds. If there is a storm rolling in, plan to seek shelter at a lower elevation and hike over the pass later after the storm has rolled through.
The rest of the risks are fairly typical for backpacking in the mountains. Hike within your fitness and skill level and be cautious at river and stream crossings. Also, be sure to filter all water before drinking.
Supplies: There are black bears in the park, so you are required to bring a bear canister. I also recommend pre-treating your hiking clothes and tent with permethrin spray repellent. This repellent keeps mosquitoes, flies, and ticks away. The permethrin treatment stays on your clothes for up to 7 washes, so it helps reduce the amount of spray you need to put on your skin.
The temperature can be quite cold at the higher elevation campsites in the evening and mornings. I highly recommend having some warm wool-based clothes for camp. Wool is great because it doesn’t pick up funky stenches as fast at cotton or synthetic clothes and also because it dries out quickly if you get caught in the rain. You also want to make sure your hiking clothes are made of synthetic (or wool) fabric that will dry out if you get caught by a thunderstorm and get wet. That last thing you want is to be drenched in cotton clothes that will stay wet and keep you cold.
Below is a list of recommended gear for the Four Pass Loop:
Hiking clothes
- a lightweight hiking rain jacket (North Face Venture 2 Jacket)
- fast drying synthetic hiking pants (prAna Zion Pants)
- a quick drying long sleeve hiking shirt (Columbia Silver Ridge L/S Shirt)
- wool outer socks (People Socks Moreno 4-pack)
- thin blister preventing base socks (WrightSock double layer Coolmesh)
- quick drying synthetic boxer briefs (ExOfficio Give-N-Go)
- Gore-tex hiking shoes (adidas Outdoor Terrex Fast R Gore-Tex Shoe)
Clothes for camp
- wool leggings (Minus33 Merino Wool Kancamagus Midweight Bottom)
- wool base layer shirt (Minus33 Merino Wool Chocorua Midweight Crew)
- warm wool overshirt (Pendleton Long Sleeve Classic-Fit Board Shirt)
- lightweight down jacket (Patagonia 800-fill Down Jacket)
- lightweight camp shoes (Xero Z-Trail lightweight sandal)
- warm beanie hat and thin pair of gloves
Hiking gear
- topographic map (Maroon Bells topo map)
- trekking poles (Black Diamond Trail Ergo Cork Trekking Poles)
- 2 liter hydration bladder (Platypus Big Zip Water Reservoir)
- 65 liter backpack (Osprey Atmos 65 Liter pack)
- water filtration system (Platypus gravity filtration system)
Camp gear
- strong tent with rain-fly (Alps Mountaineering Chaos 2 Tent)
- inflatable sleeping pad (Therm-a-Rest Trail Pro Sleeping Pad)
- sleeping bag (REI Co-op Igneo 25 Sleeping Bag)
- inflatable camping pillow (Ultralight Inflating Pillow)
- lightweight backpacking chair (Helinox Chair Zero)
- lightweight lantern (MPOWERD Luci Outdoor 2.0)
- headlamp (Black Diamond Cosmo Headlamp)
- multi-tool with knife (Gerber MDime Mini Multi-Tool)
- Bear canister (BearVault BV500)
- lightweight stove (MSR PocketRocket 2)
- lighter (BIC plastic lighters)
- 2 liter pot (GSI Outdoors Halulite Boiler Pot)
- coffee cup (GSI Outdoors Glacier Stainless Cup)
- lightweight spork (Snow Peak Titanium Spork)
- small, quick drying towel (REI mutli towel mini)
Random
- wet wipes (Stall Mates individually wrapped wipes)
- mole skin for blisters (Blister medic kit)
- lightweight trowel (GSI Sanitation Trowel)
- small amount of duct tape for gear repairs
- chapstick and sun screen
Food and drink
- a variety of my favorite dehydrated meals
- electrolyte replacement (NUUN Hydration Tablets)
- instant coffee (Starbucks VIA)
- quick snacks (Clif Shot Bloks and Clif energy bars)
……….
Day 1: 6 miles; +2,530 / -440 feet; Maroon Lake Trailhead to West Maroon Pass
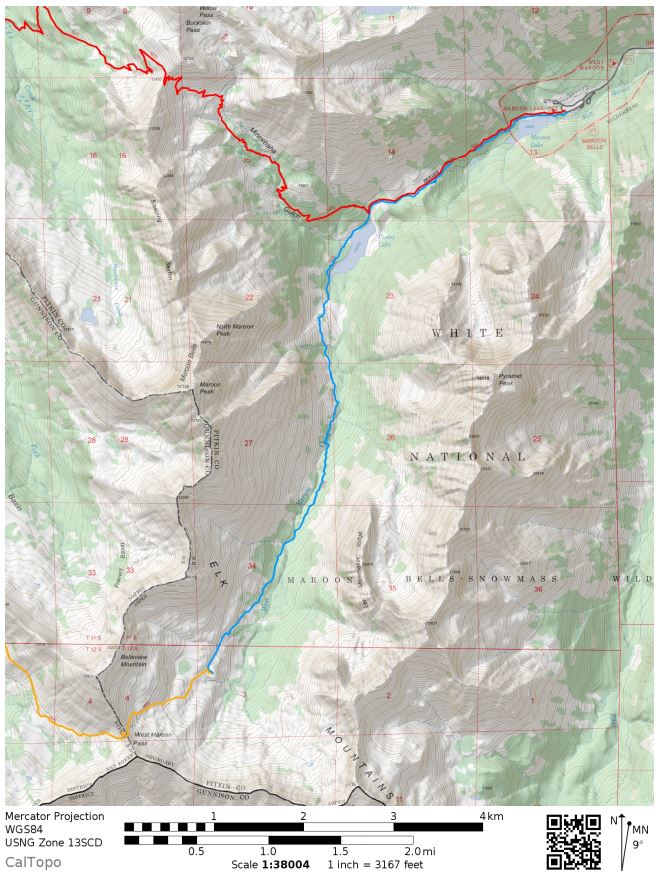
Maroon Bells-Snowmass Wilderness Four Pass Loop hike, Day 1 map (PDF)

The itinerary described in this report tackles the Four Pass Loop over four days. The hikes on any given day are between 6 and 9 miles long. If you plan to hike the loop in more or fewer days, you can use this guide from the Forest Service to decide where to camp. Note that there is a lot of elevation gain, so only very fit backpackers should tackle this loop in fewer than 4 days.
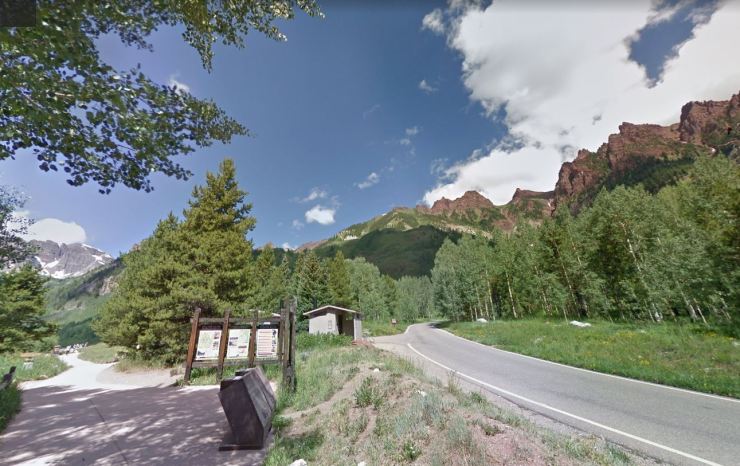
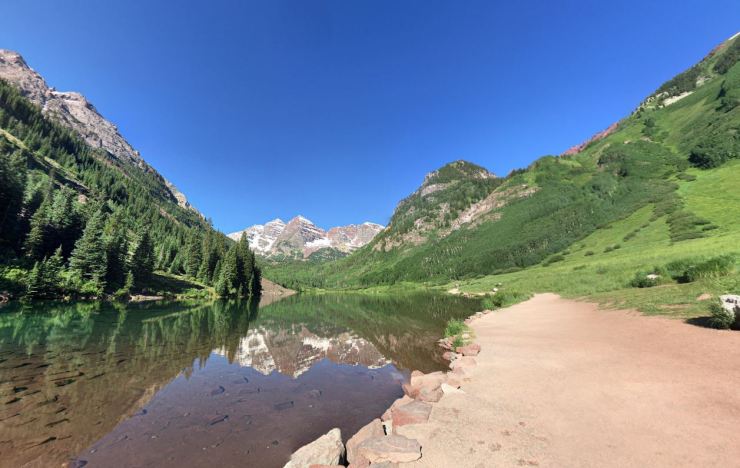
On day 1 of the clockwise itinerary, you start the hike at the Maroon Lake Trailhead. There are vault toilets at the trailhead, but there is not potable water access. Plan to fill your hydration bladders before arriving or filter water from near Maroon Lake. The loop starts by following the Maroon Snowmass Trail (#1975) along the north shore of Maroon Lake. Along this stretch of the hike you are treat to the famous view of Maroon Lake with the Maroon Bells in the background.
After roughly 1.7 miles, you reach a junction near Crater Lake. Take a left and proceed south onto the West Maroon Trail (#1970), which heads to West Maroon Pass. This trail meanders along the shore of Crater Lake and then heads up into the valley that Maroon Creek runs through. After about the three mile mark you will reach some of the first campsites. I suggest pushing up to the ~6 mile mark and making camp about mile from West Maroon Pass. The views in the this area are great and you can then rest after a short first day.

……….
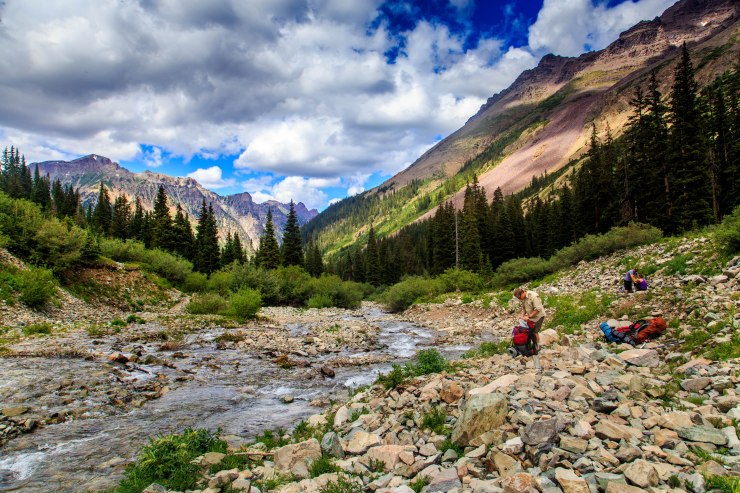
Day 2: 7 miles; +1,660 / -2,900 feet; West Maroon Pass to North Fork of Crystal River
Maroon Bells-Snowmass Wilderness Four Pass Loop hike, Day 2 map (PDF)

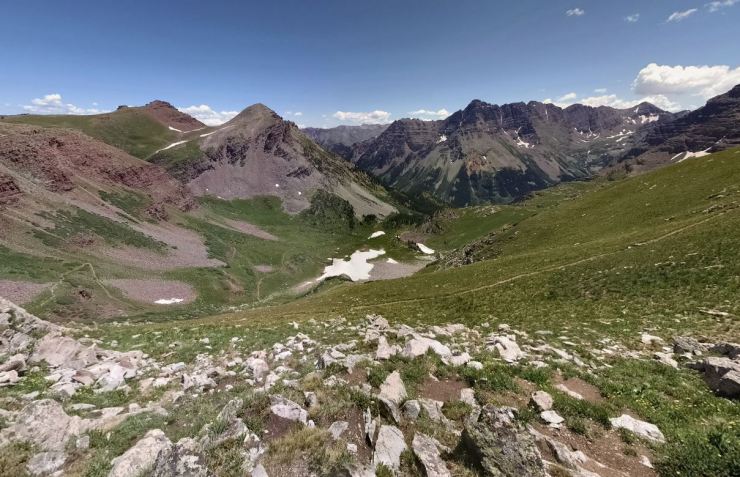
On day 2 of the Four Pass Loop, you climb up over West Maroon Pass and Frigid Air Pass. Both passes provide great views and you have plenty of time to relax and take photos since the hike is only 7 miles long.
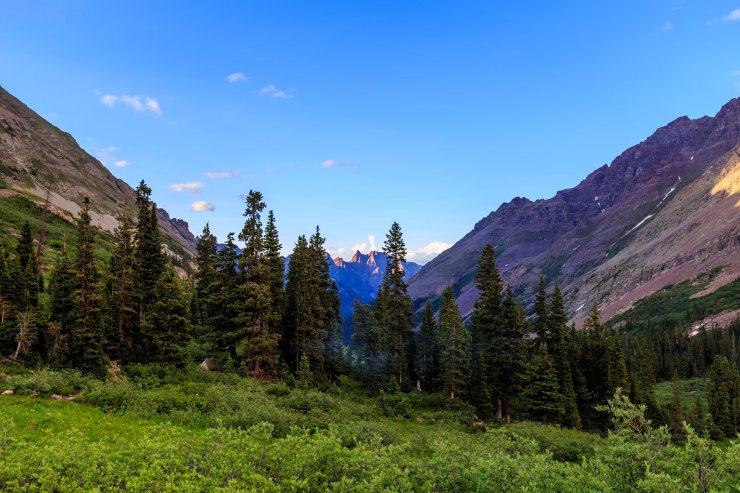
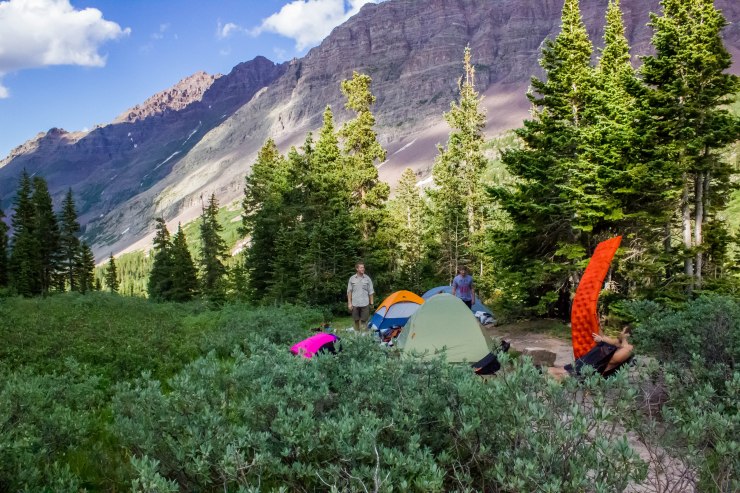
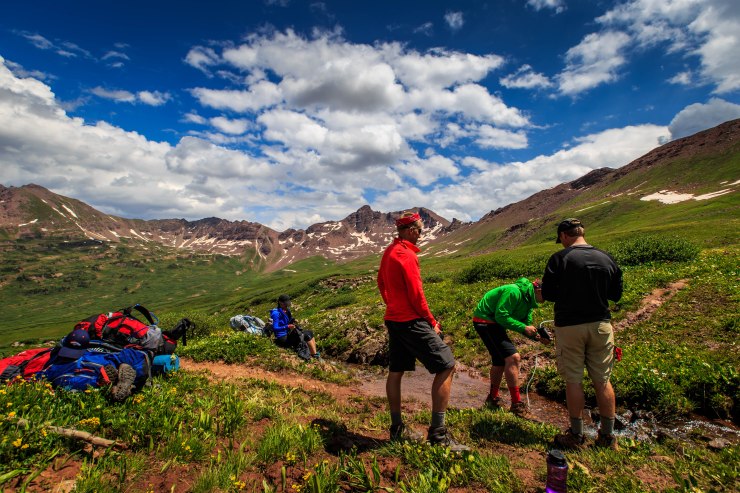
The hike starts with a 1 mile, ~850 foot climb to the top of West Maroon Pass. From there, the next two miles traverse along a ridge leading towards Frigid Air Pass. At the ~3 mile mark, you reach a junction. At this point you transition onto the Fravert Basin Trail (#1974). Take a right at the junction and head north to the top of Frigid Air Pass (about a 400 foot climb from the junction). At the top of Frigid Air Pass you get great views of the Fravert Basin and of the backside of the Maroon Bells. The trail then heads north and descends into the Fravert Basin. You drop some 2,000 feet over the next 3 miles. Starting at about the 5 mile mark, there are several campsites along the trail. The campsite in this itinerary is near a couple small pools of water near the 6.5 mile mark.


……….
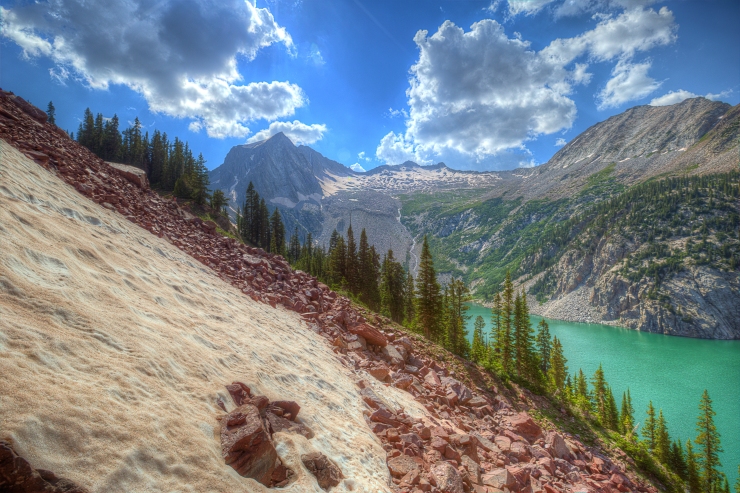
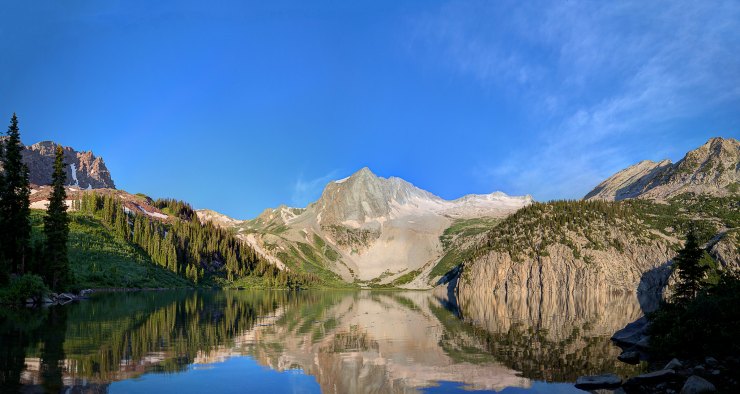
Day 3: 6.5 miles; +2,540 / -2,010 feet; North Fork of Crystal River to Snowmass Lake
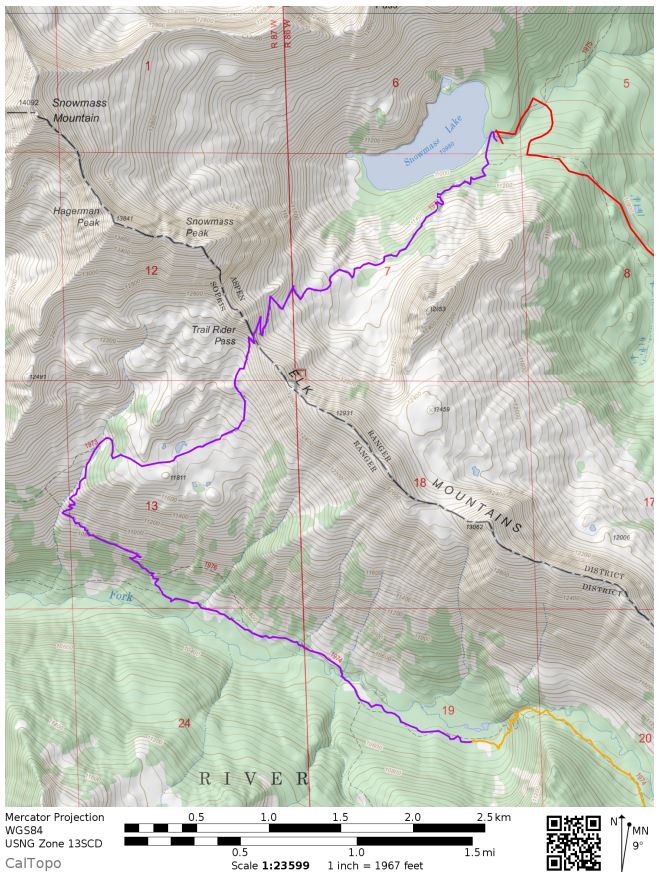
Maroon Bells-Snowmass Wilderness Four Pass Loop, Day 3 map (PDF)

The Day 3 hike is just over 6 miles long and includes a hike over Trail Rider Pass. The trail starts with a flat ~1.5 mile hike northwest along the Fravert Basin Trail (#1974). There are continued nice views of the valley and North Fork of the Crystal River along the trail. At the ~1.5 mile mark, you reach a junction. Take a right at the junction and follow the North Cutoff Trail (#1976) northwest up the ridge towards Trail Rider Pass. Roughly a mile into the climb, you will reach a stream and another trail junction. Follow the trail going to the right which meanders via switchbacks north along the stream.
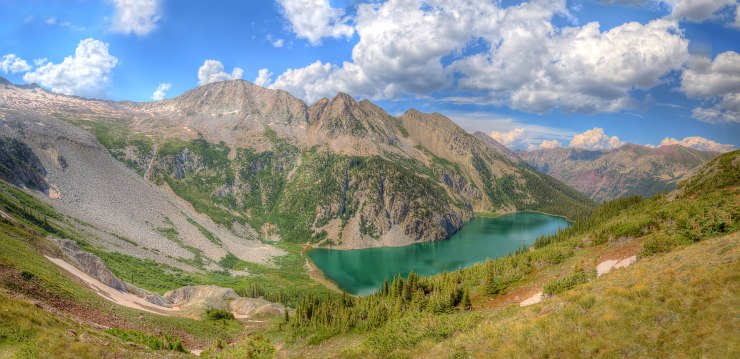
Around the 3 mile mark, this trail meets up with the Geneva Lake Trail (#1973). Take the Geneva Lakes Trail to the east towards Trail Rider Pass and Snowmass Lake. From the junction it is a ~1.2 mile hike to the top of Trail Rider Pass. From the top of the pass you get great views of Snowmass Lake and the surrounding area. After a rest, you then descend down to Snowmass Lake. It is a ~2 mile hike down to the lake. Near the lake, there is a junction. Take the route to the left, which heads towards the shore of Snowmass Lake. This trail leads to a stream crossing and there are several campsites in the area past the stream.
……….
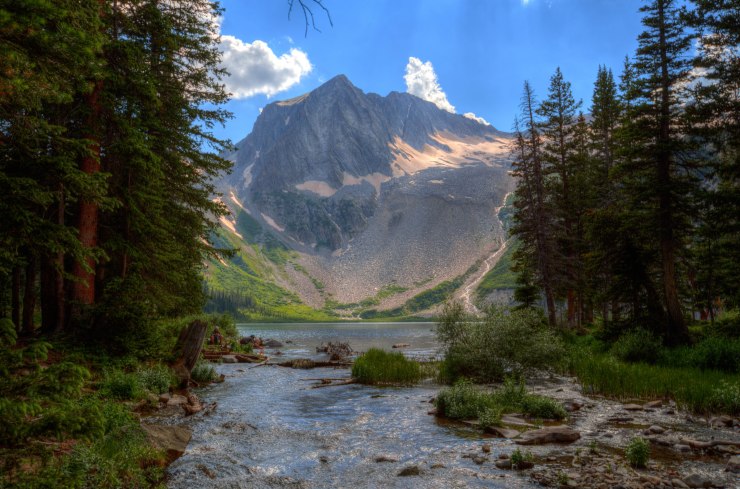
Day 4: 8.5 miles; +2,180 / -3,560 feet; Snowmass Lake to Maroon Lake Trailhead
Maroon Bells-Snowmass Wilderness Four Pass Loop hike, Day 4 map (PDF)

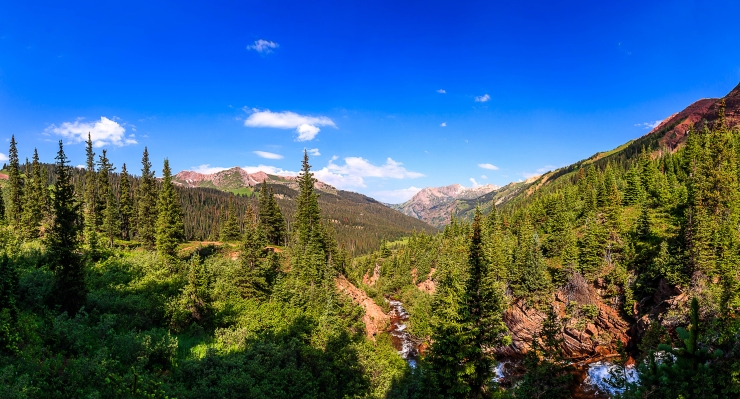
On Day 4 you hike 8.5 miles from Snowmass Lake back to the Maroon Lakes Trailhead. This is the longest hike in this itinerary, but your packs should be a bit lighter on that last day since you have eaten most of your food! Start the hike by crossing to the north side of the stream that flows from the east side of Snowmass Lake (you may have already crossed yesterday). Roughly a quarter mile northeast of the stream crossing, you reach a junction with the Maroon Snowmass Trail (#1975). Take the Maroon Snowmass Trail southeast towards Buckskin Pass. Around the 2 mile mark the trail begins to steadily climb up to Buckskin Pass. After climbing ~1,700 feet, you reach the top of the pass at the 4 mile mark. There are some great views near Buckskin Pass, so this makes for a good lunch spot. From here, you just continue east along the Maroon Snowmass Trail as it descends nearly 3,000 feet down to the trailhead.
………
Here are some related trip reports:
Rocky Mountain National Park – Continental Divide National Scenic Trail (45 mile loop)
Three Sisters Wilderness – Broken Top Loop (24 mile loop)
Trinity Alps Wilderness – Four Lakes Loop (20 mile trek)
Teton Crest Trail – Grand Teton National Park (48 mile loop)

How is the weather on this hike, do you have to bring rain gear?
LikeLike
Hi Eric, I’d say it’s best to bring a rain shell and the rain fly for your tent. There often brief thunderstorms in the late afternoon in the rockies, so it’s good to be prepared. You don’t need rain pants or anything like that. It’s likely to be sunny for most of the hike – you just don’t want to get soaked if a storm rolls through one afternoon after you set your tent up. The shell and rain fly will help keep you warm at night too.
LikeLiked by 1 person
Do you think it is better to hike clockwise or counter clockwise? Thanks
LikeLike
Hi Tom, I like the clockwise direction for the Four Pass Loop. This direction gives you great views of Snowmass Lake after your hike up Trail Rider Pass and gives really nice views as you hike down into the Minnehaha Gulch. Some prefer CCW, so you can’t go wrong with that either.
LikeLike
Awesome pictures and write up… do you know when the maroon lake trail head will open this year? Heard there is a lot of snow
LikeLike
Hi Jared – the latest report I have seen said they hope to have the road to Maroon Lake open by the end of May (https://www.aspendailynews.com/news/maroon-creek-road-tentative-opening-moved-up-to-may/article_ea204342-76c7-11e9-a407-bfec70b311b2.html).
Note that even if the road opens in May, the shuttles will not start running until June 15. Also, the trail is likely to be very snowy into July this year so I think the real hiking season will start pretty late this year.
LikeLike
Great write up! My buddies and I are thinking about backpacking this trail. They have backpacked before, however I haven’t. I’ve done 6-8hour hikes before, nothing overnight though. Would you recommend this trip for a novice? Any tips?
LikeLike
If you can handle 8 hour hikes at altitude without much issue, I think you would be fine! This is a tough loop, so a novice would want to go with others who have backpacking experience (your buddies). They can help you figure out what to pack and not pack.
For tips:
-Beginners usually pack too much weight, so try not too over pack. It’s tough to hike with a big backpack on.
-Make sure your boots are worn in and your backpack fits well.
-Bring trekking poles for the downhills.
-Practice setting up your tent before camping the first time. You don’t want to get stuck setting up a new tent in the dark!
-Average less than 10 miles hiking a day on your first backpacking trip. Backpacking is harder than normal hiking!
LikeLike
Do you know any other treks in the area that might have similar views but fewer other hikers? I really want to see great Colorado Rockies views but like more solitude on the trail.
LikeLike
Hi Kyle – One alternative is the Capitol Creek Loop starting at the Capitol Creek Trailhead (https://www.alltrails.com/trail/us/colorado/capital-creek-loop-to-haystack-mountain).
This loop is roughly 40 miles long and is just northwest of the Four Pass Loop (the trail is shared in one short section near Snowmass Lake and Trail Rider Pass). The reviews I have read say this loop is just as beautiful as the Four Pass Loop and has significantly fewer hikers. The Trailhead is much less busy too so parking at the trailhead is likely less of an issue.
The obvious difference is that Capitol Creek Loop is longer than the Four Pass Loop, so you may need to take an extra day (or two). Hope that helps!
LikeLike
My husband and I hiked this loop 2 years ago.. Hiking up the four passes really make your legs burn and the altitude is tough but the views make it all worth it!
LikeLike
Planning on this hike arriving July 22. What is the weather, temps this time of the year?
LikeLike
Hi Kevin – The temperatures should be nice in late July. I would expect daytime highs in the 70s and lows in the 40s (maybe in the 30s at night if you camp at higher elevation). There are likely to be some afternoon thunderstorms, so prepare to have a rain jacket and some layers because the temperature can temporarily drop quite a bit when the storms roll in. These storms are usually short lived and things get nice after a couple hours.
Your main concern hiking the Four Pass Loop in July this year is that the snow pack is currently very high. You will want to keep an eye out for reports of the trail conditions. If the snow doesn’t melt quickly in June/early July, you may have to deal with some snowy and sloppy hiking near the passes. Hopefully things melt out nicely, but I would call the rangers a week or so before you are due to hike. They can let you know if the trail is clear or if they recommend crampons or gaiters or anything else.
LikeLike
Hey — Thank you for this excellent resource. I am hoping to attempt the Four Pass Loop in mid-August. But I understand this may fall within “Monsoon Season.” Is mid-August a good time to try the FPL?
LikeLike
Hi Tony – the “monsoon season” you heard about is really just the tendency of there to be afternoon thunderstorms in the Colorado Rockies during the summer. Mid August is typically a totally fine time of year to hike the Four Pass Loop. You have the potential for thunderstorms in Maroon Bells in July, August, and early September, so August is not much worse than other months of the hiking season.
The main rules of thumb to stay out of trouble is to bring proper gear and to stay off the mountain passes during the afternoon or when ominous clouds are present. For gear, bring a rain jacket and have a tent with a rain fly. You also want either synthetic or wool clothing because these dry out much faster than cotton clothes. If you get caught in a storm and are soaked, you want your clothes to dry off so that you don’t get too cold.
For negotiating mountain passes, you want to start hikes early in the morning so that you can be down off the passes by the afternoon when storms are most likely. If you are on a mountain pass and see storm clouds moving in, hike down to lower elevation asap to avoid lighting strikes. Lighting is probably the biggest safety issue in the Rockies in the summer. Avoid being stuck on a open mountain pass during a storm. You also want to make sure you do not camp right next to a river or in a canyon so that you avoid flash floods. This is not much of an issue for the Four Pass Loop though because there are plenty of safe camping sites. If you follow those rules, you will have a safe hike!
LikeLike
Hello, I am wondering if you have recommendations as to where to stay to make this trip one day shorter. Thank you
LikeLike
Hi Nicole – I assume you are asking about where to camp for a 2 night itinerary instead of a three night one?
If so, I would recommend hiking further on the first day and camping North of Frigid Air Pass on the first night. Then, you can camp near Snowmass Lake on night 2. The site for night one could be #32, 33, or 34 on this map (https://www.fs.usda.gov/Internet/FSE_DOCUMENTS/fseprd542652.pdf). Alternatively, you could camp before Frigid Air Pass (sites #35, 36, or 37) if you get tired on day 1.
Good luck and hope you have a good trip!
LikeLike
To answer your other questions (sent via e-mail):
There is no guarantee for parking at the Maroon Lake Trailhead if you drive up in the evening after the road opens (after 5pm). It’s just really hard to estimate if the lot will be full. You’ll probably have the best luck finding a spot if you drive in mid week. I imagine the lot will be full on a Friday or Saturday evening. If you can’t find a parking spot in the evening, you are bit out of luck since the the last shuttle drops people off at Maroon Lake around 5pm. The shuttle only runs between 8am and 5pm. I think the only option at that point would be to drive back to Aspen and get a taxi or rideshare to drop you off at Maroon lake.
Regarding dogs, on the shuttle website (https://www.rfta.com/routes/maroon-bells/) it says leashed dogs are allowed on the Maroon Bells buses. I can’t confirm this first hand, but there is a number you could call if your want to verify!
For camping near the Maroon Lake Trailhead, there are a few campsites along Maroon Creek Rd (info at bottom of this page https://www.fs.usda.gov/recarea/whiteriver/recarea/?recid=82346#mbcampgrounds). If you are able to reserve a site there, perhaps you could just drive to one of those camps the evening you plan to arrive. The next morning you could take your car to the trailhead before 8am. I imagine the campsites are in pretty high demand though, so try to reserve early.
Camping is prohibited at the Maroon Lake overnight parking lot, so you cannot legally stay the night there. Some people say if you discretely sleep in your car in the lot, you can get away with it, but others have been busted by rangers and gotten fines. Whatever you do, I would not plan to pitch a tent at the overnight lot. This is absolutely against the rules.
If you are arriving in the evening and want to start the hike that night, you can hike in a couple miles to the Crater Lake area before camping the first night. Camping is allowed in designated campsites in the Crater Lake area. You just need to make sure you make it past Maroon Lake because camping is not allowed there.
Hopefully that all helps and you have a great trip!
LikeLike
How early do you recommend beginning each hiking day in order to avoid storms later on? For an intermediate hiker, what is the average amount of time that it takes to complete each day?
LikeLike
Hi Kristen – Assuming you camp near the sites suggested in the itinerary described in this post I would go as follows:
Day 1 – Not pass to go over, so probably not much worry about lightning.
Day 2 – Going from West Maroon Pass to Frigid Air Pass and then the first 1-2 mile descent after Frigid Air are quite exposed. We can conservatively say you want to cover ~5 miles this day before Noon to avoid getting caught in the exposed area during a storm. Assuming you hike at 30 minutes a mile, you can start hiking at 9am and be ok!
Day 3 – Miles 3 to 5 when you go over Trail Rider Pass are pretty exposed. I would again try to be through ~5 miles before Noon. Again, leave by 9am and you are probably fine.
Day 4 – Again you probably want to get over Buckskin Pass by Noon, which is about 5 miles of hiking. Probably leave around 9am to do this (I guess there is a theme here?).
With the itinerary as written in this report, most of the hikes go over the passes within 5 miles. I think the main issues would be if you try to cut down on the number of days and need to tackle a pass at like mile 10 on a day. Then you are likely to be hitting the pass right in the heat of the afternoon.
Also, note that it is most important that you just pay attention to the weather and the sky as you hike. If it’s clear and beautiful, there probably is not a big reason to rush. But, if you see dark clouds moving in, you want to get to lower elevation to protect yourself. Hopefully that helps, have a great trip!
LikeLike
Do you have GPS cords for the campsites?
LikeLike
Hi there – you can find the GPS coordinates of all the designated campsites along the loop in this pdf (https://www.fs.usda.gov/Internet/FSE_DOCUMENTS/fseprd542652.pdf).
LikeLike
Best right up I have come across, nice job and great pics. My son and I are planning a trip this summer. Our first opportunity is next week, but I just talked to the Ranger station and it’s a no go with the current snow conditions. Our next chance is the week of the August 12th. Hopefully things start to improve.
LikeLike
Thank you for posting this update on the conditions! What a crazy snow year… Hopefully you are able to get out in August and catch some wildflower blooms!
LikeLike
My son and I just attempted the loop on July 10th. Still a lot of snow and avalanche debris. Had to turn back about a mile prior to West Maroon Pass. Very tough getting that far and in some cases had to rely on the gps in the snow covered areas and while picking our way through debris. I was told if you have snow picks and a few extra days it may be passable.
LikeLike
Great update – glad to hear you made the safe choice to turn around. Hopefully you can get back out there sometime when the snow has melted and the flowers are blooming!
LikeLike
A Wilderness ranger for the Aspen-Sopris Ranger District hiked the Four Lakes Loop July 12-15, 2019 and posted a detailed update of conditions in the Four Lakes Loop facebook group. You can find the update here: https://www.facebook.com/groups/581773065256376/permalink/1960353324065003/
Based on everything I have read and seen, I would expect there to be rough trail conditions until mid August at the earliest. There is a lot of snow to melt and a lot of trees need to be cleared. Here are the Ranger’s conclusions from his post (thank you ranger Jerome Olp!):
“Some things to note:
1. There is a LOT of snow above 11000 feet.
2. Expect wet feet the entire loop. Trails are muddy and often have running water in them. Please stay on trails to avoid creating new ones.
3. Allow for slower travel than usual. Travelling on sun cupped soft snow for most of the trail isn’t easy. Get over passes early in the day to allow yourself to get into lower elevations by thunderstorm time (after 12 PM)
4. Microspikes and an ice axe is highly recommended for insurance if you do fall on steep snow slopes.
5. Route finding is necessary as 60% of the loop is under snow and avalanches”
LikeLike
Wonderful review of the trip. Thank you for documenting it so well and providing the beautiful pictures. Quick question: based on your description, night 2 and 3 are right next to water sources, but what about the campsite on night 1? I hate needing to carry extra water in my pack and love just pumping water. Thanks for your help!
LikeLike
Hi Jacob – In the itinerary I wrote about, the night 1 camp is pretty close to a couple streams that feed into the West Maroon Creek. You can usually find some nice campsites in the area that are close to these feeder streams. If you are backpacking very late in the season and the streams have dried up, then you can camp closer to the main West Maroon Creek.
LikeLike
Thanks for the detailed logistical info. Have you/ do you know of anyone who has hiked in late September or early October? Want to know what to expect weather/ temperature-wise.
LikeLike
Hi GS – I personally have not backpacked the Four Pass Loop in late September or early October. However, most of what I have seen/heard says that you should be prepared for anything from sunny and 60s to cold and snowing. At night I would expect pretty cold temperatures as well. The weather in the mountains in October is very hit or miss. Your best bet is probably to be prepared for cold temperatures and snow (i.e. have plenty of layers and a good sleeping bag, have at least trekking poles, and have good navigation skills/tools in case the trail gets obscured).
Best case, you get a nice weather window and can enjoy crisp moderate temperatures and see lots of fall colors. Worst case, it snows and is cold, but you are prepared and do not get into trouble. If planning a trip for myself in October, I would check the weather report frequently before the trip and would have a backup plan in place in the event of a sketchy looking forecast. Hopefully that helps!
LikeLike
This is incredible, thank you for posting all of this helpful information!
LikeLike
You are welcome!
LikeLike
I know this can be a busy loop and sometimes campsites fill up quickly. Assuming a hike in July August, is there a good day of the week to head out. Maybe mid week? to limit having to compete with too many people for campsites?
LikeLike
Mid week will definitely be your best bet for a less crowded experience. I imagine Thursday through Sunday probably get the most foot traffic.
LikeLike
Do you have to camp in the numbered campsites, or anywhere 100 ft from trail or water?
LikeLike
Per the USFS “Visitors wishing to camp at either Crater Lake or Geneva Lake must camp in designated sites. In all other areas, visitors should find an impacted campsite that is 100+ feet from trails and water sources. Ideal camp sites are not visible from the trail and so are easier to find in the day light.”
So, you do not necessarily need to camp in a numbered/designated site, but it is best to find these sites since they are already impacted.
LikeLike
Is backpacking allowed during the Covid-19 Pandemic? Also, I was wondering which loop was better for intermediate backpackers: Capitol Creek Loop or Four Pass Loop. Also, is the weather good in August, are there lots of other backpackers and does a 80 liter backpack work?
LikeLike
Hi Enzo, backpacking will be allowed soon. You can find more info here (https://aspenchamber.org/plan-trip/trip-highlights/maroon-bells/reservations).
Both the Four Pass Loop and Capitol Creek Loop would be ok for backpackers with experience. If you have not done much backpacking, it would best to practice on a smaller trip first (less than 20 miles maybe) or go with a partner that is experienced.
August weather is typically good. You have to watch out for afternoon thunder storms, but temperatures should be nice and much of the snow will be melted.
An 80 liter pack is plenty big for these loops. I imagine you could even use a 60 liter pack and be fine (though you need to fit a bear canister in your pack).
LikeLike
Hello, do you think that the loop will be populate between June 14th and June 28th due to the coronavirus? Will we cross a lot of people and will there be available campsites? Thank you.
LikeLike
The trail is currently very snowy and not passable unless you are experienced backpacking in snow. I would call the ranger station and verify the conditions are safe closer to the date of your trip.
LikeLike
Thanks for the detailed review! I have been wanting to hike the four pass loop for a few years now. I plan on making the hike next summer. Your breakdown by section makes it easier to manage. Thanks for putting this together.
LikeLike
I hiked this loop with a few buddies over the 4th weekend. The trail is definitely passable now after the recent snow melt. You need to cross some snow fields but its not too bad. Wildflowers should be awesome soon…
LikeLike
Hi we group of five plan to hike on FPL in mid-Aug, is there any creek to pass? Is a water shoe necessary to carry? Thanks.
LikeLike
Hi Amy – There are a few streams you must cross along the loop. It’s hard to predict how high the water will be in August, so I can’t say whether or not water shoes will be necessary. The latest reports I have seen for this year showed water up knee high on some hikers.
LikeLike
A question about the parking and shuttle total costs for the Four Pass Loop near Aspen, CO: $15.95 each way for the shuttle (or roundtrip)? Plus $30 per day for parking at Aspen Highlands Lot? So total cost if you take 4 days for the backpack would be about $152?
LikeLike
Most reports I am seeing online say that people have been charged $30 total to park at Aspen Highlands for multiple days (not $30 for each day). People say when they call to confirm with a rep at the resort, they are told it is $30 a day. But, they are actually only charged $30 when they leave the lot after being parked for several days. This also makes sense since online it says it costs $30 to park for 8+ hours and doesn’t mention anything about $30 per day. I can’t guarantee either way, but I am inclined to believe the reports saying it is only $30 total.
If you are worried about it, you can park at Buttermilk Resort for $6 a day and take the city bus to Highlands to catch the shuttle.
Good luck!
LikeLike
With covid-19, are there still permits required? I read that you can receive a permit at the trail head for overnight hikes. But do you need parking permits? And are they still available?
Thank you!
LikeLike
Advanced permits are currently not required to backpack the Four Pass Loop (you may still need to self-register for a permit at the trailhead, but I am not sure about this). For parking, all vehicles that want to park at the trailhead lots required a parking permit, reserved and purchased in advance. Otherwise you need to be dropped off at the trailhead or reserve a spot on the shuttle. You can find the latest details on the parking and shuttle situation here: https://aspenchamber.org/plan-trip/trip-highlights/maroon-bells/reservations
LikeLike
Awesome details and pictures!! So useful! About to hike this for the first time in August 2020. So excited!! Thank you guys! 😊
P.s. If anyone from Backpackers review is actually reading this, I’d love a recommendation for the next backpacking adventure that’s as beautiful and challenging as Maroon Bells. Thank you so much!
LikeLike
Thank you! You have provided an excellent service. My wife and I and 2 of our adult sons completed the loop on Sunday, July 26th. We went clockwise and took 4 days and 3 nights. I am 56, and this was the greatest (and most physically challenging) adventure of my life. I cannot find words to adequately describe the majestic landscape. Poetry. I would highly recommend this adventure – as long as you plan well and prepare physically.
If I could re-plan the trip, I would do as follows:
1) 5 days and 4 nights in order to have more “camp” and down time. We were all physically fit, but hiking 8 plus hours a day, gaining and losing elevation, gassed us. At day’s end, we would set up camp, eat and crash. Upon reflection, we each wanted more relaxation time at camp.
2) Better job of minimizing backpack weight. I thought I had planned well for this, but in hindsight could have done better. Just as an example, we carried “lightweight” camp chairs. No need. Just take a lightweight thermarest seat pad (I cut up a thermarest sleeping pad for 4 seat pads). Ask yourself, do I really need that particular gear? When you are going up the last 0.2 miles of Frigid Air Pass or Trail Rider Pass, you really do not want that luxury item so much.
3) get to campsites #s 38 / 39 on Day 1, and try and secure campsite near #25 (stunning waterfall) coming out of Fravert Basin.
Things we did right:
1) Parked at Buttermilk for $6 per day;
2) Stayed night before the loop adventure at The Inn at Aspen (decent hotel), which is right by Buttermilk parking lot, and the hotel provided a free shuttle to and from Aspen Highlands (where you catch the shuttle to Maroon Bells);
3) Got altitude prescriptions and took as prescribed (coming from 500 feet elevation to 9,000+ in 2 days to start the loop without more time to acclimate was a big concern for me); and
(4) Used trekking poles – such a huge help in climbing and descending.
My 2 cents. Many thanks again for the superb article.
LikeLike
Hi Bill – I’m glad you enjoyed the loop and its scenery. Thank you for the note and tips (others will find them useful)!
LikeLike
Do you have a GPX file you could share?
LikeLike
Hi. We are planning to backpack this loop in late September. What is the temperature range I should expect in the mountains? I am wondering about whether to bring my zero degree bag or my 35 degree bag with a 15 degree liner. Should I bring my snow spikes as well? Thank you.
LikeLike
Hi Jae – Weather in the Colorado mountains in late September can be extremely variable. You should be prepared for nightly lows that can drop into the teens. Snow is also a possibility if a storm rolls through. I would probably be more comfortable knowing I have the zero degree bag, but a warm sleeper may be ok with a warmer bag and liner. For the spikes, you could maybe be prepared to bring them and check the conditions and weather forecast before you head out. My sense is that you wouldn’t need them if the trail is clear of snow before you head out (assuming the weather forecast looks ok). If the trail is already partially covered in snow before you leave, they may be helpful if there are icy conditions after a melt/freeze cycle.
The main thing to be aware of is that a storm could roll through and drop snow on you (Denver is getting snow right now!). In that case, you want the gear to maintain warmth and also likely want a GPS or phone application that can guide you in the event the trail gets obscured. I hope that helps and hope you have a great trip.
LikeLike
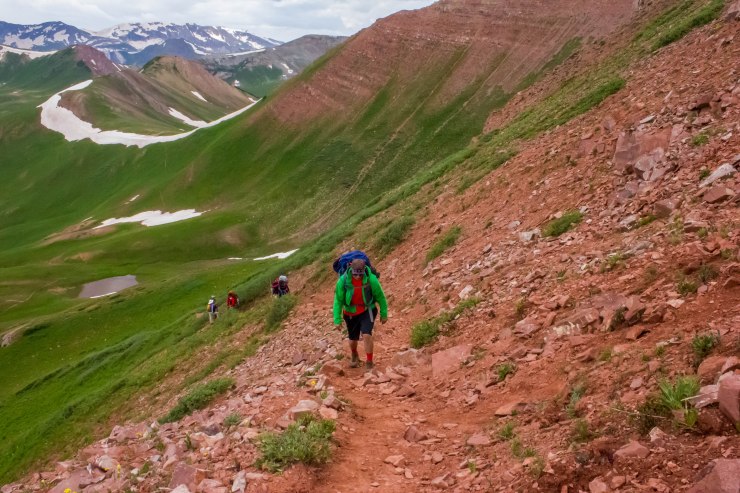
I’m currently training to do this trip by July, 2021. I’ve hiked and backpacked before in somewhat rugged terrain. Had to jump across a 3 ft wide, 25 ft deep ravine and hiked loose rock, had to scramble boulders, etc., but never have I had to traverse scree on a cliff. This is the only part of this trip that worries me. How long is the scree field? How steep is the drop, and how wide is the path through the scree? No one ever shows a full video or has a thorough description of the entire scree field. Anyone have any info on this? I’m taking my 80lb Aussidor with me on this trip, also, Lord willing! TYIA!
LikeLike
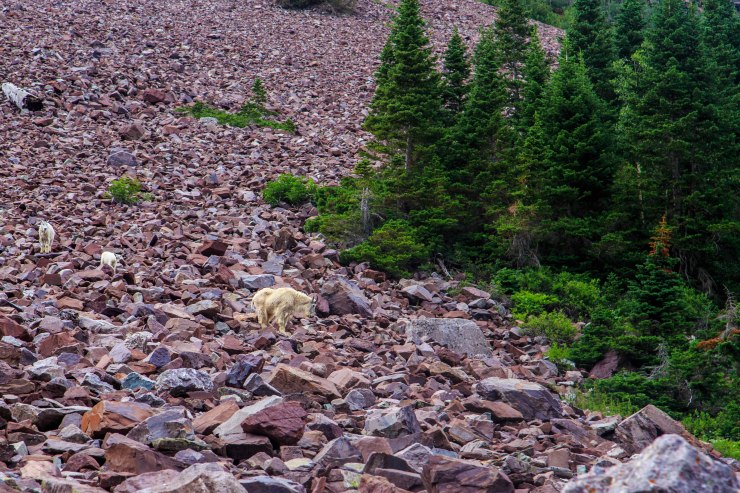
Hi Kelley – the section of scree that is traversed by the trail is not too much of an issue! If you are generally a stable hiker (i.e. you don’t fall down or slip frequently), I think you will be totally fine. Perhaps bring a pair of trekking poles for extra stability to be cautious. Regarding your pup, scree can be tough on their paws so maybe consider bringing some booties just in case?
LikeLike
Would you recommend taking this trip in mid-May? I am a little worried about the weather at that time of year. Thanks.
LikeLike
Hi Frank – In mid-May the trail is most likely going to still be covered in snow. In that case you would want to bring crampons and an ice axe to be safe (and should be experience with snow hiking). Most folks wait until June to hike this loop.
LikeLike
Thank you so much for all the quality information you provide here. I am using this page as primary source for planning a 4 pass loop hike. I was wondering if you could provide some further guidance on sleeping bags? I have a good amount of backpacking experience, but this will be my first alpine/high altitude hike. I am planning my hike for early August, 2021 with my wife and 2 11 year old girls. I have a North Face Cat’s Meow 20 degree synthetic bag. Will that be warm enough? How cold should I expect it get at night in early August? Should I only be considering down bags, and if so can you provide some current recommendations? The Igneo 25 is no longer available and it’s hard to find affordable down bags now with a quality down fill rating. I don’t want to spend more than $200 per bag and most down bags today under $200 have 600 fill down power or less, so I’m not sure there is any real advantage to those over a good synthetic.
Thanks for any help you can provide!
LikeLike
Hi Dan – In August I think you are likely to encounter nightly lows down into the low 30s. It’s not uncommon to find some frost on your tent in the morning when camping at high elevation in Colorado! Personally, I would be comfortable with a 20 degree bag. For reference, I am a man that sleeps on the warm side and I would be sure to bring a tent with rain fly to block the wind and hold in some heat if there happened to be a cooler than usual night. I would also be sure to bring some layers because it will be chilly in the evening/morning at high elevation. If you sleep on the cooler side or want to be absolutely sure you won’t be chilly, maybe looking into buying a sleeping bag liner to use with your 20 degree bag. It’s more weight than going with a 0 degree down bag, but is cheaper. Note that your sleeping pad matters a lot for warmth too so having an inflatable one with a decent R-rating is important.
For your wife and daughters, keep in mind that women are likely to be colder at night. Women’s bags are rated a bit differently to reflect this difference (https://www.rei.com/blog/camp/understanding-sleeping-bag-temperature-ratings). Just make sure they have a women’s bag that is rated for less than freezing.
Regarding down vs. synthetic, I think it ultimately comes down to cost vs. weight. If you have all the money in the world, the down bags are great because they can provide more warmth with lower weight (they also pack down to smaller sizes). If you want to save some money and are ok with carrying a synthetic bag that weights a pound or two more, I believe synthetic bags are totally fine. Rather than buy a super cheap down bag with mediocre fill, I would probably either go with a 20/30 degree synthetic bag with an extra thermal liner or rent a good down bag from somewhere like REI.
I hope this long winded answer helps and hope you have a great trip! I will note that it is totally possible that you do this trip in August and it is 80 degrees during the day and 40s at night… That said, the weather in those mountains is unpredictable so it’s best to be prepared for the cooler temps.
LikeLike
Hello, I was wondering if this trail was possible to realize between May 31st and June 11th. Would the trail be too snowy?
LikeLike
Hi Enzo – Typically the trail is quite snowy until the end of June. I would advise you to give the nearest forest service ranger station a call to ask about conditions (Aspen Ranger Station 970-925 3445), but my guess is that it would be very challenging on your proposed dates.
LikeLike
(anytime in between those 2 dates)
LikeLike
hi, awesome info, planning to do the loop in mid august, the junctions in the route are signed? or is only map finding route? never being in bear country, how easy is to get a bear encounter? is bear repellent mandatory or a “should carry”, or not necessary element?
apart from the maps your publication provides any other well mark easy to follow map you recomend?
thank you so much
LikeLike
Hi Armando – This route is pretty well marked and trafficked, so you are unlikely to get lost. That said, I always recommend bringing a map just in case (sometimes signs or trail markers can be knocked down).
To avoid issues with bears, the most important thing to do is use a bear canister to store your food at night. Regarding bear spray, this is mostly a personal preference. I would say most backpackers only carry bear spray if there are traveling through grizzly bear country. There should not be grizzly bears along this route, so it is not necessary to carry bear spray in Colorado. You may encounter black bears, but these are generally scared of humans and are unlikely to come near you unless you improperly store your food. If you do come upon a black bear, keep your distance and let the bear move away before trying to continue hiking.
LikeLike
Hi again,
Thank you for your earlier feedback on bags. I took your advice into account. We are all set to hike the 4 pass loop in 3 weeks and can’t wait! I can’t overstate how helpful this guide was in my planning. Do you remember what your average pace was for the trail?
LikeLike
Thank you for your review! this is the BEST most useful review I have ever read.
Planning on doing this at the end of August. Coming from Western NY. could you shed any light on the overnight parking situation? We have a noon shuttle from Aspen Highlands, but found out the parking there is $40/day, planning a 4 day trip. Seems parking is tough in Aspen, and as an outsider, difficult to know how to navigate. Had read a previous post about Buttermilk, but read reviews that it fills up fast. I am concerned because our shuttle is at noon and I’m worried that we may have a lot of trouble finding parking. Is the Rio Grande our best bet, also thought of parking at the airport and taking bus to aspen highlands. I don’t want to driving around looking for parking and miss our shuttle.
thanks
LikeLike
Hi Crystal – Highlands, Buttermilk, and Rio Grande are indeed the primary parking options. One hack I have heard about is parking in the Tiehack Road area and then walking across the Terral Wade pedestrian bridge and to Aspen Highlands Resort (about a mile or so). There is a parking lot called Tiehack Mountain Parking you could try (not sure about overnight parking here) or else you may be able to park along Tiehack Road (I don’t see no parking signs on Google maps).
I’ve also heard of people parking at Aspen High School and walking to Highlands, but again cannot speak to the strict legality of this strategy!
LikeLike
Thank you for the detailed trip report and the beautiful photos! We are preparing to do this trip in the next few days. I am curious what type of camera did you use for your photos? They are exquisite!
LikeLike
Hi Heather – the photos were taken with a DSLR camera (Canon EOS Rebel SL1). This trip was back in 2014, so smart phone cameras weren’t quite up to snuff 🙂
LikeLike
Hello, my son (Enzo) along with another father/son combo will be hiking this loop in early August. We have a question in regards to bear safety. We have our bear canisters as required, and went ahead and got some bear spray as an extra pre-caution. Our question; is it safe to store “good smelling” hygiene products like toothpaste & deodorant in our packs overnight, or should we put these items in the bear canister as well?
LikeLike
Hi Scott – Park rangers will tell you that all scented items should go in the bear canister. This includes toothpaste, your tooth brush, deodorant, chapstick, hand sanitizer etc. It can seem silly because your armpits definitely smell like your deodorant and your mouth probably smells like toothpaste, but those are the recommended rules from the experts!
To be honest, I usually keep a hand sanitizer and chapstick in the tent with me but it’s not best practice. If you are low on canister space, I recommend buying a travel size deodorant and cutting some of the handle off your toothbrush to make it smaller.
LikeLike
I finished the 4PL on 8/6 with my wife and 2 eleven year old daughters, primarily following this guide. It was my daughters first backpacking trip ever. My wife and I both have backpacking experience, but haven’t backpacked in many years. I had never done an alpine hike before. My wife had one under her belt. This hike was one of the greatest experiences of my life. If you are contemplating it, all I can say is you have to do it. The pictures, as amazing as they are, don’t do it justice. The views when you are there are beyond magnificent the entire time. Mile for mile, I don’t know how you can get much better beauty than this hike in the US, and conquering the 4 passes leaves you with a strong sense of satisfaction and triumph. Thank you to the creator of this site. This guide is all you need to have a successful 4PL hike, but I am thorough and looked at many resources. Many people helped us have a successful hike, and so I want to give back by sharing a few things now that I have completed it.
Itinerary: 4 days is good if you are a fit hiker. We did it in 4, but had 2 little kids, so our pace was slower than anticipated. If you are older, not fit, or are bringing younger kids like we did, do yourself a favor and plan for 5 days. We had little downtime to fully take in and enjoy the experience. Every day was a full day of hiking, camp set up, eat, clean up, and sleep X4. My only regret is I wish we would have had more time to sit around camp relaxing and taking it all in. We constantly felt rushed to keep making ground, and barely made the last bus out at the end (made it by 5 mins), which made that last day very stressful watching the clock. Knowing what I know now, I would have trained more with my kids so that they could learn the routines of stops, camp setup, teardown, packing/unpacking, water collection, and meal prep. It would have saved so much time if the kids had specific responsibilities and knew what to do through practice.
Parking: You now have to reserve parking spots at the trailhead in advance. I didn’t realize this before all the spots sold out for our dates, so we had to take the shuttle. Parking at the trailhead is the way to go, so plan to book your spots well in advance. I think they open up in April. It would have been so nice to have had our car parked there at the end when we were filthy, tired, hungry, and not wanting to deal with shuttle busses.
Lodging: Aspen is expensive. Cheapest lodging I could find was the Inn at Aspen for $250 per night. I met others who found air bnb’s for cheaper, but the Inn is a strong choice. They will shuttle you to and from Aspen Highlands for free. They have a heated pool and hot tub (so nice for after the hike), and a great barbecue restaurant on site. Also, the Buttermilk parking lot is right next door for $6 per night. We booked a room on the front and back end of our trip, so The Inn graciously allowed us to keep our car parked there during the entire 4 day hike for free. Just ask nicely.
Pack weight: My pack weight was over 45 lbs. I don’t even want to say what the exact amount was. I’m a pretty strong guy and took a lot of weight from my wife and kids to help keep their packs lighter, and it wasn’t in our budget to buy super lightweight gear for everything. With our kids there, we also erred on the side of safety with some extra stuff. You absolutely can do this hike with a 45+ lb pack, but it isn’t fun when you are climbing the passes. For a man, 35 lbs or less is a great weight to shoot for, and will make it far more enjoyable. Just make it happen, and throw out all non-necessities. You won’t need them.
Food: I planned a little over 2 lbs per person per day, and we brought a ton of food back. I think 1.5 lbs per person per day would be an ideal amount to shoot for. Your appetite won’t likely be huge, especially the first day or 2 due to altitude. I had to choke down the mountain house meals most nights, and I normally don’t mind them. Unanimous decision in our family was that the CLIF shot blocks and NUUN tablets were life savers. Easy to take down even without an appetite and they recharged us very quickly. We used them heavily on every pass. They will be a staple on our backpacking trips in the future. A good tip we got from an REI employee was to bring a couple chicken bouillon cubes. If you are feeling rough and don’t have an appetite, it can really help. They are small and lightweight. Just boil one in a cup or two of water, and it’s like chicken noodle soup without the meat and veggies. My wife felt really rough one night, and this helped her a lot.
Acclimation: Do take this seriously. We passed multiple people on day 2, heading back out from West Maroon Pass due to severe, but non life threatening altitude sickness. One woman I saw had to bail out down the Geneva Lake Trail because she was in between Frigid Air and Trail Rider, in bad shape, and needing to stay low. We had no major issues and this is what we did: We spent 1 night in Denver, and 1 night in Aspen to acclimate before the hike. We pounded water like crazy the 3 days before the hike to ensure we were hydrated, and stayed hydrated during the hike. We took aspirin for occasional headaches and Dramamine for nausea. The Dramamine was especially helpful. Almost everyone we talked to had nausea to some degree. Not only is it not fun, but it kills your appetite, which can lead to additional problems. A local suggested we take Chlorophyll and beet juice extract before and during the hike. The chlorophyll helps oxygenate your blood and the beet juice does something to help your cardiovascular system. It’s hard to say how effective this was, but if you are really worried about altitude sickness, it is something additional you can take.
Gear: The clothing on this gear list is spot on. We took exactly what was recommended, and didn’t need anything more. The only thing I didn’t use was the Pendleton shirt. Maybe I would have if I had more down time. I’m still glad I got it because it is an awesome shirt, and I will use it for other camping/hiking adventures. it is heavy though. As far as the other gear goes, the only thing we didn’t use were the camp chairs. Again, this was because we never had enough time to need them. As someone else mentioned, the bear cans make a decent chair if you want to cut weight. One thing I added to this gear list was a Garmin inReach Explorer+ GPS. It was very useful for us, as we had another child back home and were able to stay in contact with him and our family by texting over the iridium network. It also allows you to pull down weather forecasts and has an SOS button that can save your life by immediately spooling up SAR if you get in a bad situation. Another cool feature is it allows family and friends to follow your hike if you turn on the tracking feature, and they really liked this. Only issue I had with it was it incorrectly placed the cutoff trail to Trail Rider Pass from the Fravert Basin on the map. I thought we had missed it and we wasted time backtracking and looking for it. If you are travelling CW, the cutoff trail is about 15-20 mins further down the trail from where the map places it. You can’t miss it. It is a big junction with a large signpost. I contacted Garmin about the issue, but have not heard back from them.
Other: As the author suggests, it pays off big time to treat your clothing with permethrin. We did so and had no issues with bugs and many others complained about how bad they were. I also brought Picaridin spray and we never used it because the permethrin did such a good job. Definitely take sun screen. Our first 2 days were rainy and cloudy so we forgot about it. The weather for the last 2 days was almost totally clear. My hands and arms got burned bad on day 3. I really underestimated how strong the sun is at altitude with less atmosphere to filter the UV rays.
And now for the most important topic: CW or CCW? There are very strong opinions on which is better. We went CW, and here are my thoughts: No matter which direction you go, you are going to climb and descend 7,000 feet over the entirety of the loop. It honestly does not matter which way you go, though you might have a preference on how you want to take the pain : ) What I liked about CW, was the first day is pretty easy with no passes if you follow the itinerary here, which makes a good warmup while your pack is heaviest and you are still acclimating. Trail Rider pass is a long hard pass going CW, and probably the hardest day overall, but you don’t have to deal with it until day 3, and by then your conditioning has improved and you are a few pounds lighter. After you cross Buckskin on the last day going CW, it is a long steep downhill with a lot of loose rock, and much more tiring and abusive than I had imagined it would be. If you go CCW, you are going to knock out the toughest part of your hike right off the bat. Many argue it’s nice to get that out of the way, but holy cow, Buckskin seemed quite nasty to take CCW, especially for day 1 with a full pack. It’s a long steep climb. I will point out that every CCW’er says the same thing about how horrible Trail Rider looks CW. One plus to CCW is that after the downhill switchbacks on W Maroon on the last day, it’s a pretty nice gradual descent, nowhere near as steep as coming down from Buckskin. Don’t listen to what anyone says about the views being better one way or the other. The views in every direction are amazing everywhere, and you will constantly be looking all around to take them in. Again, there is no wrong or right way, IMO it’s just a personal preference of how and when you want to take the pain.
In summary, go do this hike! It is absolutely amazing, even more so than you can imagine. Follow this guide, and you will have a great trip. Many thanks again to the author for putting out this resource for us. I’m already using the trip guides section to scope out and plan our next one.
LikeLike
Thanks so much, Dan. This is the comment of the year! I’m so glad you had a great hike and am sure all the information in your comment will help other people who are planning their trip.
LikeLike
I appreciate that, but thank you! One important thing I forgot to mention. The 4PL will be going to a fee based permit system next year in order to limit the amount of hikers and impacts to the area. From what I can tell, they are intending to limit the number of hikers by 30-40%. The decision has been published, but they are still working out the details. Anyone planning for next year and beyond will need to be aware and plan accordingly.
https://www.aspentimes.com/news/forest-service-moves-to-preserve-hotspots-in-maroon-bells-wilderness/
LikeLike
We just did this hike Sept. 25th-28th mostly following this itinerary. It was incredible! It’s fun to look back at your pictures now and see how the landscape looked so different in the fall compared to your pics. The only thing I would add is that the trails around Snowmass campground were like a maze and very confusing to get in and out since we were not using any gps.. I would recommend finding a more detailed trail map of that area beforehand. Thank you so much for this write up! We really appreciated the guidance!
LikeLike
Awesome – I bet you got to see some really great fall colors!
LikeLike